Cinderbrew Meadery M+ dungeon walkthrough: Strategies and rewards
Full and easy-to-follow Cinderbrew Meadery Mythic+ guide for The War Within patch 11.1.7. Learn how to brawl with all 4 bosses, counter dangerous trash mobs, avoid wipes, and defeat the evil CEO.

Table of Contents
Key takeaways:
- Cinderbrew Meadery joined the Mythic+ rotation in Season 2.
- It challenges players with 4 boss fights and dangerous trash mobs.
- Use our boss and trash strategies to navigate encounters and optimize your CM runs.
- Check the loot table and FAQ to discover how to get the Bop pet.
Cinderbrew Meadery (CM) is a dungeon in The War Within, where players can sip some brew, brawl in the tavern, battle swarms of bees, and take on a ruthless corporate overlord. Since the beginning of Season 2, Cinderbrew Meadery has been part of the Mythic+ dungeon rotation.
This Cinderbrew Meadery guide optimized for Patch 11.1.7 has everything you need to conquer this dungeon at any Mythic+ difficulty. We’ll cover all 4 CM boss fights, key trash mob threats, a complete loot table, and essential tips to ensure your success.
Related posts:


Cinderbrew Meadery entrance

You will find Cinderbrew Meadery on the Isle of Dorn, Khaz Algar, located at coordinates [75.9 44.6].
If you need additional guidance in-game, use the following command:
/way 75.9 44.6The entrance itself looks like this.

Cinderbrew Meadery map and boss location
Cinderbrew Meadery includes 4 bosses and a simple, linear map. You must defeat them in the following order:
- Brew Master Aldryr
- I’Pa and Benk Buzzbee (in any order)
- Goldie Baronbottom
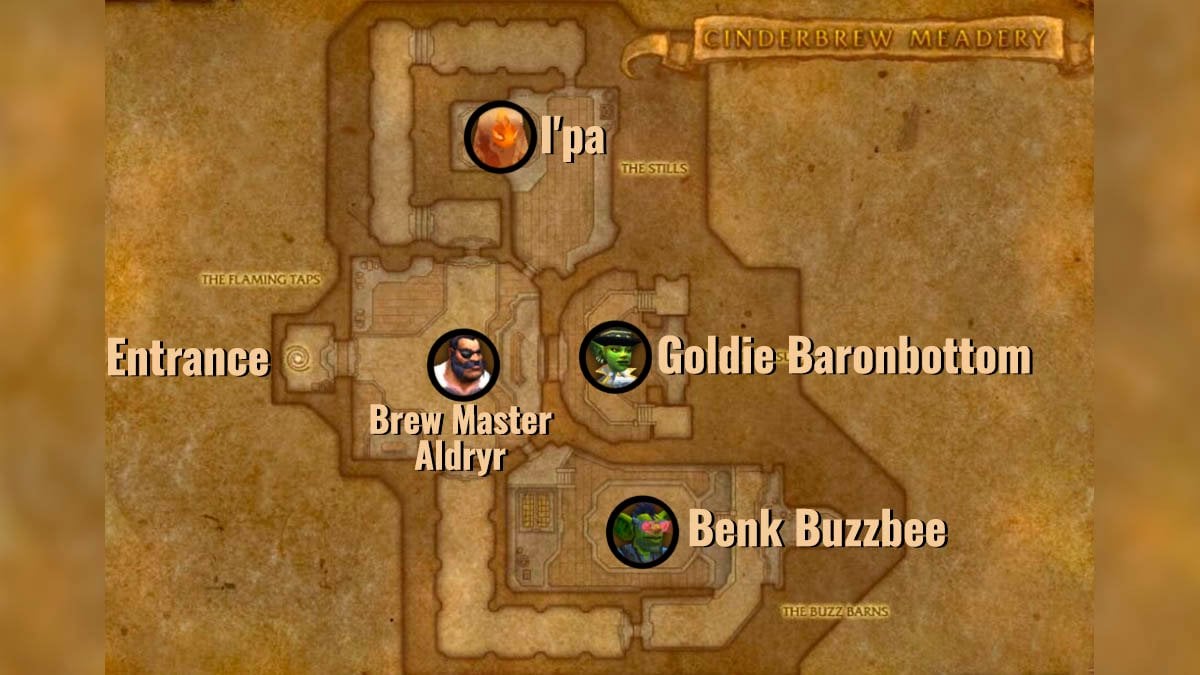
After the initial battle with Brew Master Aldryr, you can choose to head left or right to face I’Pa and Benk Buzzbee. Once both are defeated, return to Brew Master Aldryr’s location and interact with one of the bees to fly to the final boss, Goldie Baronbottom.
Cinderbrew Meadery M+ boss guide
In this section, we’ll cover all 4 Cinderbrew Meadery bosses, detailing their abilities, counter strategies, and key mechanics for each encounter.
Brew Master Aldryr M+ guide

Key fight aspects:
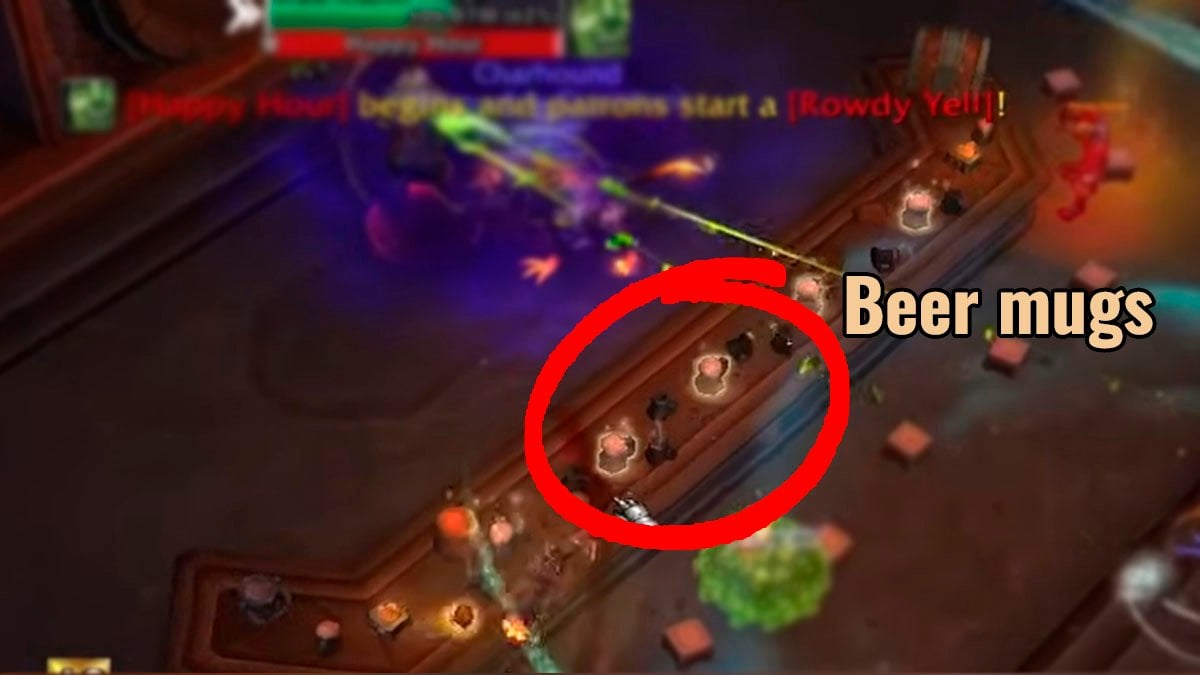
- A relatively easy boss that leaves puddles and performs a cone attack targeting a random player. Stay close to the boss to avoid the cone attack and move out of puddles.
- When Happy Hour starts, find a beer mug, click on it, and deliver it to a Thirsty Patron.
Boss’s abilities and how to counter them:
| Ability | Effect | How to counter |
|---|---|---|
| Happy Hour | At 66% and 33% HP, the boss becomes Disregard and summons Thirsty Patrons, which deal periodic damage by Rowdy Yell to all players. | Find a beer mug at the bar near the boss and deliver it to one of the Thirsty Patrons. |
| Crawling Brawl | After each Happy Hour, the boss summons dangerous zones that deal damage and stun players. | Avoid these zones. |
| Throw Cinderbrew | The boss targets 2 random players, casting a DoT effect on them and creating a puddle by Hot Honey. | Use defensives and stay away from the puddles. |
| Blazing Belch | The boss casts a frontal cone attack on a random target, dealing heavy damage. | Stay relatively close to the boss to make it easier to avoid the cone attack. |
| Keg Smash | The boss applies a knockback effect on the tank, which also leaves a puddle. | The tank should use defensives and move out of the puddle. |
I’pa M+ guide

Key fight aspects:
- This boss fight requires kiting the Ipa away from Brew Drops while cleaving Brew Drops to prevent them from reaching the boss. Brew Drop is vulnerable to crowd control, so make use of it.
- Healers must be prepared to heal significant damage from Spouting Stout, and the entire party should avoid getting hit by its Mead droplets.
- Dispel Burning Fermentation.
Boss’s abilities and how to counter them:
| Ability | Effect | How to counter |
|---|---|---|
| Spouting Stout | Deals heavy AoE damage and throws Mead droplets onto the ground. | Avoid getting hit. |
| Brew Drop‘s Oozing Honey | Brew Drop explodes upon death, leaving a puddle. After some time, the puddle will reform into the new Brew Drop. | Run away from Brew Drop‘s explosion and keep the boss away from the puddles. |
| Brew Drop‘s Frothy | Dramatically increases speed of the Brew Drop | Can’t kite the boss forever; you also need to cleave the Brew Drops. |
| Fill ‘Er Up | I’pa consumes Brew Drops it touches, inflicting damage to all players and granting I’pa a 10% HP shield. | Kite the boss and cleave the Brew Drops. |
| Burning Fermentation | The boss casts a DoT on two players, dealing damage over time. | Dispel it. If it’s not dispelled, use defensives. |
| Bottoms Uppercut | Knocking the tank back. | Stay in the correct position to avoid being knocked back into the puddles or toward the Brew Drops. |
Benk Buzzbee M+ guide

Key fight aspects:
- The key to this fight is dealing with Ravenous Cinderbee and Barrels of honey.
- Bring Ravenous Cinderbee to 1% HP, mount them, and direct them toward a Barrel of Honey to destroy both.
- Assign any DPS player to do it.
- The tank should run with Honey Marinade and drop it on the outside of the room.

Boss’s abilities and how to counter them:
| Ability | Effect | How to counter |
|---|---|---|
| Snack Time | Summons Barrels of honey, which spawn Ravenous Cinderbee every 30 seconds. | Focus Ravenous Cinderbee and deal with them along with Barrels of honey, using the Bee-Haw! ability. |
| Honey Marinade | Applies debuff on the tank; when it expires, it deals AoE damage and leaves a dangerous puddle. | Run away from the boss and drop the puddle in a corner of the room. Use defensive when it procs. |
| Fluttering Wing | An AoE effect around the boss that deals heavy damage and pushes players away. | Use defensives and be prepared to heal through heavy damage. Stay aware of your positioning to avoid falling into the Honey Marinade puddle |
Adds abilities and how to counter them:
| Ravenous Cinderbee abilities | Effect | How to counter |
|---|---|---|
| Shredding Sting | Attacks a random player and leaves a stacking bleed on them. | Deal with adds ASAP. Interrupt its cast. |
| Tamed | Upon reaching 1% health, Ravenous Cinderbees become docile and can be mounted by players. | Mount Ravenous Cinderbee and use Bee-Haw! to target and destroy Barrels of honey. |
| Bee-Haw! | Available when Ravenous Cinderbee is at 1% HP and mounted. Allows to destroy Barrels of honey by targeting the Ravenous Cinderbee at them. | Use to destroy Barrels of honey. |
| Honey Gorged | If Ravenous Cinderbee enters a Honey Marinade puddle, it becomes significantly more dangerous. | Tank should leave Honey Marinade puddles in the corners of the room. |
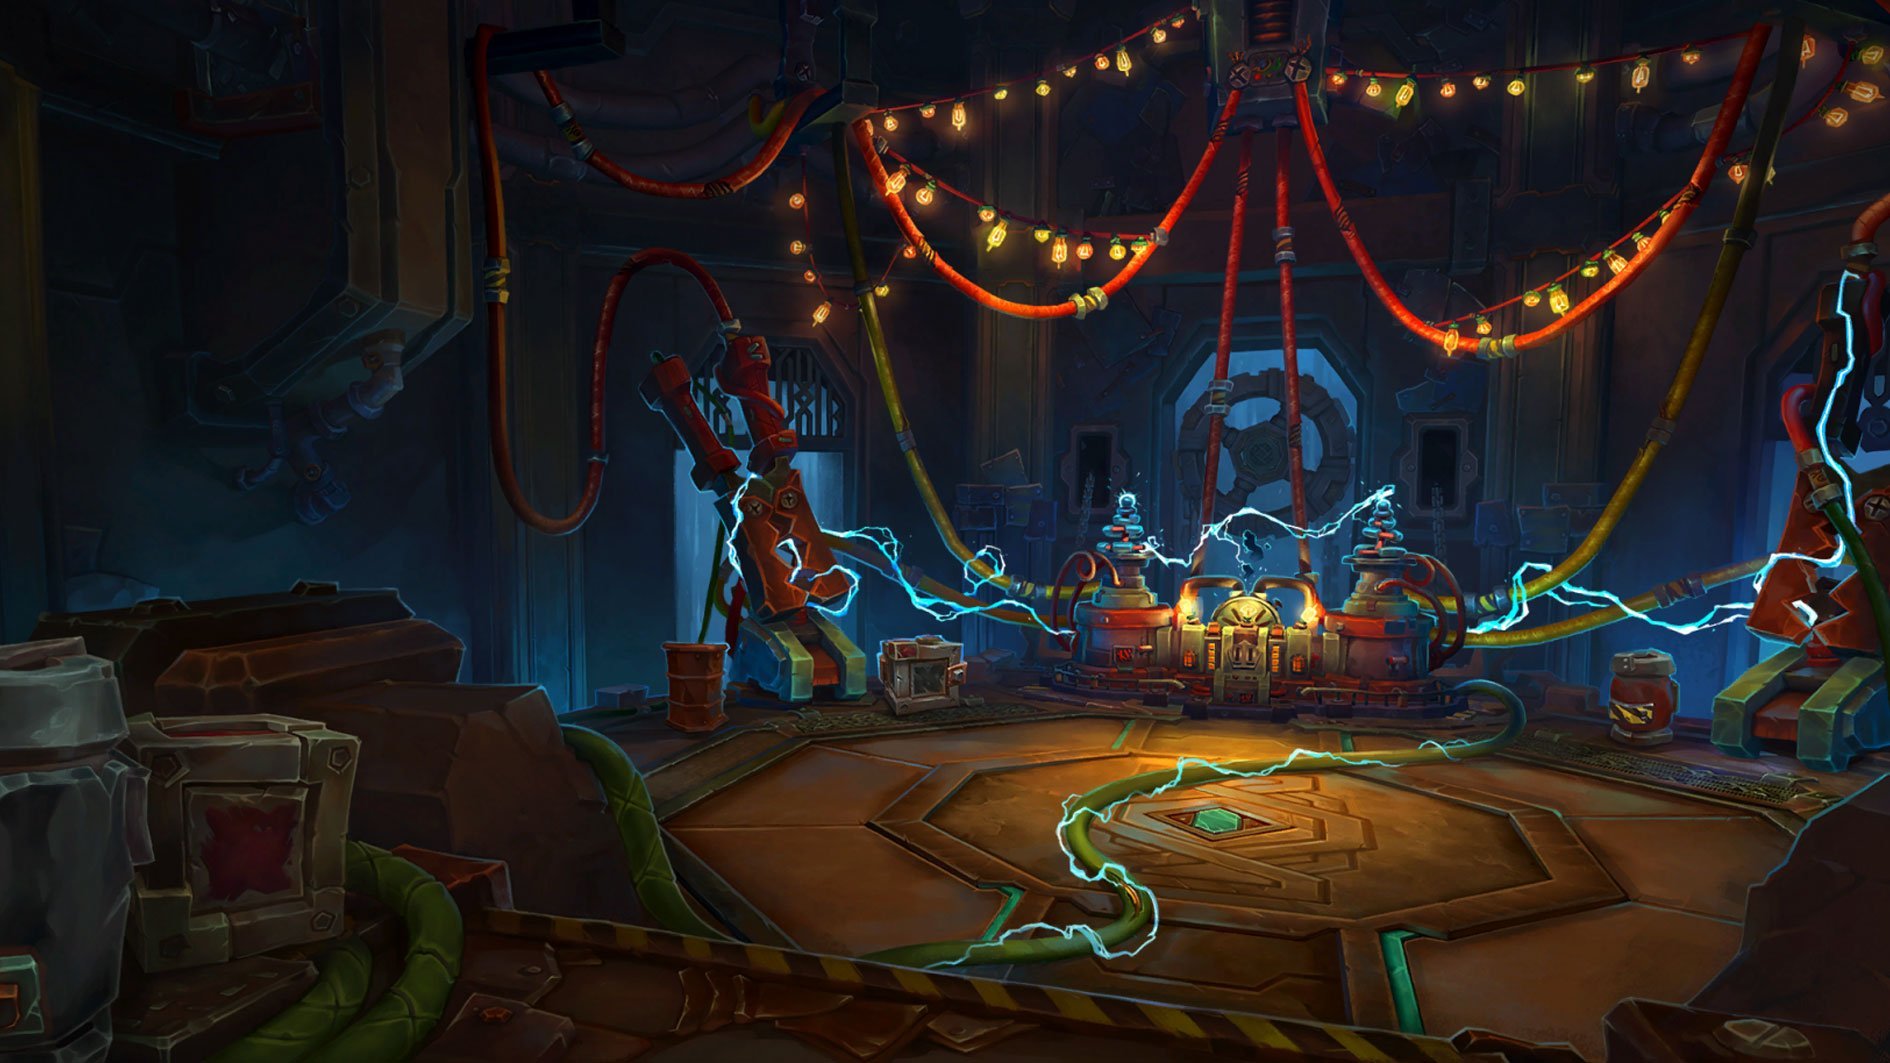
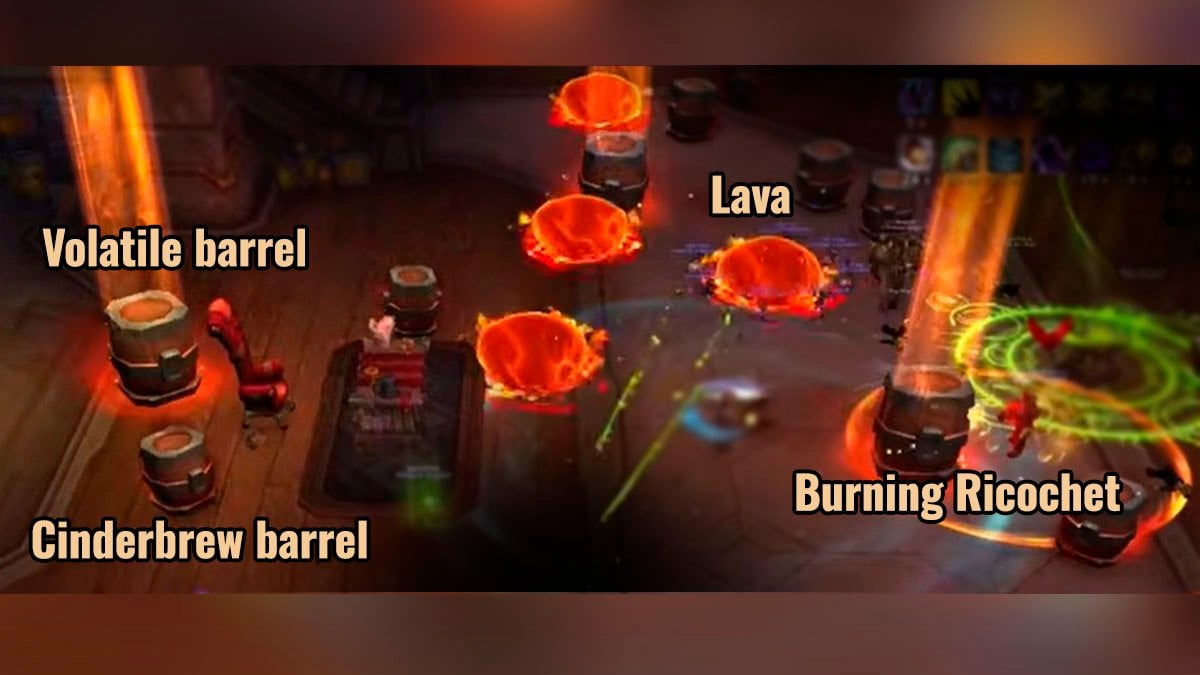
Goldie Baronbottom M+ guide

Key fight aspects:
- Break 2 Cinderbrew barrels or Volatile barrels at a time using the boss’s Cash Cannon (tank) and Burning Ricochet (DPS & healer) abilities.
- Prioritize Volatile barrels first and steer clear of the moving lava when they explode.
- Avoid triggering barrels with different boss abilities consecutively, as Cindering Wounds can stack and extend its duration.
- At 100 energy, the boss casts Let It Hail!, detonating all remaining Barrels and dealing massive damage—use defensives and heal up by any means.
Boss’s abilities and how to counter them:
| Ability | Effect | How to counter |
|---|---|---|
| Spread the Love! | Spawns Cinderbrew barrels and Volatile barrels. | Destroy them using Burning Ricochet and Cash Cannon boss abilities |
| Cinder-BOOM! | Waves of lava are triggered when Volatile barrels are destroyed. | Don’t step into the lava. When destroying barrels, stand near Volatile barrels but position yourself carefully to avoid touching the upcoming lava. |
| Cindering Wounds | Destroying barrels applies periodic damage to all players, which stacks and can be extended if barrels are broken too quickly one by one. | Do not destroy too many barrels at once. Wait for the Cindering Wounds debuff to expire before breaking more barrels. |
| Let It Hail! | When the boss reaches 100 energy, she deals massive damage and detonates all remaining barrels. | Heal up the party before the effect triggers and use defensives to mitigate the damage. |
| Burning Ricochet | Marks 2 players, dealing damage and destroying barrels in a small AoE around them. | Position yourself away from other players and near a Barrel (if Cindering Wounds is not active and the group is healed). |
| Cash Cannon | A cone attack is directed at the tank, dealing damage, knocking back, and destroying barrels in its path. | The tank should position the boss away from the party and destroy Barrels (if Cindering Wounds is not active and the group is healed). |
Cinderbrew Meadery Mythic+ trash strategy
Here’s a breakdown of the most significant trash mobs and encounters, including their most dangerous abilities and effective strategies to handle them.
M+ Trash before Brew Master Aldryr
- In the first waves, be aware of the Thirsty buff on the mobs. Avoid pulling too many Thirsty mobs at once. Use soothes or tank defensives if there is a lot of incoming damage.
- The most dangerous trash mob here is Hired Muscle. Pull only one at a time. It combines AoE party damage with a massive single-target nuke, which can only be countered with heavy healing.
- If Venture Co. Patron stacks too many Mean Mug bleed stacks on the tank, use defensives or a bleed cleanse.
- Interrupt or crowd control Boiling Flames cast by Venture Co. Pyromaniac, and use a dispel or defensives if you have the Erupting Inferno debuff.
- Chef Chewie mini-boss is not too difficult if you don’t pull too much additional trash with him. Avoid pulling Chef Chewie alongside Venture Co. Pyromaniac, as you won’t be able to interrupt both of their casts.
M+ Trash before I’pa
- Be aware of the Flavor Scientist—this is the most dangerous mob in this area.
- They cast Failed Batch, which should be your top priority to focus.
- Rejuvenating Honey applies a healing effect to a trash mob—interrupt the cast or dispel the buff.
- Taste Tester is dangerous due to Spill Drink and Free Samples? casts. Try to interrupt them.
- Careless Hopgoblin casts Reckless Delivery, charging at a random player.
- Try to avoid the charge, but you will still take some damage even in that case.
- Upon hitting a wall, a Brew Drop will spawn, so the tank needs to taunt it.
- Be aware of the puddles.

M+ Trash before Benk Buzzbee
- The most dangerous mob here is the Bee Wrangler.
- Make sure to interrupt every cast of Bee-stial Wrath.
- Bee-Zooka fires a projectile in a line at a random player. The targeted player should stand still to allow others to dodge the attack.
- Worker Bees are most dangerous below 20% HP when they cast Final Sting. Use crowd control or your strongest defensives to survive it.
- Venture Co. Honey Harvester is also dangerous—do not pull more than one at a time. Avoid their Beeswax AoE damage.
- Interrupt Honey Volley cast by Royal Jelly Purveyor.
- Dispel the Bee Venom magic debuff from Bee-let. If your stacks get too high, use defensives.
M+ Trash before Goldie Baronbottom
You can skip a lot of trash if your entire party mounts the bees in The Flaming Taps. When you do this, all mobs will lose interest in you.
Yes Mans are mostly here for the memes. Just focus on one at a time, as they will fully heal after one dies.
Cooking Pot and Flamethrower location
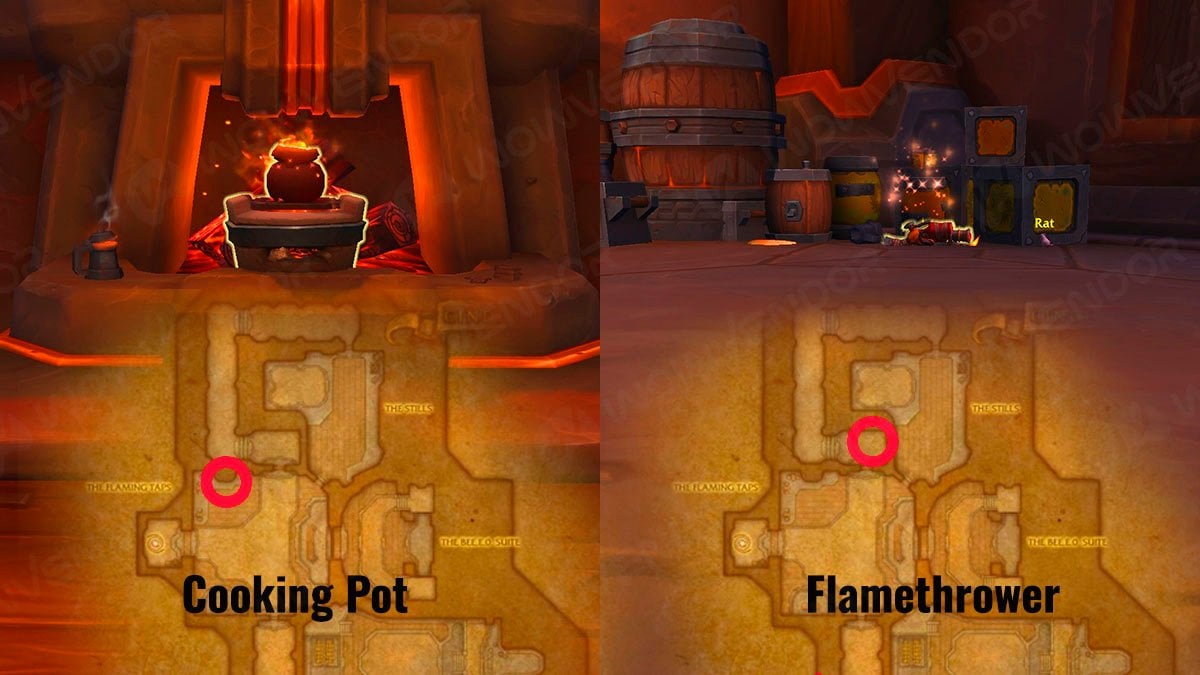
The Cooking Pot is located in The Flaming Taps. You can pick it up if you have 25+ Khaz Algar skill in either Cooking or Alchemy. It grants an extra button for 3 minutes, allowing you to cast Sticky Honey. This ability can target friends or enemies, reducing their Haste by 15% and their movement speed by 80% for 9 seconds. This is a waste of time, so don’t bother.
You can find the Flamethrower on your way to I’pa. It requires Goblins, Gnomes, Mechagnomes, or Khaz Algar Engineers with at least Skill 25 to pick up. If obtained, it grants the Flame On! button. This ability is only useful for healers, as DPS will deal more damage with their own skills. Healers should only use it if the party is generally fine and doesn’t require heavy healing.
Cinderbrew Meadery loot
Here’s a complete list of all the loot available in Cinderbrew Meadery.
Cloth loot
| Item | Slot | Boss |
|---|---|---|
| Cinderbrew-Soaked Cowl | Head | I’pa |
| Moneymaking Businessmantle | Shoulder | Goldie Baronbottom |
| Punctured Apiary Gloves | Hands | Benk Buzzbee |
Leather loot
| Item | Slot | Boss |
|---|---|---|
| Fireproof Cinderbee Perch | Shoulder | Benk Buzzbee |
| Battle-Scarred Fisticuffs | Wrist | Brew Master Aldryr |
| Brewery Toiler’s Waistband | Waist | I’pa |
| Backbreaking Bootstrappers | Feet | Goldie Baronbottom |
Mail loot
| Item | Slot | Boss |
|---|---|---|
| “Azeroth’s Greatest BEE.E.O.” Cap | Head | Goldie Baronbottom |
| I’pa’s Pale Aleguards | Wrist | I’pa |
| Pollen-Lugger Treads | Legs | Benk Buzzbee |
Plate loot
| Item | Slot | Boss |
|---|---|---|
| Foam-Ridden Pauldrons | Shoulders | Brew Master Aldryr |
| Slashproof Business Plate | Chest | Goldie Baronbottom |
| Fuzzy Cindercuffs | Wrist | Benk Buzzbee |
| Hops-Laden Greatboots | Feet | I’pa |
Trinkets
| Item | Stat | Boss |
|---|---|---|
| Ravenous Honey Buzzer | Agility / Strength | Benk Buzzbee |
| Cinderbrew Stein | Tanks | Brew Master Aldryr |
| Synergistic Brewterializer | Intellect | Goldie Baronbottom |
Other
| Item | Slot | Boss |
|---|---|---|
| Chef Chewie’s Towel | Back | Brew Master Aldryr |
| Strapped Rescue-Keg | Neck | I’pa |
| 85-Year Tenure Ring | Finger | Goldie Baronbottom |
Weapons
| Item | Type / Stat | Boss |
|---|---|---|
| Crusher of the Unsettled | 1H Mace / Agility | Brew Master Aldryr |
| Profit Divider | 1H Axe / Strength | Goldie Baronbottom |
| Scalding Queenmaker’s Shiv | 1H Dager / Intellect | Benk Buzzbee |
| Vessel of the Beverage | Off-hand / Intellect | I’pa |
| Hivebreaker’s Dipper | 2H Mace / Strength | Benk Buzzbee |
| Sticky Stirring Stick | 2H Stuff / Agility | I’pa |
Conclusion
We hope this guide has helped you navigate this unique brawling dungeon, packed with brews, chaos, and corporate scheming. If you’re looking for extra support on your M+ journey and aiming to conquer the highest difficulty dungeons, consider our WoW Mythic carry service.
Check out our FAQ below to explore other aspects of Cinderbrew Meadery, including quests, achievements, rare pet, and more.

Cinderbrew Meadery FAQ
Where is Cinderbrew Meadery located?
Isle of Dorn, Khaz Algar at [75.9 44.6].
Are there any quests for Cinderbrew Meadery?
Yes, there is a Mergers and Acquisitions quest, which can be obtained inside the dungeon from Wenbrandt. You can complete it on Normal or Heroic difficulties as well.
What are Cinderbrew Meadery achievements?
There is nothing special, just these 4:
Cinderbrew Meadery
Heroic: Cinderbrew Meadery
Mythic: Cinderbrew Meadery
Keystone Hero: Cinderbrew Meadery
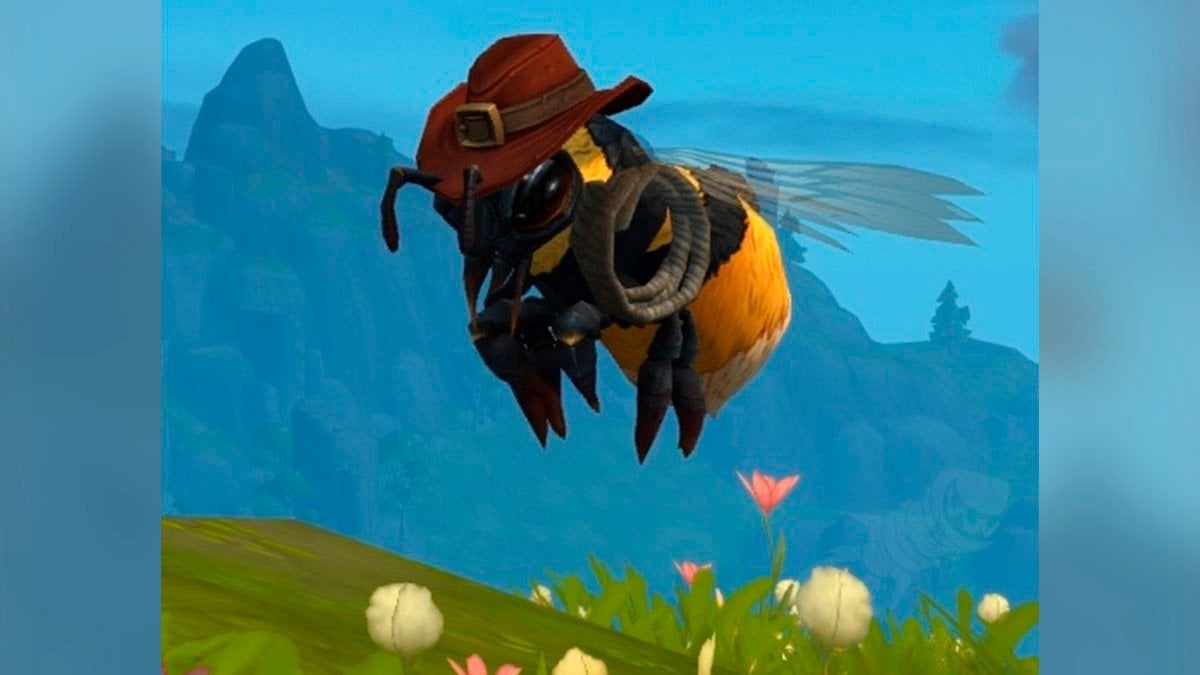
How to get the Bop pet?
Bop has a 3% chance to drop from the final Cinderbrew Meadery boss, Goldie Baronbottom.


Comments