LoU boss guides: All mechanics and strategies
Season 3 is here, and Liberation of Undermine raid is easier than ever. Here is a complete Liberation of Undermine boss guide with every ability and tactics for them in 11.2 patch!
Table of Contents
Key takeaways:
- Raid overview: The Liberation of Undermine raid introduces eight challenging boss encounters, requiring strategic planning and execution.
- Boss guides: The article provides individual strategies for each boss, including:
- Vexie Fullthrottle
- Cauldron of Carnage
- Rik Reverb
- Stix Bunkjunker
- Sprocketmonger Lockenstock
- One-armed Bandit
- Mug’Zee
- Chrome King Gallywix
- Tactics & Abilities: Each boss has unique abilities, and the guide offers tips to counter them effectively for a smoother raid experience.
We prepared this Liberation of Undermine boss guide for every enemy you will face during this raid adventure. Here, we will also mention tactics and tips and tricks for every encounter. If you want to learn more about this raid, read our Liberation of Undermine overview. So, without further ado, let’s dive into this topic!
Related posts:


How many bosses are in Undermine
Liberation of Undermine raid features eight exciting encounters with the following bosses:
Vexie and the Geargrinders
Vexie Fullthrottle and her gang strike fear into anyone unfortunate enough to cross their path. Answering Gallywix’s call for backup, they’ve arrived in Undermine to settle an old debt—leaving behind plenty of chaos and grease stains in the process.
Cauldron of Carnage
Undermine is no stranger to intense battles, but none compare to the ongoing feud between Torq the Tempest, a galvanic gorilla, and Flarendo the Furious, a molten mechasaur. Their explosive showdown threatens to split the city in two, and only the bravest will dare to intervene.
Rik Reverb
Rik Reverb lives for the sound of explosions, fireworks, and, most of all, his own voice. From his airborne sonic resonator, he serves as Gallywix’s top hype man, mesmerizing Undermine’s citizens with dangerously addictive beats.
Stix Bunkjunker
Garbage disposal is an essential service—at least, that’s what Stix Bunkjunker wants everyone to believe. He and his crew have been “cleaning up” Undermine for years, finding creative ways to eliminate anything (or anyone) deemed unnecessary.
Sprocketmonger Lockenstock
A brilliant yet ruthless inventor, Sprocketmonger Lockenstock is always pushing the boundaries of innovation—often at the expense of safety and ethics. His never-ending quest to cut costs and maximize efficiency makes Undermine the perfect testing ground for his latest contraptions.
The One-Armed Bandit
The pride of Gallywix’s Gallagio, this mechanical enforcer ensures fair play—though its definition of “fair” remains a mystery. Those caught breaking the rules won’t get a second chance, as its punishments are swift, brutal, and unmistakable.
Mug’Zee, Heads of Security
Born inseparable, the two heads of Mug’Zee rest atop a massive ogre enforcer tasked with keeping order at the Gallagio. Recently reassigned, Mug’Zee now stands guard over the casino’s most restricted areas, ensuring no one gains unauthorized access.
Chrome King Gallywix
After retreating to his fortress within the Gallagio, Jastor Gallywix has been hard at work on something powerful and deadly. Whatever his latest creation is, it’s designed to obliterate anyone who dares to challenge him.
Vexie Fullthrottle boss guide
Vexie is the first enemy we will start this Liberation of Undermine bosses guide with. Recommended Bloodlust/Heroism timing: Second phase.
Phase 1
On Normal difficulty, the fight revolves around managing Protective Plating, handling Biker adds, and executing proper Tank swaps. On Heroic difficulty, the challenge intensifies with the addition of a new mechanic, Spew Oil, and extra debuffs that complicate positioning and movement.
Below is a breakdown of Vexie’s abilities and the best strategies to counter them.
On Normal difficulty:
| Ability | Description | Tip |
|---|---|---|
| Protective Plating | Plating has 4 stacks and lets the boss gain energy. | This is the main mechanic of the whole boss battle. All platings must be removed within two minutes with the next ability mechanic. Otherwise, the boss reaches 100 Energy and wipes the raid with Unrelenting CAR-nage. |
| Call Bikers | The boss summons adds to the arena. These adds charge into random players and leave a bike upon death. | Since adds spawn on the opposite side of the arena, tanking the boss near the edge makes them spawn in almost same place. Kill bikers adds and use their bikes to remove Protective Plating from the boss. Click on the bike to hop on, aim the boss, and use the first action button to send the bike into the enemy. |
| Tank Buster | This ability debuffs the hit player to receive 200% more damage from the next Tank Buster. | Swap Tanks after every Tank Buster cast. |
| Incendiary Fire | The boss creates flaming zones under the marked players every 0,5 seconds. | Stutter-step damaging zones and slightly move away from the raid. |
On Heroic difficulty, Vexie gains an extra ability. Also, her existing ones also apply debuffs as detailed below:
| Ability | Description | Tip |
|---|---|---|
| Protective Plating | Plating has 6 stacks and lets the boss gain energy. | No change. |
| Call Bikers | No change. | No change. |
| Heroic: Spew Oil | The boss marks a few players with purple circles and creates Oil Slicks under them after a few seconds. | Leave Oil Slicks on the edges of the arena to avoid these zones at places where they can be uncomfortable to handle. Make sure not to send bikes from adds through Oil Slicks. Otherwise, they will be stuck and won’t hit the boss and remove its Protective Plating. Players with Incendiary Fire effect must clear Oil Slicks by running into them. |
| Tank Buster | Heroic: Tank Buster leaves an Oil Slick under the boss. | Heroic: Keep the boss to the edges of the arena for Oil Slicks not to appear in bad places. |
| Incendiary Fire | The boss creates flaming zones under the marked players every 0,5 seconds. These zones remove Oil Slicks. | Bite damaging zones to remove as many Oil Slicks as possible. |
Phase 2
In both Normal and Heroic difficulty, Phase 2 begins once all Protective Platings are removed. This phase is a short but crucial damage window where you should maximize your damage output while preventing the boss from regaining its defenses:
| Ability | Description | Tip |
|---|---|---|
| Mechanical Breakdown | Boss reaches this phase after all Protective Platings are removed. Lasts 45 seconds. | The boss takes 100% more damage. This is an excellent opportunity to use your strong cooldowns, including Bloodlust/Heroism. |
| Pit Mechanics | The boss calls for Pit Mechanics adds to appear. When they reach the boss, they start to Repair its Protective Plating. | Make sure to CC or quickly AoE cleave the adds before they reach the boss. They will disappear after the phase is over, so CCing might be the best solution to avoid wasting damage resources. |
Cauldron of Carnage boss guide

Here is Cauldron of Carnage, Liberation of Undermine boss, guide. Here, we will mention all their abilities and strategies for conquering them. Recommended Bloodlust/Heroism timing: Pull.
Phase 1
This whole phase is concentrated on splitting the raid into two groups for separate battling with Flarendo and Torq.
| Ability | Description | Tip |
|---|---|---|
| Blistering Spite / Galvanized Spite | Flarendo / Torq applies Blistering / Galvanized Sprite DoT. This debuff stacks. | Divide the raid into two groups. Keep the bosses on the opposite sides of the arena. Swap groups after every second phase. Raised Guard is another reason to not bring them together as they start receiving less damage. |
| King of Carnage | The last remaining boss gets a stacking damage increase. | Make sure to defeat both Flarendo and Torq at the same time. |
Flarendo group
On Normal difficulty, Flarendo raid group has to concentrate on performing Scrapbomb mechanic and bringing Blastburn Roarcannon out of the raid and away from the bomb.
| Ability | Description | Tip |
|---|---|---|
| Scrapbomb | Flarendo creates a bomb that deals heavy damage to the raid. | Share the bomb’s damage together. |
| Blastburn Roarcannon | Flarendo focuses on the random player and starts casting a deadly beam after some preparation. | Move the laser path away from the raid and the bomb. |
| Eruption Stomp | Flarendo deals high damage to the Tank and sends it into the air. | Tanks have to use defensives to survive this ability. Healers might need to use their strong healing cooldowns. |
On Heroic difficulty, the Scrapbomb mechanic is more complicated.
| Ability | Description | Tip |
|---|---|---|
| Scrapbomb | Heroic: The bomb creates a Molten Pool after explosion. | Heroic: Make sure to move to the edge of the arena before the explosion and run away from the fire zones after it. |
| Blastburn Roarcannon | No change. | No change. |
| Eruption Stomp | No change. | No change. |
Torq group
On Normal difficulty, Torq raid group has to concentrate on moving as little as possible even while dodging.
| Ability | Description | Tip |
|---|---|---|
| Static Charge | Players fill the Static Charge bar when moving and reduce it when standing. When the bar is filled, Static Discharge stuns the player. | Try moving as little as possible. Stutter-step if you need to dodge anything. |
| Lightning Bash | Torq smashes the Tank, dealing all unmitigated damage to the raid. | Use defensives to reduce the damage to the raid. |
On Heroic difficulty, the penalty for moving becomes worse, and players have to dodge one more mechanic.
| Ability | Description | Tip |
|---|---|---|
| Static Charge | Heroic: Static Charge stuns all players within 10 yards when the bar fills. | Try moving as little as possible. Stutter-step if you need to dodge anything. |
| Heroic: Voltaic Image | Torq summons images that chase players and deal damage and create a hazardous zone on contact. | CC the images to avoid unnecessary running. |
| Lightning Bash | No change. | No change. |
Phase 2
The boss starts the Phase 2 when it reaches 100 Energy. If the raid successfully survives the phase, both Flarendo and Torq return to Phase 1.
| Ability | Description | Tip |
|---|---|---|
| Colossal Clash | Bosses move to the center of the arena, deal heavy damage to the raid, and start casting Zapbolts and Fiery Waves onto players. Damage to the raid is increased by 15% with each Colossal Clash. | Use defensives to survive the raid damage. Avoid swirlies from Fiery Waves and lightnings from Zapbolts. |
Rik Reverb boss guide

Rik Reverb is the third boss in this raid. Here are some Liberation of Undermine tips and tricks to defeat this boss with no issues. Recommended Bloodlust/Heroism timing: Pull.
Phase 1
During this phase, on Normal difficulty, players have to concentrate on both damaging the boss and completing the Amplifiers mechanic.
| Ability | Description | Tip |
|---|---|---|
| Amplification! | The boss summons Amplifiers next to his arena. Amplifiers create Noise Pollution and Resonant Echoes that become deadlier with every new Amplifier. When the Amplifire reaches full energy, it wipes the raid with Haywire. | Make Amplifiers lose their power by activating them and causing Lingering Voltage. Choosing ranged classes to perform this mechanic is the best choice, since these players can keep dealing damage to the boss while activating Amplifiers. Healers have to pay extra attention to the health of players who perform this mechanic. |
| Faulty Zap | Rik marks random players with an AoE zone around them and damages anyone inside. | Move zones out of the raid. |
| Sonic Blast | Tank combo that leaves a debuff increasing damage from the next Sonic Blast by 100%. | Swap Tanks after the debuff expires on the resting Tank. Other players should avoid getting hit by this ability, so make sure to move away from the boss’s face. |
On Heroic difficulty, one ability is added, making the raid quickly split their damage to destroy barrels.
| Ability | Description | Tip |
|---|---|---|
| Amplification! | Heroic: Lingering Voltage leaves a stacking DoT on players | Change players who activate amplifiers. |
| Faulty Zap | No change. | No change. |
| Sonic Blast | No change. | No change. |
| Heroic: Sparkblast Ignition | The boss drops five barrels to the arena. Once they explode, they wipe the raid with Grand Finale. | Destroy barrels within 15 seconds to avoid a wipe. Dealind damage to barrels increases your movement speed by 10% and Haste by 2%. Stacks up to three times. |
Phase 2
The boss enters Phase 2 at 100 Energy. After the Hupe Hustle is over, Rik returns to Phase 1.
| Ability | Description | Tip |
|---|---|---|
| Hype Hustle | Rik gets Sound Cloud buff and receives 99% less damage. Deadly waves from Blaring Drop start to spread through the arena. Third Hype Hustle starts Hype Fever! and never ends. | Use Amplifiers marked with blue to Blowout! into the air and escape from Blaring Drop waves. |
Stix Bunkjunker boss guide

Here are all Stix Bunkjunker abilities and strategies to handle them. Recommended Bloodlust/Heroism timing: Pull.
Phase 1
During this phase, on Normal difficulty, players have to collect garbage and focus adds to defeat the boss.
| Ability | Description | Tip |
|---|---|---|
| Electromagnetic Sorting | When the boss reaches 100 Energy, he creates small and large Garbage Piles. A few players have to roll at the arena and collect the trash by pathing through it. Rolling over another player stuns it. | Fill the bar by rolling over four small and then four large Garbage Piles or Scrapmaster adds. Don’t roll through the boss when the bar is not full. Make one cleaning player roll through all Discarded Doomsplosives once it fills the bar to remove them. Other cleaning players can roll through adds first, and then through the boss for extra damage to both. Heroic: Avoid rolling through Territorial Bombshells. |
| Incinerator | The boss marks random players with an AoE zone. Garbage Piles get on fire on impact from this spell and start dealing damage to the raid. At least one Garbage Pile will be set on fire after each cast. | Move zones out of the raid and away from Garbage Piles. |
| Scrapmasters / Junkyard Hyenas | Scrapmasters cast Scrap Rockets and charge onto players with Dumpster Dive. Hyenas are melee adds. Heroic: Hyenas apply Infected Bite on their targets if they get too close, reducing healing received. This debuff can be removed as a Disease. | Interrupt Scrapmasters’ Scrap Rockets and CC Hyenas. Kill adds ASAP. |
| Demolish | The boss performs Tank combo that applies a debuff increasing all damage taken by 100%. | Swap Tanks after every Demolish. |
| Heroic: Territorial Bombshell | Three Territorial Bombshells are added to the large Garbage Piles in total. Rolling over the bomb or leaving it undestroyed makes it explode. Surviving more than one is almost impossible. | Focus bombs and drop them below 75% to detach them from Garbage Piles. Avoid rolling onto bombs and destroy them before they explode. |
On Heroic difficulty, one extra ability and a few important mechanics are added to some skills from Normal raid.
| Ability | Description | Tip |
|---|---|---|
| Electromagnetic Sorting | No change. | Heroic: Avoid rolling through Territorial Bombshells. |
| Incinerator | No change. | No change. |
| Scrapmasters / Junkyard Hyenas | Heroic: Hyenas apply Infected Bite on their targets if they get too close, reducing healing received. This debuff can be removed as a Disease effect. | No change. |
| Demolish | Heroic: This ability is followed by Meltdown dealing heavy damage to the target. | Heroic: Don’t miss the swap timing. Otherwise, the Tank might die to Meltdown. |
| Heroic: Territorial Bombshell | Three Territorial Bombshells are added to the large Garbage Piles in total. Rolling over the bomb or leaving it undestroyed makes it explode. Surviving more than one is almost impossible. | Focus bombs and drop them below 75% to detach them from Garbage Piles. Avoid rolling onto bombs and destroy them before they explode. |
Phase 2
The boss enters Phase 2 once during the battle after two Electromagnetic Sorting cycles.
| Ability | Description | Tip |
|---|---|---|
| Overdrive | The boss takes 99% less damage and casts Overcharged Bolts upon players. After this phase, Stix will start using one additional Discarded Doomsplosive and two more Territorial Bombshell (on Heroic). Hyenas’ and Scrapmasters’ attack speed will be increased by 25%. | Dodge lightnings and get away from the boss’s landing area after the end of this phase. |

Sprocketmonger Lockenstock boss guide

Spocketmonger is the fifth boss of this raid. Here is a small Liberation of Undermine boss guide for you to defeat this enemy. Recommended Bloodlust/Heroism timing: Pull.
Phase 1
During this phase, on Normal difficulty, players have to dodge electrified zones on the arena and dodge various projectiles.
| Ability | Description | Tip |
|---|---|---|
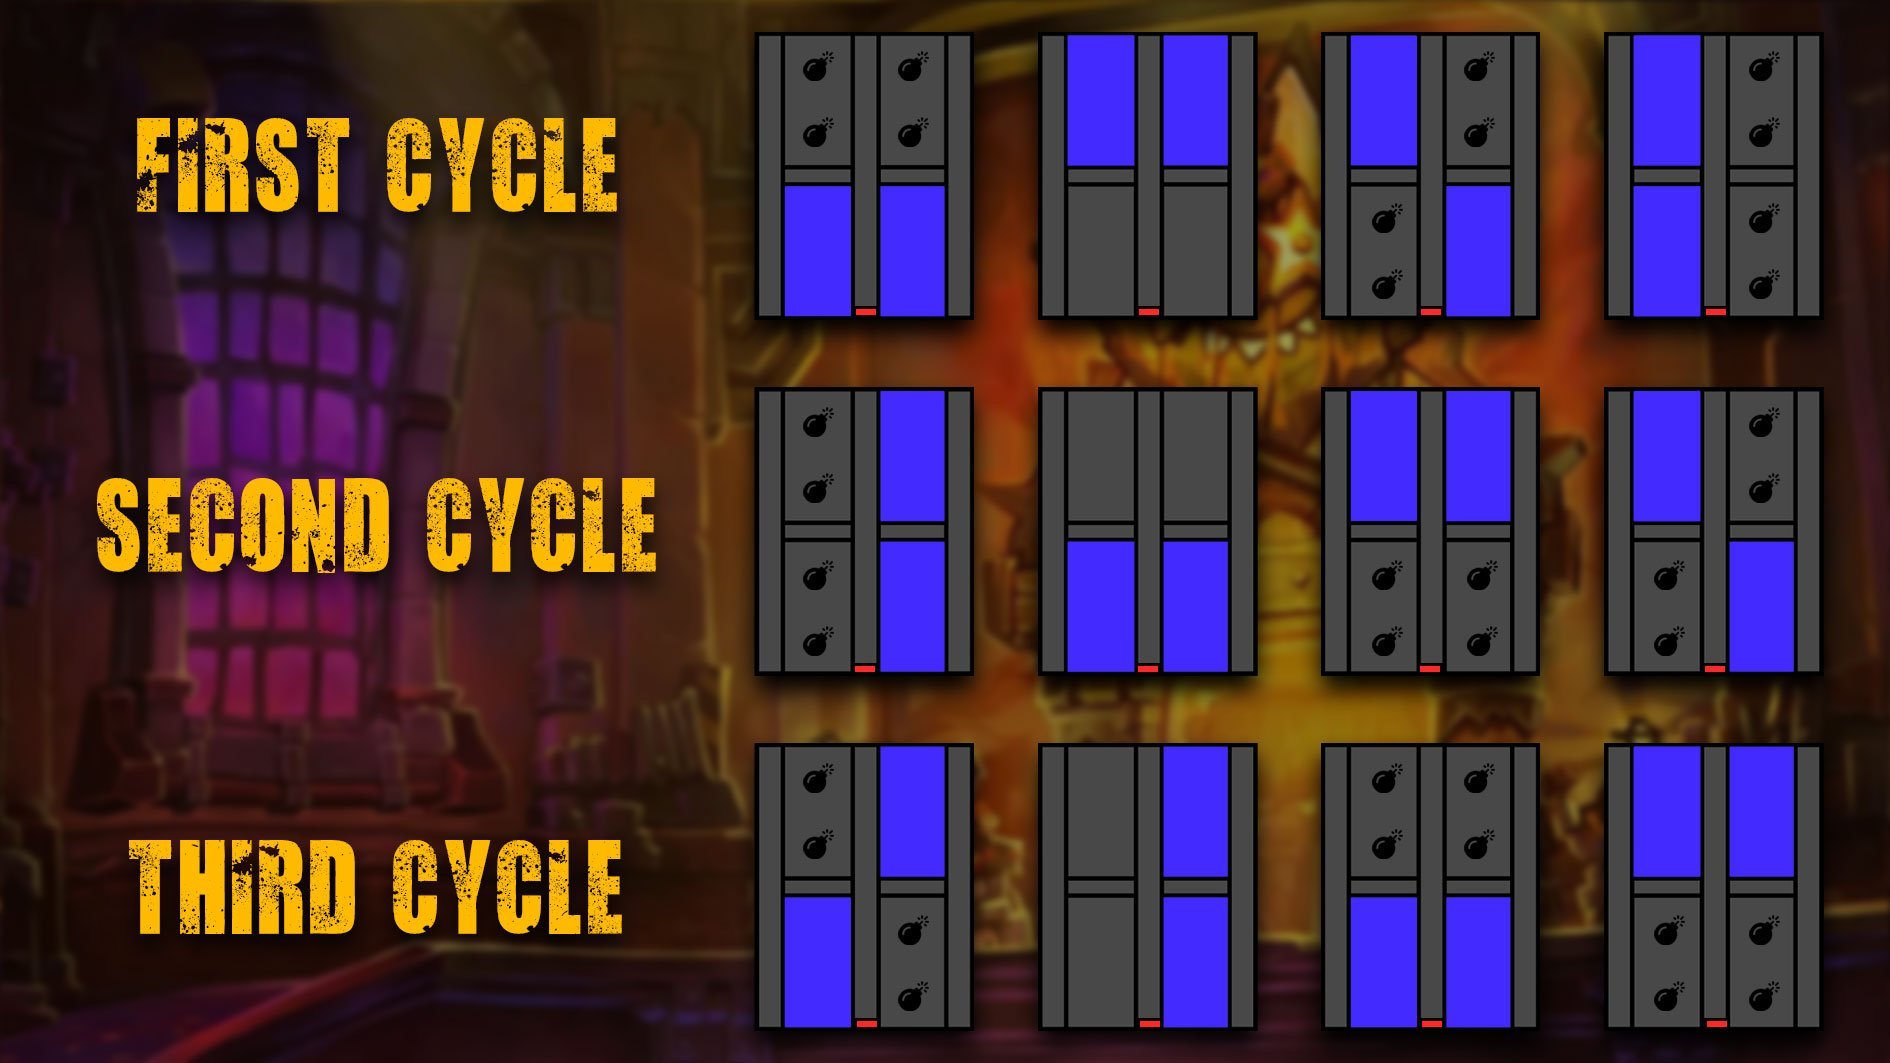
| Wire Transfer | Boss arena has four static spaces and three main conveyors. Two segments are electrified and deal damage. Conveyors remain safe for most of the fight. From time to time, electrified segments switch. Each boss fight has the same changing pattern. | Move to segments that are not electrified. Check a schematic picture below this phase to learn more about patterns. |
| Screw Up | Boss marks a random player and drills start to appear under it every 1,5 seconds. | Stutter-step away from the raid. |
| Gravi-Gunk and Pyro Party Pack | Boss’ attacks apply Gravi-Gunk to the target, increasing damage taken and slowing the target. Pyro Party Pack attaches a bomb to the current Tank. After six seconds, the bomb detonates, dealing damage to the raid. | Change Tanks after five stacks of Gravi-Gunk or after Pyro Party Pack cast. Move the bomb away from the raid to deal less damage to the raid. |
| Sonic Ba-Boom | Boss damages the raid and applies DoT debuff to all players. | You might want to use your strong healing cooldowns during this spell’s impact. Players can also use their defensives to lose less health. |
| Activate Inventions! | All inventions on conveyors are activated. After the first second phase, Blazing Beams become Jumbo Void Beams with larger lasers. After the second second phase, Rocket Barrage becomes Void Barrage, dealing AoE damage on impact. | Dodge lasers from Blazing Beams on the left conveyor and rockets from Rocket Barrage on the right conveyor. Move away from magnets on the central conveyor, not to get stunned. |
| Heroic: Foot-Blasters | Boss spawns bombs in the arena. Bombs are triggered by stepping on them or by electricity from the segment. 12 bombs in total appear during one phase. | Detonate bombs one by one with different players. Detonate the next bomb after at least two seconds after the previous one. |
On Heroic difficulty, players have to perform a new mechanic and clear the arena from bombs.
| Ability | Description | Tip |
|---|---|---|
| Wire Transfer | No change. | No change. |
| Screw Up | No change. | No change. |
| Gravi-Gunk and Pyro Party Pack | No change. | No change. |
| Sonic Ba-Boom | No change. | No change. |
| Activate Inventions! | No change. | No change. |
| Heroic: Foot-Blasters | Boss spawns bombs in the arena. Bombs are triggered by stepping on them or by electricity from the segment. 12 bombs in total appear during one phase. | Detonate bombs one by one with different players. Detonate the next bomb after at least two seconds after the previous one. |
Here is the electrification (and Foot-Blasters bombs on Heroic) pattern during the boss fight:
- Gray zones – safe space.
- Blue zones – electrified space.
- Bombs – locations of three-pack of Foot-Blasters on Heroic difficulty.
- Red rectangle – arena entrance.
Phase 2
Spocketmonger enters Phase 2 after reaching 100 Energy and returns to Phase 1 after Beta Launch mechanic.
| Ability | Description | Tip |
|---|---|---|
| Beta Launch | After reaching 100 Energy, the boss pushes players away and electrifies the arena except the conveyors. The raid suffers heavy damage and heal absorb. | Run to the boss and avoid swirlies. Use strong CDs and defensives to survive. The damage will increase with each second phase. |
One-armed Bandit boss guide
One-armed Bandit is the next Liberation of Undermine boss fight. Here are some tips and tricks on how to defeat him. Recommended Bloodlust/Heroism timing: Second phase.
Phase 1
On Normal difficulty, players must play this slot-machine boss and insert various tokens for different outcome.
| Ability | Description | Tip |
|---|---|---|
| Spin To Win! | Three adds with tokens spawn on the arena. Killing adds makes them drop their tokens. If two tokens are not brought to the boss or the same combination is used twice in a row, the raid is wiped. Coin and Lightning (C&L): Pylon that sucks players in. Lightning and Bomb (L&B): Pylon summons adds. Lightning and Fire (L&F): Pylon fires projectiles. Fire and Bomb (F&B): Three large chasing adds are summoned. Coin and Bomb (C&B): Five small chasing adds are summoned. Fire and Coin (F&C): Deals damage to the raid. | Kill adds and bring two chosen tokens to the boss. Use an Action Button to insert tokens. C&L: Stay away from the pylon. L&B: Try cleaving or AoEing the adds. L&F: Dodge fire swirlies. F&B: CC and kill adds. C&B: CC and kill adds with AoE or cleave. F&C: Use defensives and healing cooldowns. |
| Pylons | Pylons are activated by players’ touch and during every Spin To Win!. Clicking a pylon to activate it deals heavy damage to the player and removes two closest Shocking Fields. | Use pylons to remove excess Shocking Fields if needed. |
| Withering Flames | A random player is debuffed, losing max health. | Move away from the raid and get dispelled. |
| Pay-Line | Boss launches two casino chips through the raid. Players hit are stunned. When chips hit the wall, they deal AoE damage and damage to the raid. | Move away from chips’ trajectory but close enough to get High Roller! buff. When chips are stopped, use the Extra Button to start rolling them and destroy them. Any remaining chip increases the boss’ damage. |
| Foul Exhaust | The boss deals heavy damage and applies an absorb shield to the raid. | Use strong CDs and defensives to survive. |
| The Big Hit | Boss performs Tank combo, dealing heavy damage to the target and creating Shocking Field under it. Applies debuff increasing the next cast of this ability to deal 350% more damage. | Swap Tanks after each cast. Make sure to leave Shocking Fields at the edge of the arena. |
On Heroic difficulty, mobs from one of the combinations become deadly and are harder to handle.
| Spin To Win! | Lightning and Bomb: Heroic: Explosive Gaze summons bomb adds that fixate on players. | Kite bombs and kill them ASAP. |
| Pylons | No change. | No change. |
| Withering Flames | No change. | No change. |
| Pay-Line | No change. | No change. |
| Foul Exhaust | No change. | No change. |
| The Big Hit | No change. | No change. |
Phase 2
The boss enters Phase 2 at 30% health or after six tokens combination insertion and has to be killed during it.
| Ability | Description | Tip |
|---|---|---|
| Cheat to Win! | The boss performs the following mechanics in order: Linked Machines: Connects boss and pylons with deadly beams. Hot Hot Heat: Marks two players and launches a beam to their positions. Scattered Payout: Deals damage to the raid. Explosive Jackpot: Wipes the raid. | Kite the boss and move away from the raid if you become targeted with Hot Hot Heat. |
Mug’Zee boss guide

Here is a short Mug’Zee, Liberation of Undermine boss, guide. Recommended Bloodlust/Heroism timing: Second phase.
Phase 1
| Ability | Description | Tip |
|---|---|---|
| Head Honcho | Boss arena is split into two halves. One half can be activated by moving most of the raid to it. Right one makes Mug perform abilities. Left one makes Zee perform his abilities. | Don’t let the boss reach 100 Energy and always swap the arena’s halves you fight in at 90-95 Energy. |
Mug’s half of the arena
On Normal difficulty, when fighting on Mug’s half of the arena, players have to escape from gaols and dodge frontals.
| Ability | Description | Tip |
|---|---|---|
| Earthshaker Gaol | Boss locks a group of players in two gaols that deal split damage. An add appears in the gaol. | At least five players (including at least one Healer) must stay in the gaol. The boss has to be out of gaols. Dodge frontals, interrupt Pay Respects, and kill add to break out. |
| Frostshatter Boots | Mug debuffs random players outside the gaols and makes their movement slippery. | Keep in mind that starting to move and stopping with debuff takes longer. |
| Stormfury Finger Gun | Boss targets a random player, performing a few cone frontals. | Stay in place to let other players get out of the frontal zone. |
| Molten Gold Knuckles | Boss performs a Tank combo frontal, dealing heavy damage, knocking players back, and applying Golden Drip debuff. | Swap Tanks after every cast. Leave pools at the edge of the arena not to get stunned. |
On Heroic difficulty, players also have to dodge deadly ice spears during the Frostshatter Boots debuff.
| Ability | Description | Tip |
|---|---|---|
| Earthshaker Gaol | No change. | No change. |
| Frostshatter Boots | Heroic: The boss then launches deadly Frostshatter Spear into affected players. | Heroic: Aim spears at the gaols’ walls. |
| Stormfury Finger Gun | No change. | No change. |
| Molten Gold Knuckles | No change. | No change. |
Zee’s half of the arena
On Normal difficulty, when fighting on Zee’s half of the arena, players have to activate moving mines adds and soak damage from a rocket drop.
| Ability | Description | Tip |
|---|---|---|
| Mk II Electro Shocker | After changing to Zee half, the boss summons two adds that deal damage to the raid. | Focus adds. At 80% health they get stunned for 12 seconds and receive 200% damage. |
| Unstable Crawler Mines | Boss summons fixating adds that are immune to damage and gain movement speed with time. Adds explode on contact. | Trigger adds at full health and when you have shields, or simply use immunes. |
| Goblin-guided Rocket | Boss targets a random player, creating a soak zone around it. The player also leaves a trail of fire underneath. | At least five players must soak the damage at the edge of the arena to leave fire zones away. |
| Uncontrolled Destruction | Boss deals heavy damage to the raid and applies stacking DoT to all players. | Use defensives and strong healing cooldowns. |
| Spray and Pray | Boss aims at a random player and performs a cone frontal. | Stay in place to let other players get out of the frontal zone. |
| Double Whammy Shot | Boss aims at a random player, showing the path of the launching projectile. | One Tank must reduce the projectile’s damage by standing on its path and using mitigation. |
On Heroic difficulty, triggering mines becomes much more hazardous.
| Ability | Description | Tip |
|---|---|---|
| Mk II Electro Shocker | No change. | No change. |
| Unstable Crawler Mines | Heroic: Triggering the add’s explosion leaves a debuff on a player, increasing damage received from other adds. | Heroic: Don’t trigger more than one mine at a time. Soak pools left after their death to avoid extra damage to the raid. |
| Goblin-guided Rocket | No change. | No change. |
| Uncontrolled Destruction | No change. | No change. |
| Spray and Pray | No change. | No change. |
| Double Whammy Shot | No change. | No change. |
Intermission
Boss starts Intermission at 40% health.
| Ability | Description | Tip |
|---|---|---|
| Bulletstorm | Boss performs intermission at 40% health. First, the boss uses Static Charge at a random player’s location and then starts rotating while performing dealing damage in cones in two opposite sides. | Stay away from damaging zones and follow the boss’ rotation. |
Phase 2
The boss enters Phase 2 after three cycles of Intermission.
| Bloodlust | Both Mug and Zee can now use their abilities at the same time. They increase their Haste by 30% and increase their damage by 1% every five seconds. | Defeat the boss before it reaches 100 Energy and wipes the raid. |
Chrome King Gallywix boss guide

Gallywix guide will be the last and concluding part of today’s article. Here are some strategies for this boss. Recommended Bloodlust/Heroism timing: Pull / Third phase.
Phase 1
| Ability | Description | Tip |
|---|---|---|
| Scatterblast Canisters | Boss performs a cone frontal at the current Tank, applying absorb heal to all players hit. | Split the raid into two groups and share frontal damage one by one. Switch Tanks after each cast. Heal through absorb. |
| Big Bad Buncha Bombs | Gallywix uses various bombs against the raid that apply a stacking DoT to any player hit. Bad Belated Boom: Bombs that create a zone on the floor and deal heavy damage to players hit. Sapper’s Satchel: Marks random players and explodes in a circle around them. Zagging Zizzler: Fires damaging projectiles. Heroic: One 1500-Pound “Dud” bomb that wipes the raid if it explodes after 15 seconds. | Run away from Bad Belated Boom zones not to get hit. Players with Sapper’s Satchel must move out of the raid. Dodge Zagging Zizzler particles. Heroic: Inactive Tank must activate the big bomb. Activating it deals heavy damage to the Tank and knocks it back. |
| Suppression | Boss creates damaging zones all over the arena. | Dodge swirlies. |
| Venting Heat | Gallywix deals heavy damage to the raid and applies DoT to all players. | Use defensives or strong healing cooldowns. |
| Trick Shots | Boss gains one stack every 4 seconds. During the Tank swap or after reaching 10 stacks, all stacks are consumed and the boss deals heavy damage, applying a stacking DoT (damage increases based on consumed stacks). | Swap Tanks in time and use defensives. Gallywix doesn’t move. Make sure to leave at least one Tank in melee at all times to avoid sudden deaths. |
Phase 2
Boss reaches this phase at 100 Energy. All abilities from the first phase remain and new ones are added.
| Ability | Description | Tip |
|---|---|---|
| Giga Coils | Gallywix activates one out of four Giga Coils on the arena that pulsate and deal damage. Giga Blast deals damage in a line and increases damage from Giga Coils. | Bring Giga Bomb to Giga Controls to stop the boss. |
| Darkfuse Technician | The add drops a Giga Bob that can destroy Giga Controls, making Giga Coils inactive for the rest of the fight. Destroyed Giga Coils’ quarters of the arena become electrified and start dealing damage. | Kill the add ASAP and deliver Giga Bomb to Giga Controls (lights that indicate which Giga Coil is going to be activated) to stop the Coil from wiping the raid. The bomb can be thrown to save time. |
| Giga Blast | Gallywix channels a laser beam. | Dodge the laser and move Giga Bomb away from it. |
| Fused Canisters | Boss marks random players with the spell, dealing damage and applying heal absorb. If less than two players handle one Fused Canister, the whole raid gets heal absorb. | Make sure that at least two players handle each Fused Canister. |
| Sharpshot Sentry / Darkfuse Wrenchmonger | Gallywix summons adds to the arena. | Sharpshot Sentry’s casts must be interrupted, and Darkfuse Wrenchmongers need to be aggroed by Tanks. Heroic: Darkfuse Wrenchmongers gain an enrage buff that slows them. It can be removed or used to kite these adds. |
Intermission
The boss starts intermission at 50% health.
| Ability | Description | Tip |
|---|---|---|
| Cratering | Gallywix slams the arena with Cratering, killing anyone on impact, and gets a massive shield, blocking interrupts. Heroic: Radiant Electricity spawns damaging lightnings during the intermission as well. | Break through the shield to interrupt TOTAL DESTRUCTION!!! cast. Heroic: Dodge Radiant Electricity lightnings. |
Phase 3
Gallywix enters Phase 3 after the Intermission shield is broken and TOTAL DESTRUCTION!!! cast is interrupted. On normal difficulty, players will have to face a deadlier version of Phase 1 mechanics.
| Ability | Description | Tip |
|---|---|---|
| Bigger Badder Bomb Blast | Gallywix starts moving and can now follow Tanks. This mechanic is identical to Big Bad Buncha Bombs one. However, Tank Combo now deals AoE damage in 30 yards. Overloaded Rockets are similar to Sapper’s Satchel but now fire three rockets from marked players. Heroic: 1500-Pound “Dud” bomb mechanic remains during this phase. | Move away from the Tank marked with Bigger Badder Bomb Blast. Make sure to dodge projectiles from Overloaded Rockets. Heroic: Keep dealing with the 1500-Pound “Dud” bomb. |
| Tick-Tock Canisters | Boss throws Canisters to the arena. Canisters explode, dealing damage and applying absorb health to the soaking players or the whole raid if not soaked. | At least one player must soak each Canister to avoid damage and heal absorb being applied to the raid. Heal through the absorb. |
| Suppression | This skill is now followed with Gallybux Finale Blast that creates a big area that explodes and deals heavy damage that lessens with range. | Dodge swirlies and run away from Gallybux Finale Blast zone. You might need to use mobility skills to do it in time. |
On Heroic difficulty, there are a few changes to Normal raid mechanics and an extra Tank combo mechanic.
| Ability | Description | Tip |
|---|---|---|
| Bigger Badder Bomb Blast | Heroic: 1500-Pound “Dud” bomb mechanic remains during this phase. | Heroic: Keep dealing with the 1500-Pound “Dud” bomb. |
| Tick-Tock Canisters | No change. | No change. |
| Suppression | No change. | No change. |
| Heroic: Ego Check | Boss performs a Tank combo, dealing four damaging hits. All unmitigated damage transfers into DoT debuff. | Swap Tanks to increase your chances of surviving after each cast. Use defensives during hits to reduce further DoT damage. |
Last parting words
This is it for our Liberation of Undermine boss guide for 11.1.7 patch. We hope this knowledge will help you during your adventures. And if you face any significant difficulties, you can always rely on WoW raid boost as an alternative. Good luck, and happy raiding!
What do you think about the Liberation of Undermine raid? Do you find any boss especially difficult? Let us know your opinion in the comments!


Comments