Operation: Floodgate M+ dungeon walkthrough — Map, bosses, and loot table
Welcome to your Operation: Floodgate M+ guide in 11.1.7! Here, you will find everything you need to know about the dungeon walkthrough, bosses, trash, important mechanics, and what’s in the loot table.
Table of Contents
Season 2 of World of Warcraft: The War Within patch 11.1.7 presents new content for players to enjoy. Among many delights is the completely new dungeon for the Mythic Plus system. Called Operation: Floodgate, this dungeon introduces new challenges for players to overcome. So, here’s a comprehensive Operation: Floodgate Mythic plus guide to ensure you won’t go there blind and helpless!
Related posts:


What is Operation: Floodgate
Operation Floodgate is a new instance added in Season 2. WoW Operation: Floodgate entrance located in the northern part of the Waterworks area of Ringing Deeps. The story premise is that you have to stop mad scientists working at this water dam. Join the covert operation to ruin Gallywix’s plans.
Operation: Floodgate walkthrough

In our Operation: Floodgate walkthrough, you’ll discover detailed information about the dungeon layout, weapon locations, boss strategies, loot tables, achievements, and more. So, let’s start with the dungeon layout!
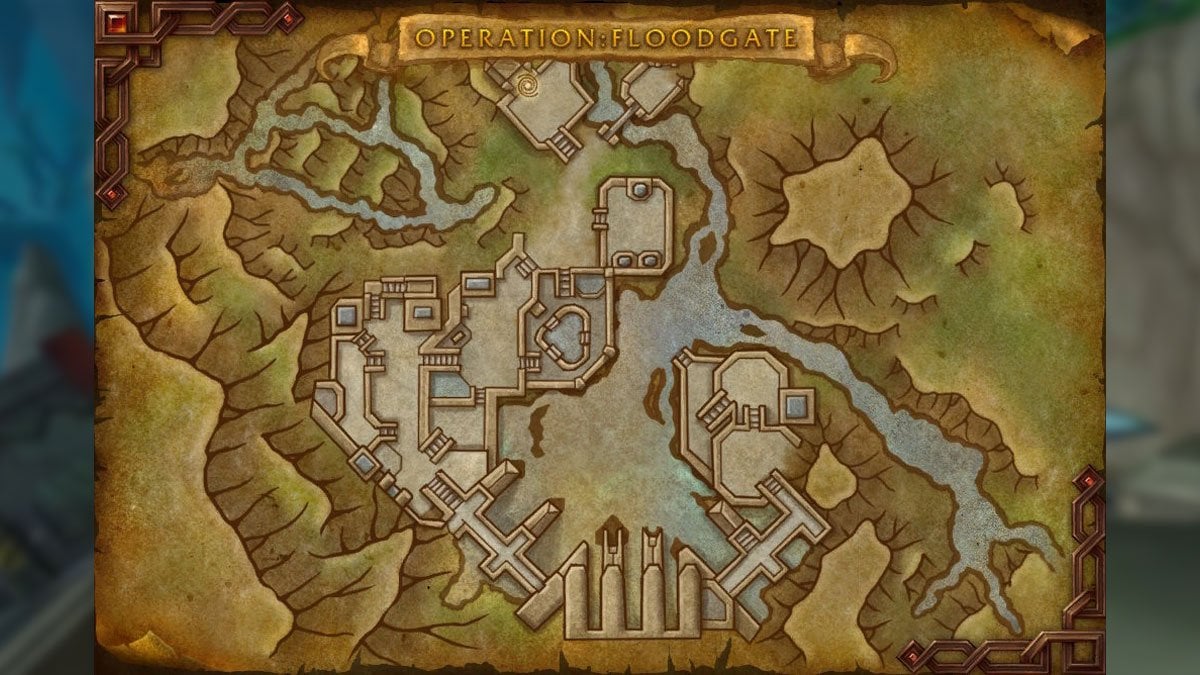
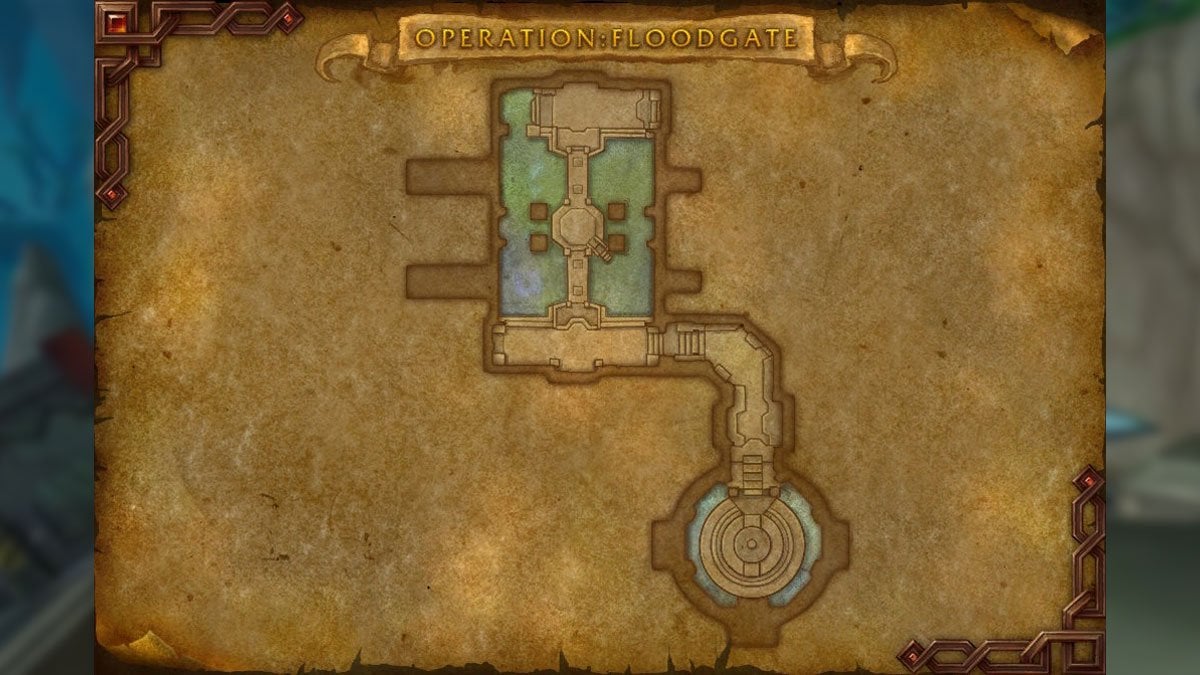
Operation: Floodgate dungeon layout
The dungeon consists of two areas. Waterworks, the outdoor area is the biggest part of the dungeon. The G.R.I.D. is the inside area, the final stretch before the completion. You can check Operation: Floodgate dungeon map below:
First Part: Finding Weapons
Your initial goal at the start of the dungeon is to pilfer 5 Weapons Stockpiles. These are scattered all around the first-boss and second-boss areas. So as you proceed, keep an eye out for a big stockpile of glowing boxes.
Another thing to look out for is the Shreddinator 3000. These mobs are one, if not the most dangerous mobs in the entire dungeon. They have two attacks that can easily wipe out the whole party. Shreddation spawns a Sawblade at every player’s location as the cast ends. These blades damage anyone standing near them, so get ready to move out asap. Flamethrower creates a conal AoE damage in front of the enemy. The zone slowly moves in one direction. Avoid standing in that.
There are many other enemies in the area to look out for. Thus, Venture Co. Contractors use Wrench Wallop to deal heavy single-target damage. Venture Co. Surveyors attack from range with EZ-Thro Dynamite III and apply Surveyed Beam to a random target. This cast should be interrupted, as the beam leaves a trail of damaging puddles.
Loaderbots are another target to keep aware of. Although not as dangerous, they have an annoying cast called Wind Up. It turns bots into AoE that slowly moves towards the selected player. You cannot kick it, but stuns and other disabling abilities work.
Mechadrone Snipers are dangerous foes, as they can deal high damage using Snipe and Trickshot. Trickshot can be interrupted. Darkfuse Demolitionists use R.P.G.G. to shoot AoEs at players. These AoEs can be dodged. After every shot Demolitionists need to Reload and they can be stunned during that, making them start the reload over again. Darkfuse Soldiers have a chance to apply DoT debuff with every attack, so be careful to not be overwhelmed fighting those. And last, Darkfuse Bloodwarpers. These can deal heavy group-wide damage with Warp Blood and significant single-target damage with Blood Bolt. Interrupt these at all costs.
As you get your second Weapon Stockpile, you will see a big robot patrolling the next area. That is the first boss in our Operation: Floodgate m+ guide.
Big M.O.M.M.A. boss guide
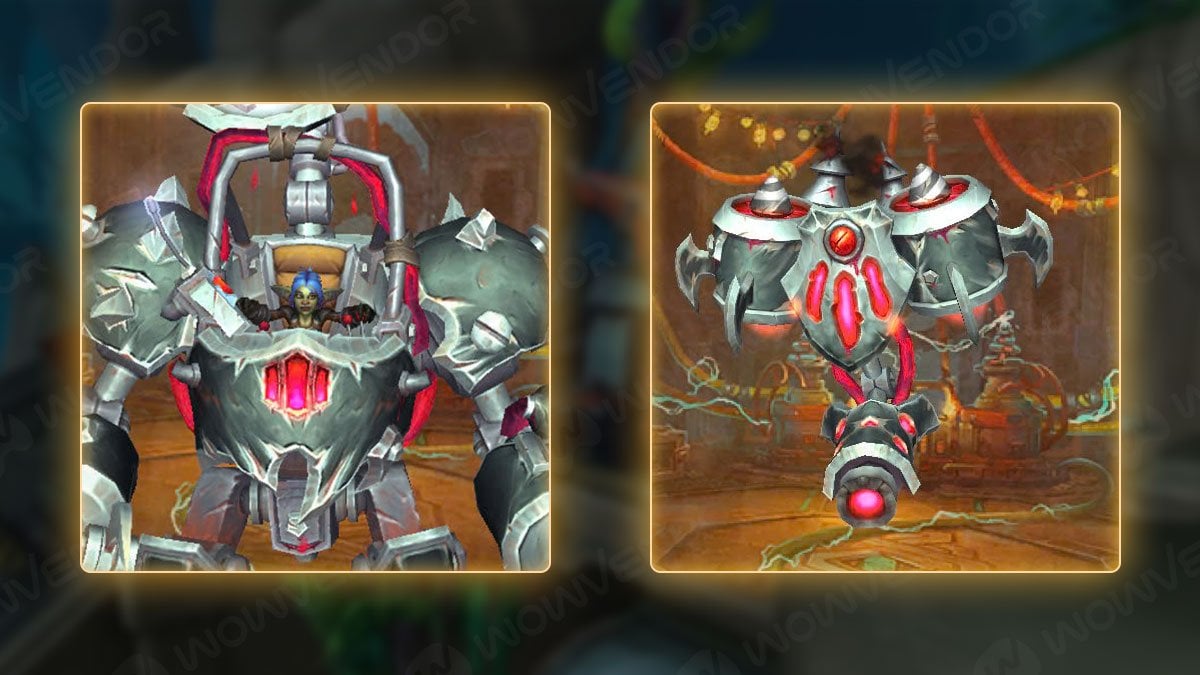
Start the fight at any end of the boss patrol route. That way you can have enough space to deal with boss mechanics.
Just as the name suggests, M.O.M.M.A. has 4 smaller Darkfuse Mechadrones. The goal of this fight is to constantly kill adds, as it makes the boss take extra damage. Your main goal is to focus adds when they are present. Defeating them triggers Jumpstart, making the boss take increased damage. Use this opportunity to burst the boss down.
- Jumpstart. When all adds are dealt with, the boss pulses with group-wide damage for 12 seconds. While doing so, the boss takes 200% increased damage. When the duration ends, MOMMA leaves a growing electric damage zone. Move the boss out of it and prepare for the next wave of adds.
- Electrocrush. A tank-buster attack. Deals a lot of damage, usage of defensive cooldowns is necessary.
- Sonic Boom. Shoots an AoE at the selected player. The AoE silences and deals damage to anyone inside it, while dragging them along its way. As it reaches an obstacle, it explodes in a 7y radius burst of damage. Aim it at the furthest wall away from the team to avoid getting hit by the final explosion.
- Darkfuse Mechadrones. These are adds that spawn in the group of 4 and need to be killed to trigger Jumpstart. In the downtime, they Shoot random players. They also have two attacks players need to be aware of. Doom Storm creates a line of circle AoEs, making an add to bombard the area. Maximum Distortion is a powerful channel that deals a lot of group damage and knockbacks players with every pulse. Interrupt as soon as you see the cast.
After you defeat the boss, the barrier surrounding the 3rd batch of crates will disappear.
Second Part: Finding the rest of the weapons
Now return to the area near the water with a triangle-shaped pool in the middle. Here you will find the 4th pile of crates. It is guarded by Venture Co. Architect. These enemies apply annoying DoTs. But you destroy the scaffolding they are standing on. This will make them stop attacking, as they will be busy rebuilding.
After that, you have to cross the river. Here you can meet Venture Co. Divers. They can plant proximity bombs that deal damage and launch upward players in the explosion area. Avoid triggering them.
On the other side, you will find a ladder leading to the next boss. But before that, you have to pass two Shreddinator 3000 at once. As they deny a lot of space with their abilities, it is advised to pull them down the stairs, so you have more room for maneuver. You can also try to pull them one by one. Or you can stay with them on their floor, but more likely your party will body pull some other enemies there. Be ready for that. No matter how you decide to deal with two mechs, climb another set of stairs to reach the second of Operation: Floodgate bosses.
Keeza Quickfuse and Bront boss guide
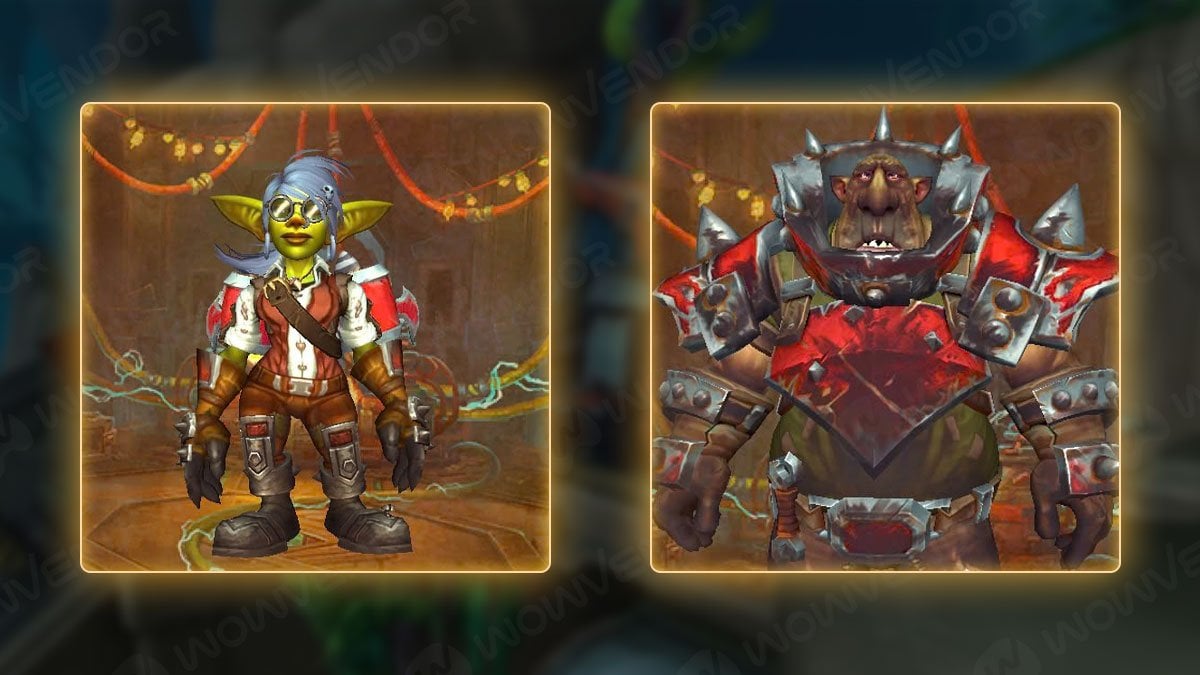
You have to fight two bosses at once. They need to be defeated at the same time. The reason for that is Enrage. As one of them dies, another gets a ramping power up which lets them quickly overwhelm the party. They do not share Health, so keep your eyes on both Health bars.
Keeza Quickfuse
- Big Badaboom. The main mechanic of the fight. A set of bombs appears in the arena. Players have 30 seconds to get rid of them using two other boss mechanics: Kinetic Explosive Gel and Barreling Charge. After 30 seconds bombs explode, dealing massive damage and applying a stacking DoT effect to all players.
- Quick Shot. An attack aimed at a random player. Spot heal it or use self-healing.
- B.B.B.F.G. Several line AoEs in a fan shape will spread away from Keeza. Any player caught will get severe damage and be knocked up.
- Kinetic Explosive Gel. Keeza applies a DoT to a target. If dispelled, the target explodes, dealing damage in a 5y area around the self. The explosion can be used to get rid of bombs left by Big Badaboom.
- Divided Duo. If either Keeza or Bront dies, the one left gets a 20% damage increase every 4 seconds.
Bront
- Wallop. A tank-buster attack. Use defensive cooldowns to mitigate the damage. If Keeza dies before Bront, he will start using Wallop non-stop.
- Barreling Charge. Bront takes aim at a random player. After the cast ends, Bront will charge forwards, dealing damage and stunning any players. Charge will also destroy any bombs left by Big Badaboom on its way. Targeted players should position themselves in such a way as to get rid of as many bombs as possible. When the cast ends, the player should sidestep the charge.
Make sure to kill both bosses at the same time and get rid of any bombs in the area. Other than that, there is nothing special to this fight. You should get rid of the most bombs using Barreling Charge. It is easier to get rid of any leftovers using Kinetic Explosive Gel.
When the deed is done do not forget to get the last Weapons Stockpile behind the fence.
Third Part: To the water dam
Now you need to get inside the dam. To do so, you have to return back to the river. Here you need to make your way to the dam so you can plant some explosives. But before doing that, you should consider clearing the area as the exploding will start a third boss battle.
Near the dam, you will find Disturbed Kelp. These mossmen can heal themselves using Restorative Algae. Interrupt the cast.
Another enemy in the area is Bombshell Crab. These explode on death, dealing damage and applying a stacking DoT. Avoid killing them all at once or be prepared to heal a lot.
When the area is clear enough, plant the explosives and get ready for the next battle.
Swampface boss guide
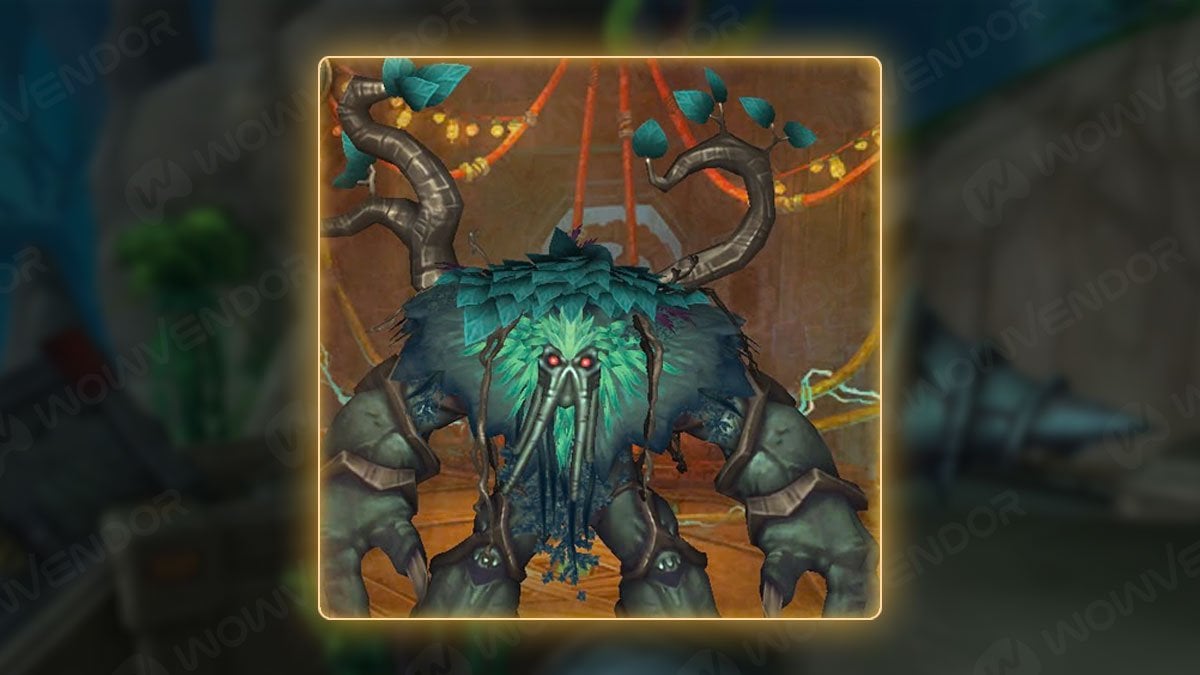
Not a mechanically hard boss, but there is a catch. Four players will be tied to each other in pairs. Spreading further than 14y from each will collide tied players back. This means you have to dodge mechanics together.
- Razorchoke Vines. The main mechanic of the fight. Aside from tying two players together, it also deals consistent damage over the duration.
- Sludge Claws. A tank-buster. Deals heavy damage and leaves a debuff that prevents a certain amount of healing. Use defensive cooldowns.
- Mudslide. A linear AoE. Dodge it together with your pair.
- Awaken the Swamp. The starts to pulse with damage and spawn Skewering Root AoEs.
- Skewering Root. A circle AoE dealing damage to any player caught in it. As it goes off, it sends several Rushing Tides outwards.
- Rushing Tide. A wave of water that deals damage to anyone caught in its way, as well as dragging them along.
The fight is just dodging things while being tied up together. We advise you to decide in what direction you will be dodging to avoid confusion mid-fight.
When the fight is finished, proceed inside the open tunnel to reach the inner parts of the water dam.
Final part: the water dam
The last stretch before the final boss is linear, but there are some enemies to worry about. First of all, do not go into the water. The fish there are nasty, their stacking debuff quickly deals with tanks.
On the first bridge, you will meet Bubbles. A mini-boss kinda deal. You want to pull him backward from the bridge to a more open area so you can have more space to fight him. Still, there are some moves up his sleeve. Bubble Burp creates bubbles that explode on player contact with them. Avoid touching those. Splish Splash is a frontal-cone AoE, dodge it accordingly. Backwash is his third attack and deals several pulses of group-wide damage, healers beware.
As you move forward you will meet more humanoid enemies. You can kick Venture Co. Electrician‘s Lighting Bolt casts, as they apply DoT. That way you can help your healer out.
The last encounter before the boss is against two Darkfuse Jumpstarters. These are also annoying, as they deal high damage, both ST and AoE. They have three moves: a group-wide attack, a series of AoE on the ground, and mini tank-buster Sparkslam.
When you finish with them, it is time for the final encounter.
Geezle Gigazap boss guide
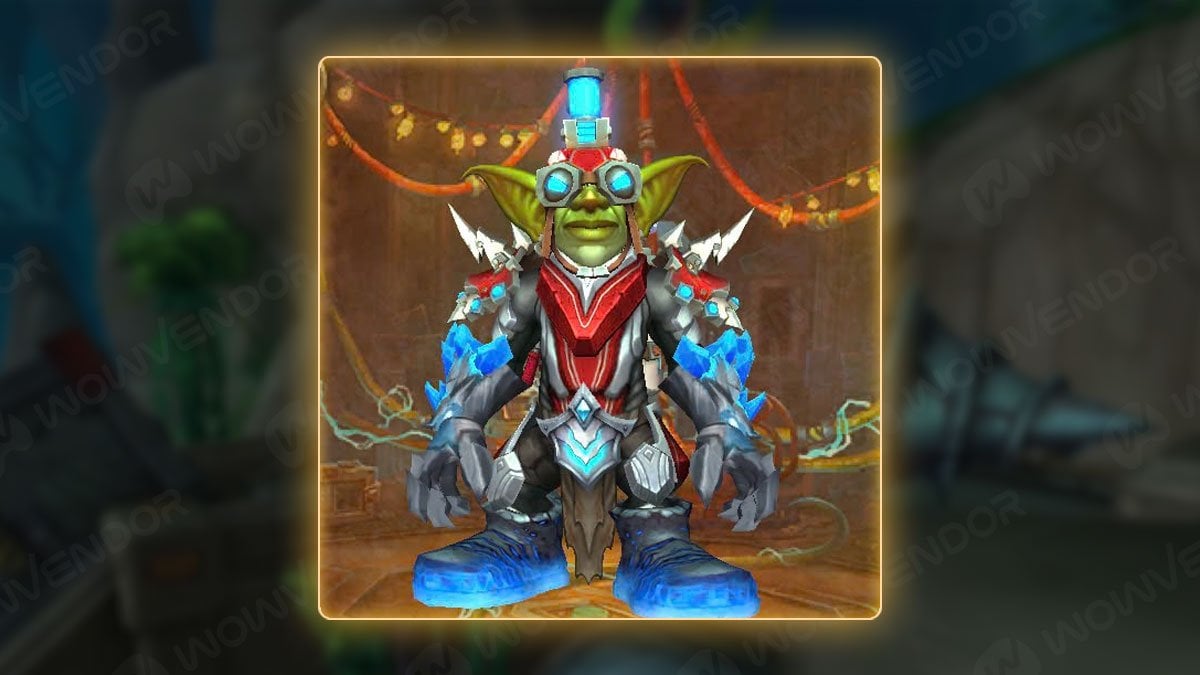
Geezle has an electricity meter which serves as energy to many of his attacks. Each attack has its own cost, so knowing how much energy the boss has left can tell you what attacks he can use. The fight itself requires good positioning from both the group and the tank.
- Turbo Charge. Boss starts to charge himself for 10 seconds. Every second he pulses damage, while also charging 10 electricity. While doing so, he will also cast Turbo Bolt.
- Turbo Bolt. A set of 4 line AoEs that deal high damage and stun anyone hit. Avoid them.
- Dam Rubble. Immense energy from Turbo Charge shakes the structure of the dam, causing it to rain rubble on the arena. Randomly covers almost all the arena in damaging AoEs. Avoid getting hit by those.
- Dam Water. After Dam Rubble, the water starts to leak, creating pools of water in the arena. The water is harmless and players can pass through. But contact with electricity turns these pools into high-damage zones.
- Thunder Punch. Costs 10 Electricity. A powerful tank buster with a knockback. Use the most potent mitigation, as it also leaves a short, but potent DoT effect. Note that you can be knockbacked off the arena and die, so don’t stay close to the edge.
- Gigazap. Costs 20 Electricity. A cone-AoE targeted at a random player. Players should avoid standing close to the target. The target should not be standing near water pools to avoid electrifying them.
- Leaping Sparks. Costs 40 Electricity. Creates several sparks that chase players. Deal high damage and stun their targets on contact. To get rid of these sparks, players need to make contact with non-electrified water pools.
The fight is not hard in theory. But in practice, things can escalate quickly, especially with poorly coordinated teams. Avoid water pools to not electrify them accidentally. When it’s time for Leaping Sparks, preposition yourself close to the pool. That way others can see what pool you will use. Remember, one pool can take only one spark.
Operation: Floodgate loot table
You can expect this loot drops in Operation: Floodgate.
| Name | Gear slot |
|---|---|
| Improvised Seaforium Pacemaker | Trinket |
| Darkfuse Medichopper | Trinket |
| Ringing Ritual Mud | Trinket |
| Gigazap’s Zap-Cap | Trinket |
| Circuit Breaker | Two-Hand Sword |
| Sonic Ka-BOOM!-erang | One-Hand Warglaive |
| Keeza’s ‘B.’ B.B.B.F.G. | Ranged Gun |
| Geezle’s Coercive Volt-ohmmeter | One-Hand Dagger |
| Gallytech Turbo-Tiller | Two-Hand Polearm |
| Razorchoke Slacks | Cloth Legs |
| Saboteur’s Rubber Jacket | Cloth Chest |
| Nonconductive Kill-o-Socks | Cloth Boots |
| Waterworks Filtration Mask | Leather Head |
| Disturbed Kelp Wraps | Leather Wrist |
| Mechanized Junkpads | Leather Boots |
| Portable Power Generator | Mail Belt |
| Bront’s Singed Blastcoat | Mail Chest |
| Skystreak’s Hidden Missiles | Mail Shoulders |
| Jumpstarter’s Scaffold-Scrapers | Plate Gloves |
| Venture Contractor’s Floodlight | Plate Belt |
| Muckdiver’s Wading Plate | Plate Chest |
| Electrician’s Siphoning Filter | Cloak |
| Craboom | Companion |
Operation: Floodgate achievements
There are 4 achievements related to this dungeon
- Heroic: Operation: Floodgate. Defeat Geezle Gigazap in Operation: Floodgate on Heroic difficulty or higher.
- Keystone Hero: Operation: Floodgate. Complete Operation: Floodgate at Mythic Level 10 or higher, within the time limit. Reward: Teleport: Operation: Floodgate
- Mythic: Operation: Floodgate. Defeat Geezle Gigazap in Operation: Floodgate on Mythic or Mythic Keystone difficulty.
- Operation: Floodgate. Defeat Geezle Gigazap in Operation: Floodgate.
Conclusion
And this is it for our guide. Hope it helped you learn everything about the new dungeon in Season 2. Happy hunting!
If you ever need assistance with Operation: Floodgate, our Mythic boost is always here to help!


Comments