Helldivers 2 Stratagem Tier List: Best Loadout Choices
From top performers to those better left untouched, here’s our Helldivers 2 Stratagem tier list for you to craft your ultimate loadout and dominate the battlefield.
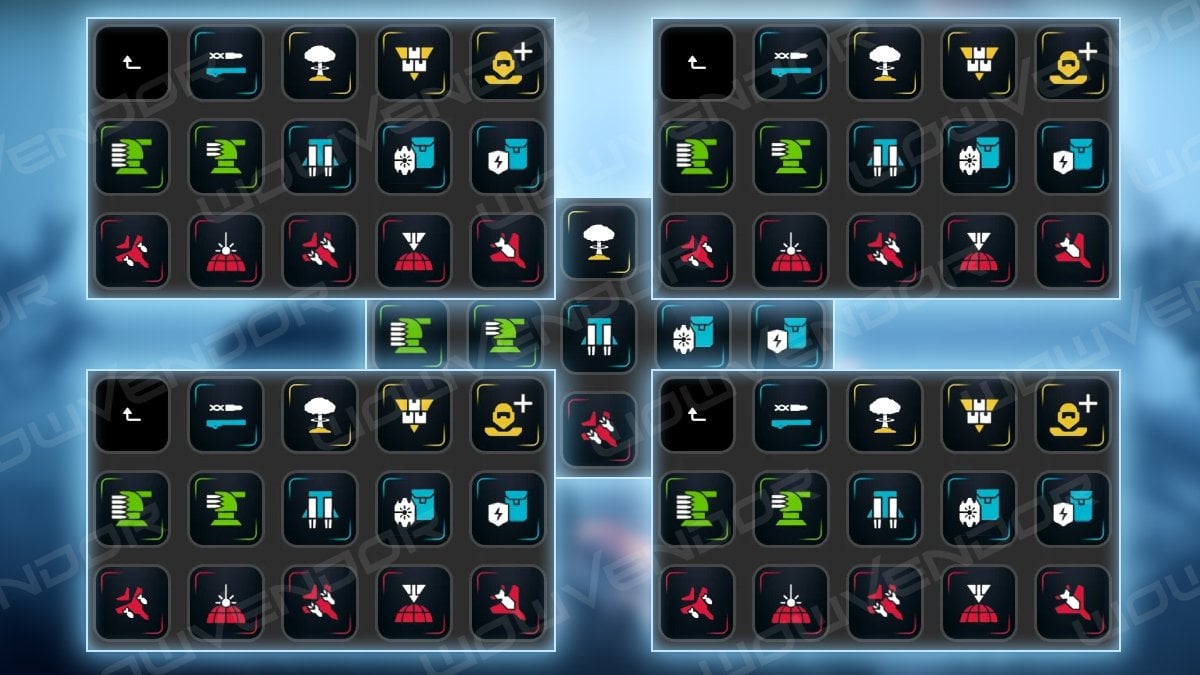
Table of Contents
Helldivers 2 Stratagem Tier List Criteria
In this guide, we’ll evaluate stratagems based on their effectiveness against both Automatons and Terminids, also considering their viability and performance at high levels and in endgame scenarios.
We’ll cover all Helldivers 2 stratagems ranked from best to worst, so let’s break down our classification:
- S-tier: Meta stratagems that excel against all enemy types, making them optimal choices for nearly any mission. Unlock them as soon as possible.
- A-tier: Excellent options but not as powerful as S-tier choices.
- B-tier: Solid choices, with their pros outweighing the cons. While not as versatile as higher tiers, they deliver reliable performance.
- C-tier: These can get the job done, but only in particular scenarios. Okay, but situational.
- D-tier: Poor performance. It’s better to avoid using these stratagems to free up valuable slots.
- F-Tier: They really aren’t worth your time.
It’s important to note that this classification represents just one opinion and reflects our personal preferences and experiences with the game and its various weapons. This is merely a recommendation that you can choose to follow or disregard.
That being said, let’s dive into our Stratagem Helldivers 2 tier list!
Helldivers 2 Stratagem Tier List
S-Tier Stratagems
SH-32 Shield Generator Pack: Excels in high-difficulty situations as an outstanding tank option. Protection from stuns and knockbacks while blocking attacks from both bugs and robots. This is your Helldivers 2 best buy — just shield up and keep on blasting!
Orbital Railcannon Strike: Never misses. Perfect for single-target hits as its strikes are often oneshots or nearly oneshots even the most formidable enemies at maximum difficulty.
Eagle 500kg Bomb: Packs a huge punch with high damage on direct hits, capable of one-shotting tanks and titans. Requires precision due to its small explosive radius and limited AoE damage. With upgrades, you can unleash two nukes almost back-to-back with a cooldown of less than 10 seconds.
APW-1 Anti-Materiel Rifle: Currently, it’s the top-tier support weapon. The Anti-Materiel Rifle excels in combat versatility. It can eliminate all kinds of adversaries, even Tanks and Hulks. Its remarkable armor-penetrating capabilities, coupled with significant damage output, solidify its superiority on the battlefield.
GL-21 Grenade Launcher: Performs great in endgame scenarios, especially when farming for medals. Delivers good damage, excels at destroying nests, and proves highly effective against robots as well. It simply destroys everything. Chargers, Tanks, Hulks, Factories, Broadcast towers, hives, you name it.
A-Tier Stratagems
ARC-3 Arc Thrower: Having a high charge-up time and relatively low DPS, it shines with infinite ammo reserves and a decent AoE. When paired with the C Shield Pack, it can unleash its full potential, effortlessly eliminating nearby threats. While it can handle enemies with heavy armor to some extent, it’s not particularly effective in this regard. However, you should exercise extreme caution, as the lightning charge can harm both teammates and enemies in its path.
RS-422 Railgun: Despite recent nerfs, the Railgun remains one of the top choices among Helldivers 2 players. It can handle a wide range of enemies, deals decent damage, and takes only one slot. This powerhouse doesn’t even need a backpack and shines brightest in its unsafe mode, offering extra damage and ammo. However, it currently trails behind the Anti-Materiel Rifle in terms of performance.
AC-8 Autocannon: Amazing for clearing out both robots and Terminids, especially as you’re leveling up. Serves as a solid alternative until you unlock the Railgun, but keep in mind that the Autocannon requires a backpack, preventing you from using the Shield Pack, which is not something you’d want to give up.
Orbital Laser: This one has an amazing uptime and is effective against a multitude of enemies. While it has a high cooldown, this drawback is well compensated by the immense damage output. But keep in mind that there’s a risk of killing yourself and your allies using it. This is also the main reason why the Orbital Laser is ranked lower in many tier lists.
Eagle Airstrike: This Helldivers 2 close air support stratagem is great for taking out numerous adds, offering a fast recharge rate, decent damage, and a good AoE. Unlocked early on, it remains viable all the way up to the endgame missions.
A/M-12 Mortar Sentry: Their unpredictability is a significant drawback. They kill more allies than enemies, and they have been notorious for accidentally wiping out the entire team, especially when you are swarmed by enemies.
Eagle Cluster Bomb: An early-game unlock excelling at clearing enemy hordes. Upgrades enable firing 5 bombs in an 8-second cooldown, which is absolutely terrific. However, caution is crucial due to a large blast radius that can harm teammates. As for enemies, it turns smaller ones to dust and weakens the armor of heavier foes for easier takedowns.
A/ARC-3 Tesla Tower: While it can kill allies, it’s perfect for solo play. You can easily take out numerous enemies since they tend to ignore it. It’s simply indispensable for clearing out and defending.
Exo-45 Exosuit: The mech proves useful on nearly every mission. However, you must be careful while using as mishandling it could get you killed. While it may not dispatch Automatons as effectively as it does bugs, its overall performance remains commendable and enjoyable. Fun fact: You can kill yourself if you quickly turn and shoot a rocket.
B-Tier Stratagems
A/AC-8 Autocannon Sentry: With overall high DPS and decent range, it gets even more effective when upgraded. In a Hulk vs Sentry fight, we’d place our bets on the latter, and it also excels against bugs. It’s undeniably useful, but proper placement is crucial. Its standout feature lies in its capability to even destroy dropships, making it a must-have in missions focused on civilian defense.
LAS-98 Laser Cannon: Once deemed a D-tier, recent buffs have turned it into a highly viable choice. It easily handles medium-armored targets, swiftly eliminates chargers, and can even take down a Hulk with a precise shot. Currently, it delivers a solid B+ performance, but we’ll keep a close eye on it for further uptiers.
Orbital Precision Strike: With a low cooldown and decent damage output, it’s sufficient for clearing objectives and small swarms of enemies. While a good option, its Eagle version is better, earning it a spot in the B-tier.
LIFT-850 Jump Pack: A niche but super fun stratagem to use. Performs well against Terminids, especially when clearing bug nests. A good alternative before unlocking the Shield Backpack: if overrun, you can swiftly fly out of harm’s way. However, this trick won’t work with robots since they attack from a distance.
M-105 Stalwart: While lacking high firepower, Stalwart’s mobility allows for fast reloads on the move, making it efficient for dealing with normal adds. It struggles against armored enemies, but its ample ammo capacity still ensures noticeable damage. Relatively weak for high difficulties but effective in the mid-game progression.
Eagle Napalm Strike: Effective against Terminids, with decent DPS and AoE capable of eliminating smaller targets. However, it does little damage to larger targets, only slowing them down.
EAT-17 Expendable Anti-tank: Less viable later in the game but initially quite useful. Helps eliminate dropships and larger enemies. Recommended to unlock as soon as possible.
GR-8 Recoilless Rifle: The primary downside here is that you need an assistant to reload or have to spend twice the time to do that on your own. The extra ammo pack, though, is definitely a plus.
AX/AR-23 “Guard Dog”: A powerful turret with decent damage but limited ammo. Guard Dog armor penetration is also weak.
AX/LAS-5 “Guard Dog” Rover: Similar to the previous turret, but its laser beam packs a stronger punch and requires fewer recharges. Does friendly fire and might damage you and your team.
FX-12 Shield Generator Relay: Creates a shield dome that allows shooting from within while being protected from incoming fire. Excels against robots, but you likely won’t need it against bugs at all. The main drawback is the shield’s stationary nature, making it impossible to use on the move.
Eagle 110MM Rocket Pods: Although it doesn’t instantly kill Heavies, it still gets the job done for less bulky enemies. It zones in on the biggest target it can spot but lacks the damage to be placed higher on our stratagem tier list.
A/M-23 EMS Mortar Sentry: This weapon is powerful, but only against robots. It doesn’t kill allies, but it’s not as effective as the Autocannon.
C-Tier Stratagems
MG-43 Machine Gun: One of the first stratagems you get, it’s good for piercing enemy armor. If it wasn’t for its long and stationary reload, the machine gun would have been the best stratagem in Helldivers 2 for the early game. It’ll still carry you through pretty much all the initial missions, but later on, you’ll have a lot more viable options to use.
FAF-14 SPEAR Launcher: Effective against large and armored enemies but can’t one-shot tanks. Long reload time and the need to lock onto the target make it somewhat clunky.
FLAM-40 Flamethrower: Recent buffs have improved its DPS, making it great for clearing bugs and giving it a decent fighting chance against chargers. However, the problem still lies in its limited range; you need to get very close to the target to deal damage. When facing robots that attack from a distance, the Flamethrower may not be as helpful. Its effectiveness is largely dependent on the situation.
Orbital Airbust Strike: Overkills small targets and lacks firepower against larger ones.
A/G-16 Gatling Sentry: A better version of the A/MG-43 Machine Gun Sentry. However, it struggles against bulkier enemies and breaks quickly. It’s only effective during evacuation situations.
Orbital Gatling Barrage: Not a bad one but cannot penetrate heavy armor, and for everything less armored you can find more effective options.
Orbital Walking Barrage: Not very precise, has a long cooldown but does well in specific scenarios if you know when and how to use it.
Eagle Strafing Run: Quick to come, packs a decent number of charges, suitable for Elimination missions. Significantly weaker than other Eagles but can be used before unlocking the 500kg nuke.
Orbital EMS Strike: Would be placed in the Helldivers 2 best stratagems tier list as a solid A if not for the EMS Sentry giving you a much better effect. Currently, a transitional option until you unlock the EMS Sentry.
E/MG-101 HMG Emplacement: Decent for clearing adds on lower tiers, but in the endgame, better options are available.
A/MLS-4X Rocket Sentry: This one has a larger ammo reserve and shoots faster than the Autocannon Sentry, but it struggles significantly against armored targets. It’s pretty much a situational Stratagem and may not always be effective.
D-Tier Stratagems
Orbital Smoke Strike & Eagle Smoke Strike: May find a spot while leveling but become utterly useless in the endgame.
Orbital Gas Strike: Just like the Smokes, it’s useless in the endgame and very situational even at lower levels.
Orbital 380MM HE Barrage: Look epic when used, but the accuracy is not great. The chances of damaging yourself or your teammates are higher than those of hitting the enemy. However, it has recently been buffed and now can toss bombs at enemies for 30 seconds, which makes it very useful, especially when you’re up against Automatons.
Mines: While not inherently bad, with so many other, much cooler options available, it’s almost impossible to prioritize mines over everything else.
SH-20 Ballistic Shield Backpack: Doesn’t provide enough protection and limits your choice of weapon. You might as well hide behind a rock and shoot from there without taking up a slot.
F-Tier Stratagems
A/MG-43 Machine Gun Sentry: Decent against small bugs but ineffective against armored enemies. Not very helpful in endgame situations and even falls short on defense missions.
B-1 Supply Pack: Pretty useless. Ammo drops are abundant across the map, and you can also request free ammo support. Therefore, the B-1 Supply Pack is considered unnecessary and falls into the F-tier category.
Conclusion
And that’s a wrap on the best Helldivers 2 stratagems ranked in our tier list. We hope this guide proves helpful, but once again, we have to remind you that this is purely our opinion and recommendation, and you are not obliged to follow it. If your favorite stratagem doesn’t rank high here, don’t get upset — use what works for you, and have fun!


Comments
I didn’t like this article at all. The author describes each Stratagem, but without any specifics why they bad or good. This article seems to be made without knowledge of the game, since Materiel Rifle is incredibly effective against Automatons, especially on high difficulties. Tanks and Hulks are easily destroyed with it. There aren’t even Mechs in the article, which indicates that the article is not relevant. That explains why Orbital 120MM HE Barrage is in D-Tier after the recent buff.