The War Within 11.1.7: Horrific Visions of Orgrimmar walkthrough
Horrific Vision of Orgrimmar returns in The War Within! Follow our complete Horrific Visions guide with easy walkthrougр to master every part of the challenge.

Table of Contents
- How to start Horrific Visions of Orgrimmar
- Horrific Visions of Orgrimmar route
- Horrific Vision of Orgrimmar Potion color & location
- Horrific Vision of Orgrimmar Odd Crystals location
- Horrific Visions of Orgrimmar Mailbox location
- Orgrimmar Madness affixes
- Horrific Visions of Orgrimmar walkthrough
- Horrific Visions of Orgrimmar tips and tricks
- Conclusion
Key takeaways:
- Start simple by going straight to Thrall on your first run to unlock the Steeled Mind buff and get used to the layout.
- Each bonus area adds difficulty to the final fight, so plan your route and cooldowns carefully before facing Thrall.
- Always check the bad potion color at the start and avoid it throughout your run to prevent major Sanity loss.
- Odd Crystals, mailboxes, and tributes offer extra rewards: collect them all before finishing your vision.
- Use Sanity Restoration Orb wisely, avoid Soridormi’s Construct, and don’t rush into using all Masks until you’re confident.
A twisted version of Orgrimmar returns in The War Within. Are you ready to face it again? Dive into our complete guide for the Orgrimmar Horrific Vision, packed with easy-to-follow walkthroughs and everything you need to know to conquer this corrupted stronghold once more. Without further ado, let’s get started!
Related posts:


Before you start, check out our top 5 classes for Solo Horrific Visions.
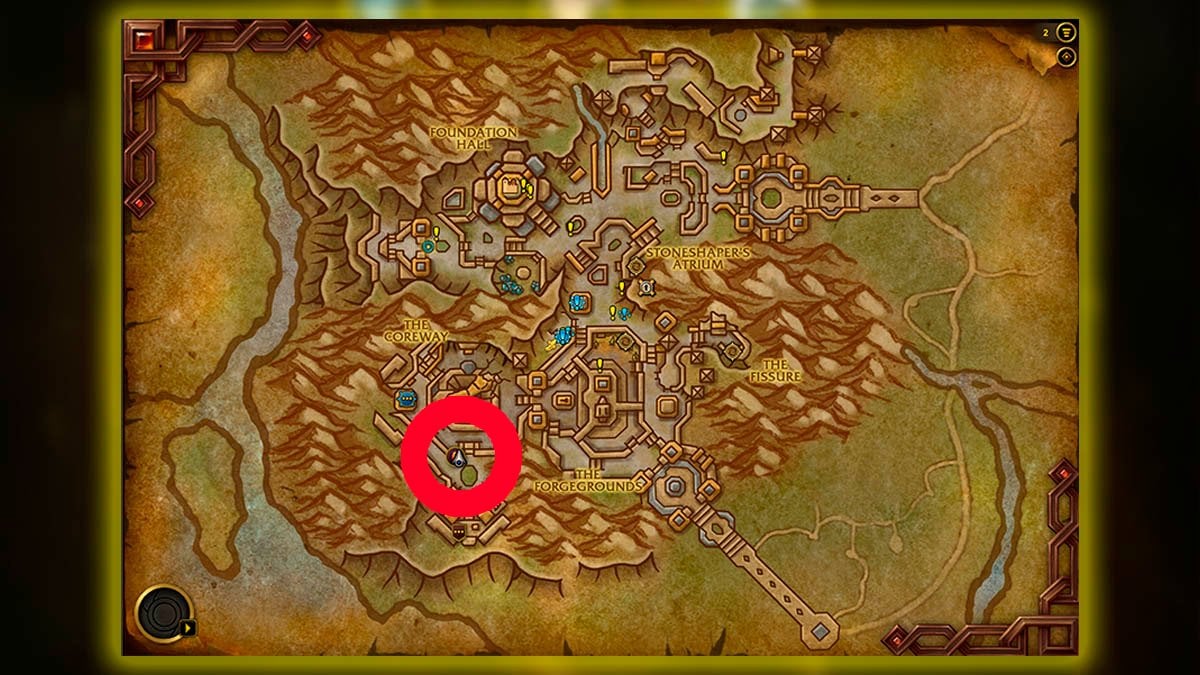
How to start Horrific Visions of Orgrimmar
To take part in the Horrific Visions event, head to the designated zone in Dornogal. There, you’ll find all the helpful NPCs and the portal leading to the event hub. Inside the event hub speak with Wrathion to start the run.
Horrific Vision event location:
/way 34.0 68.6Note
Orgrimmar Horrific Vision rotates weekly with Stormwind Horrific Vision, so don’t miss it. Be sure to check for the event across two consecutive weeks.
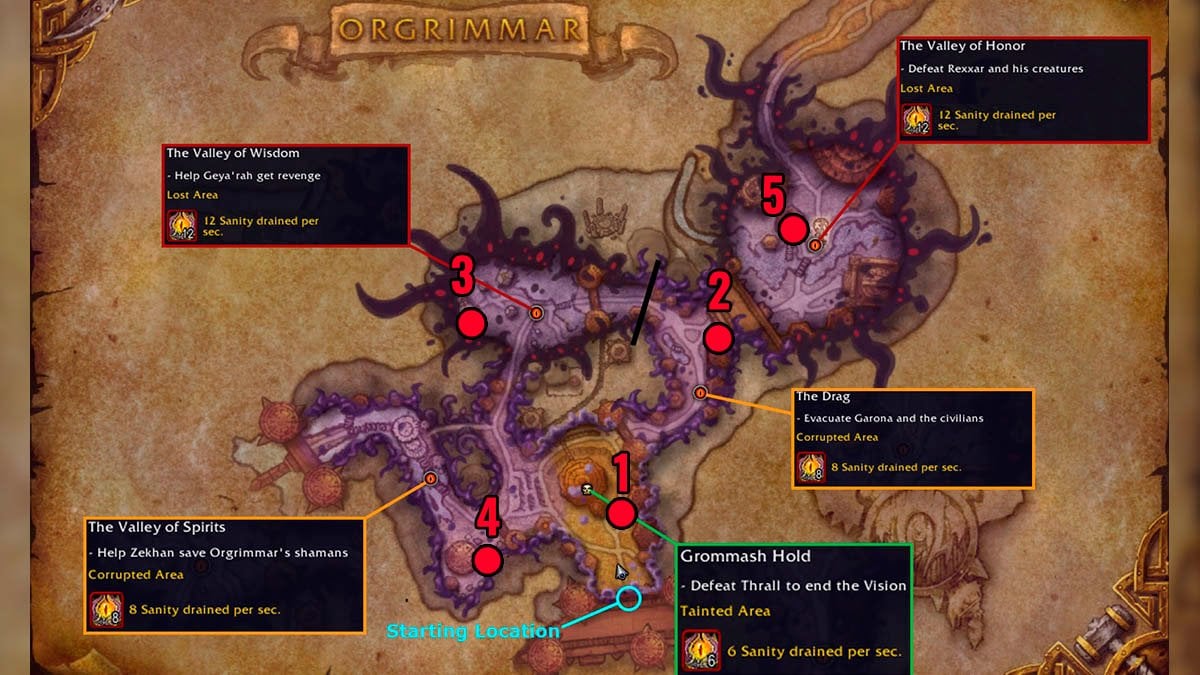
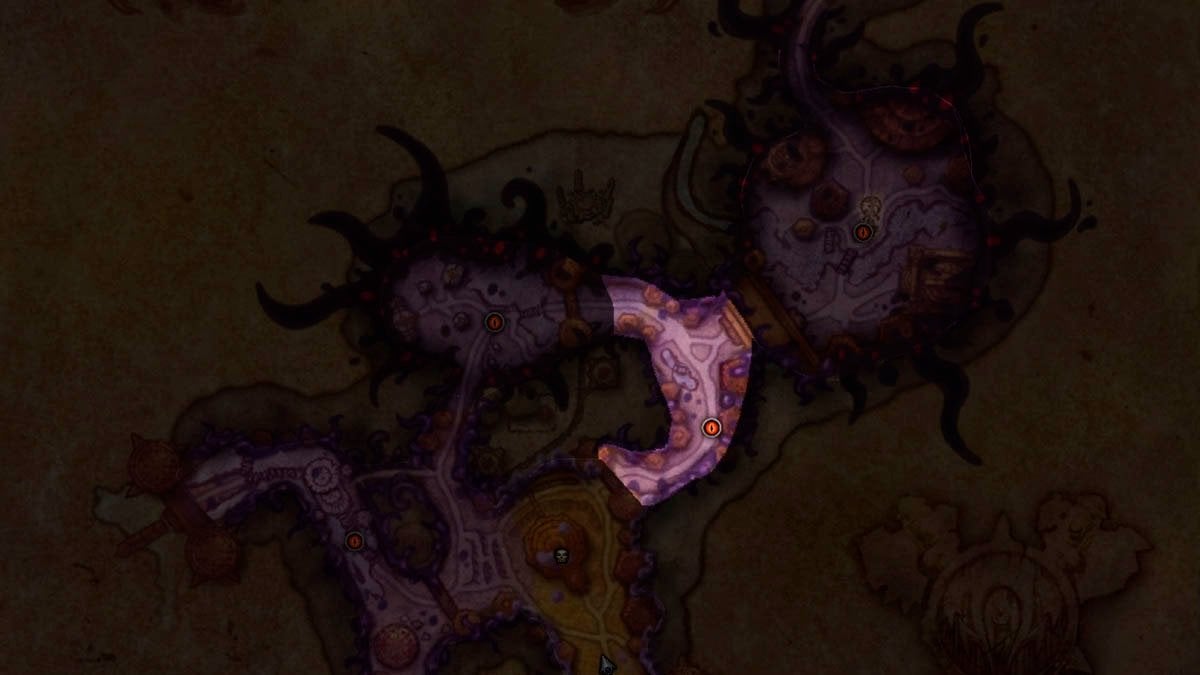
Horrific Visions of Orgrimmar route
To fully clear the Orgrimmar Horrific Vision, follow this route. It’s the fastest and most efficient way to tackle every threat and claim all available rewards.
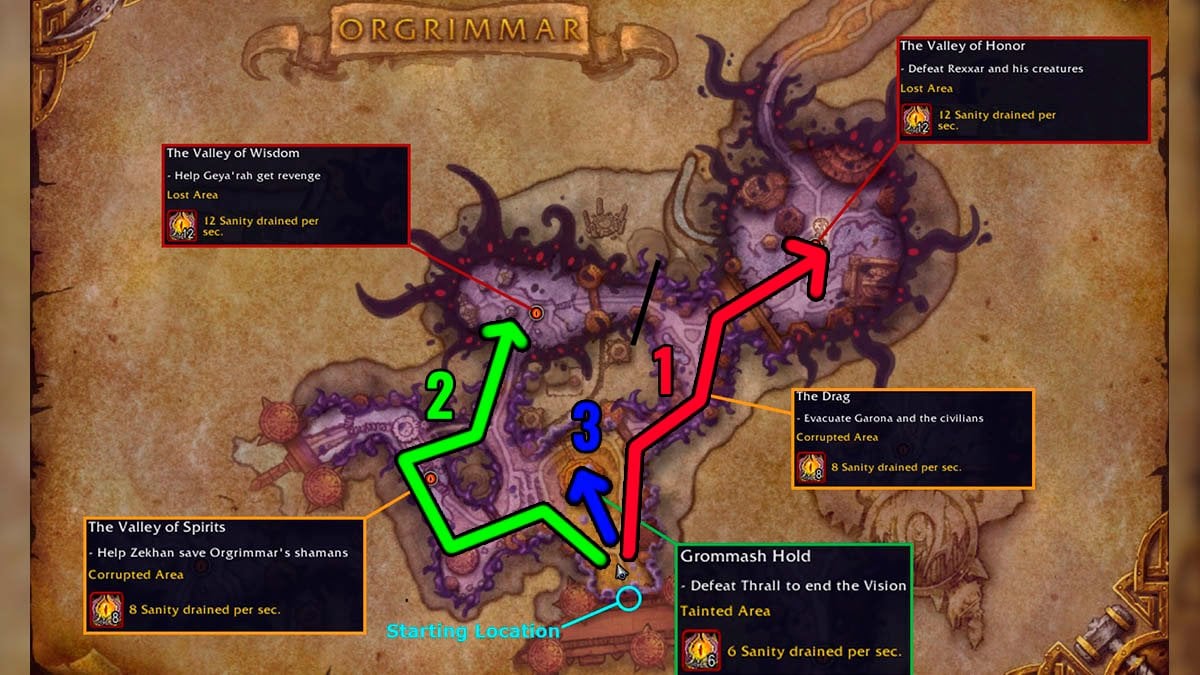
The Orgrimmar Horrific Vision route is straightforward and consists of the following three steps:
- Clear all the adds and elites in Grommash Hold (except Thrall) and check the poisonous potion. Then head to The Drag and complete all the events there. Next, move to the Valley of Honor and defeat Rexxar. Once done, use the Wind Totem to fast travel back to the starting point.
- Head to the Valley of Spirits, then proceed to the Valley of Wisdom. Clear all mobs and bosses in both areas and complete all the events along the way.
- Finally, face Thrall in Grommash Hold to complete the Orgrimmar Horrific Vision.
You may stray from the route if you’re farming Odd Crystals, Mailboxes, or Masks.
We’ll cover all the steps in detail, including events, elites, and boss tactics, in the Walkthrough section of this guide. But for now, here are a few more important things you need to know.
Tip
You can swap the Valley of Spirits and the Valley of Wisdom during our runs, as the order of these wings doesn’t affect the overall speed. Feel free to play them in any order: Spirits first or Wisdom first.
Horrific Vision of Orgrimmar Potion color & location
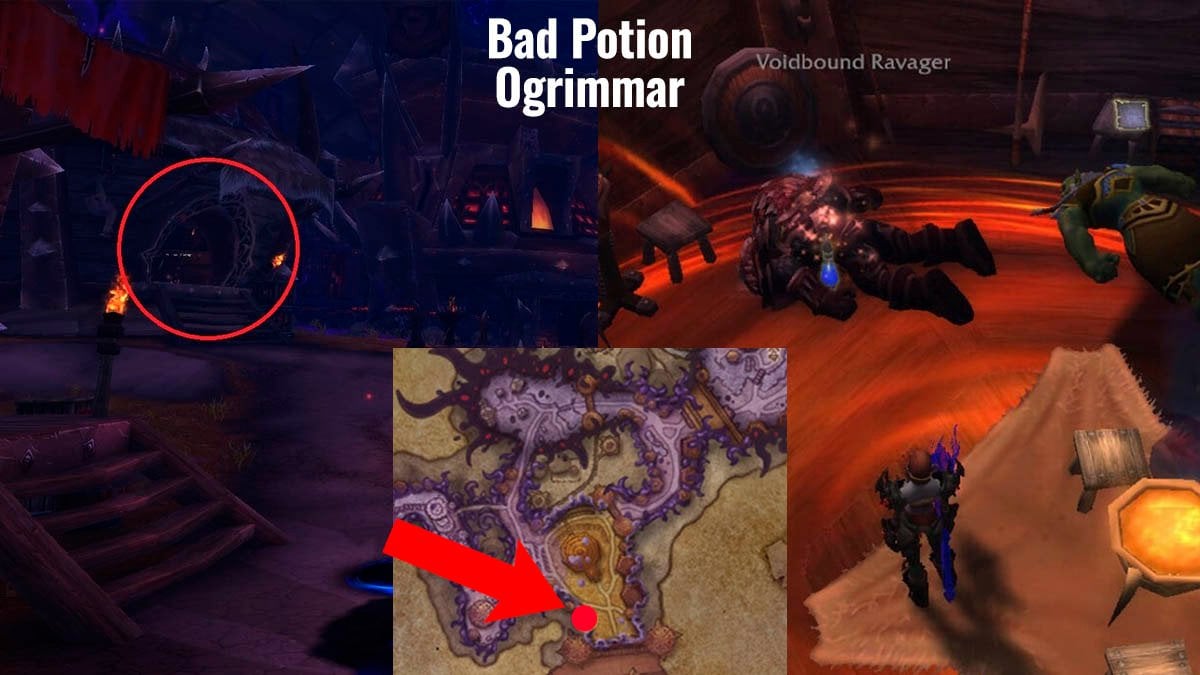
One of the first things you should do in every Horrific Vision run is to check the color of the bad potion. It’s located in the hut inside the Grommash Hold area, and its color changes with each run—there are five possible colors in total.
Find the first potion in the hut, note its color, and do not drink it, as it will drain your Sanity. You should avoid all potions of that same color throughout your entire run.
The other colors are safe to drink, and one of them will even restore your Sanity. Check the table below to see which color is best to drink, depending on the bad potion’s color.
| If the Bad Potion is this color | Then this is +100 Sanity Potion color |
|---|---|
| Black | Green |
| Blue | Purple |
| Green | Red |
| Purple | Black |
| Red | Blue |
Orgrimmar Horrific Vision bad potion location:
/way 46.89 81.13Here are all 5 Horrific Vision potion effects and what they do:
- -100 Sanity
- +100 Sanity
- Spicy Potion — Frequently breath fire dealing damage to nearby enemies. On expiration or removal you will catch fire yourself for a short time.
- Sluggish Potion — Heals 2% of maximum health every 5 seconds. On expiration or removal it will slow movement speed for a short time.
- Sickening Potion — Take 5% less damage from all sources. On expiration or removal you will Vomit uncontrollably for a short time.
Here is Weakaura for Potions in Horrific Visions runs:
Horrific Vision of Orgrimmar Odd Crystals location
Odd Crystal farming is optional, it provides Corrupted Mementos. This currency can be used to buy Horrific Vision Revisited mounts and upgrade Hourglass of Horrific Visions talents.
Here are all the Odd Crystal locations in the Orgrimmar Horrific Vision:
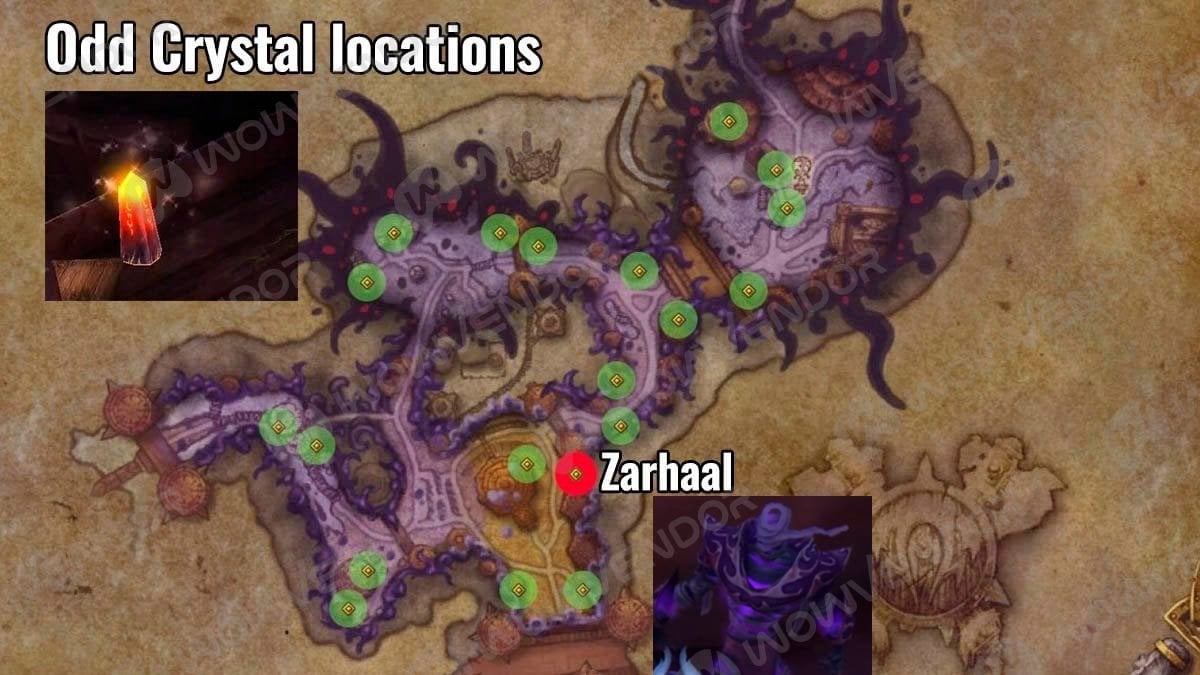
In every Horrific Vision of Orgrimmar run, there are 10 Odd Crystals to find. Each zone contains 2 crystals in 4 possible spots, and they’re usually hard to spot, unless you know where to look.
You’ll find Zarhaal behind the Auction House in the starting location. Once you’ve collected your Odd Crystals, speak to him and tell him how many you’ve found. He’ll disappear and leave behind a chest with Corrupted Mementos. You can get up to 425 Mementos per run.
Don’t forget to turn in your crystals and loot the chest before finishing your run. Any Odd Crystals you don’t turn in will be lost, and unlooted Mementos won’t be added to your total.
Check our Corrupted Mementos farm guide for more info.
Horrific Visions of Orgrimmar Mailbox location
Here are all Horrific Visions of Orgrimmar mailbox locations:
Scattered throughout Orgrimmar in the Horrific Vision are interactable mailboxes. Most of the time, clicking on one will spawn a simple trash mob. However, there’s a small chance it will summon the rare enemy Mail Muncher. Defeat it and get the Mail Muncher mount, a unique and rare reward. So don’t skip those mailboxes during your run!
Orgrimmar Madness affixes
Each area can have one Madness affix from the list below. Some are tough to deal with, while others are easy to ignore.
| Name | Where can occur | Effect | How to play around |
|---|---|---|---|
| Madness: Desynchronized | Valley of Strength | Your spells and abilities can either slow or hasten you, affecting your casting, attacking, and movement speed. | Ignore. |
| Madness: Bloodthirsty | Valley of Strength | Periodically damages nearby allies and enemies, healing you slightly per target hit. | Ignore. |
| Madness: Promised Power | Valley of Strength | Summons a zone: stand in it for +25% damage, or suffer -10% if you don’t. | Ignore. |
| Madness: Entomophobia | Valley of Spirits and The Drag | In combat, you gain bug stacks. At 5, you’re forced to run for 5s. Jumping removes stacks. | Just jump. |
| Madness: Dark Delusions | Valley of Spirits and The Drag | Summons a clone that chases you; if it reaches you, it deals damage and stuns. | Run away from it. |
| Madness: Scorched Feet | Valley of Spirits and The Drag | Spawns pools of fire near you that toss you away on contact. | Don’t move, or use it for movement. |
| Madness: Split Personality | Valley of Wisdom and Valley of Honor | Surrounds you with 3 void zones that disorient you on contact. | Be aware of it and dodge. |
| Madness: Leaden Foot | Valley of Wisdom and Valley of Honor | Moving in combat quickly slows you to a stop; standing still restores movement. | Don’t move. |
| Madness: Haunting Shadows | Valley of Wisdom and Valley of Honor | Shadow spawns at your location and explodes after 4s, causing fear. | Dodge it. |
Horrific Visions of Orgrimmar walkthrough
Let’s dive into the Orgrimmar Horrific Vision walkthrough. Here, you’ll find everything you need: key trash mobs, boss fights, main objectives, useful buffs, dangerous debuffs, and more.
But before you do, make sure you’ve activated the Hourglass of Horrific Visions and picked the right Hourglass talents.
Valley of Strength strategy
Sanity drain per second: 6
Madness affix: Madness: Desynchronized, Madness: Bloodthirsty, or Madness: Promised Power
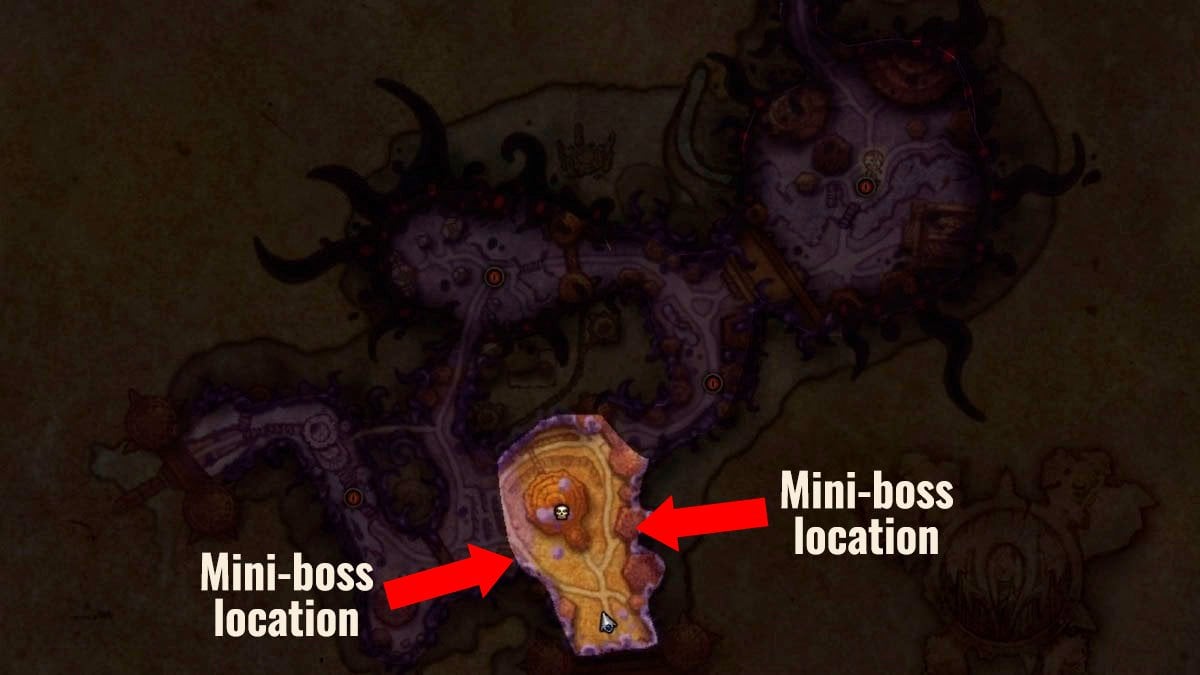
Step 1: Defeat a mini-boss
In the starting area of Orgrimmar, one mini-boss will spawn either inside the Broken Tusk Inn or in the blacksmith building across the valley. Defeat one of them early to earn a permanent buff: either 10% increased HP or 10% increased damage. More in Orgrimmar Vision hidden buffs guide.
Step 2: Check the bad potion
After that, make sure to check the bad potion color, as mentioned earlier. This will help you avoid Sanity-draining potions.
Step 3: Leave
There’s also a Thrall final boss fight in this area, but defeating him will end your run. You can choose to do so, but you’ll miss out on additional rewards. For now, leave Thrall alive and continue onward to The Drag.
The Drag strategy
Sanity drain per second: 8
Madness affix: Madness: Entomophobia, Madness: Dark Delusions, or Madness: Scorched Feet
Step 1: Defeat Annihilator Lak’hal
As soon as you enter The Drag, you’ll face Annihilator Lak’hal, who’s standing near Garona. He has two dangerous abilities:
- Orb of Annihilation – Spawns a shadow orb that explodes, dealing heavy damage and draining 60 Sanity if you’re caught in it.
- Dark Force – Fires a beam that locks onto a location. Standing in its path will knock you back and deal damage.
Defeat him, then speak with Garona to begin the next phase of this objective.
Step 2: Rescue survivors and explore shops
Your task now is to clear all enemies and search the barricaded buildings along The Drag for survivors. Garona will help once you break the barricades. One shop (the Tailoring shop) spawns an extra enemy, so be prepared.
Keep an eye out for an Ethereal Portal inside the transmog shop on the right. If it appears, it summons Warpweaver Dushar. Defeating him grants a 10% crit chance buff for the rest of your run.
Step 3: Defeat Inquisitor Gnshal
After checking all the buildings, you’ll fight Inquisitor Gnshal, the main boss of The Drag. He’s holding the last of the survivors captive. He has two main abilities:
- Void Torrent – Sends out void missiles that stun and drain 30 Sanity per second for 4 seconds if they hit. Keep moving to dodge them.
- Cries of the Void – At 65% and 30% health, he shields himself for 25% of his HP. If the shield isn’t broken in 6 seconds, it explodes, causing damage and Sanity loss based on how much shield is left.
Defeating Gnshal completes The Drag.
Valley of Honor strategy
Sanity drain per second: 12
Madness affix: Madness: Split Personality, Madness: Leaden Foot, or Madness: Haunting Shadows
The Valley of Honor is a Tier 3 area and one of the hardest parts of the Orgrimmar Horrific Vision. The goal here is simple: defeat Rexxar, located at the Hunter’s Ring. But first, you’ll need to clear out some trash mobs.
Step 1: Deal with Misha
Right at the entrance, you’ll be blocked by Misha, Rexxar’s loyal bear. While not technically required to kill, it’s nearly impossible to avoid her without pulling. It’s best to just take her down. She uses the following abilities:
- Desperate Retching – Applies a disease that creates a damaging pool on the ground and drains 30 Sanity per second.
- Maddening Roar – Hits hard in a small area and causes a 120 Sanity drain.
- Summon Aqir Scarab – On death, she spawns multiple scarabs.
Step 2: Navigate the Valley
This area is packed with Aqir mobs. Many of them are optional, so avoid unnecessary fights to conserve Sanity. Be careful where you step, walking over corpses may summon extra scarabs.
In the middle of the path, you might run into an elite mob called the Aqir Mindhunter. This enemy can be skipped with stealth or smart movement, but if you pull it by mistake, here’s what to expect:
- Toxic Breath – Applies stacks of a poison debuff. At 5 stacks, you’ll be stunned for 3 seconds.
- Toxic Volley – Fires damaging bolts that drain 30 Sanity if you get hit.
Step 3: Defeat Rexxar
Once you make it through, you’ll find Rexxar waiting. Defeating him completes the Valley of Honor objective.

Horrific Vision Rexxar tactics
Once you reach the top of the hill in the Valley of Honor, you’ll face Rexxar, one of the toughest encounters in the entire Horrific Vision. Make sure to prepare before the fight:
- Save a Sanity Restoration Orb.
- Use personal cooldowns like Bloodlust.
- Optionally, trigger Gift of the Titans by standing on corpses before the fight.
Rexxar’s Abilities:
- Mind Trap – At the start of the fight, Rexxar summons several traps. Stepping into one causes shadow damage, stuns you for 4 seconds, and drains 120 Sanity. Watch your step!
- Stampeding Corruption – At 40% health, he summons a stream of minions that charge across the room. Getting hit will deal damage and drain 60 Sanity, so stay mobile and dodge them.
- Summon Ruffer, Huffer, Suffer, and C’Thuffer – As the fight progresses, Rexxar calls in boars named Ruffer, Huffer, Suffer, and C’Thuffer. These adds cast Void Quills, which deal shadow damage and drain 30 Sanity per hit. Take them down quickly to avoid getting overwhelmed.
Rexxar hits hard and can quickly spiral out of control if you don’t stay ahead of the mechanics. Time your cooldowns wisely, stay on the move, and deal with adds fast to survive this brutal encounter.
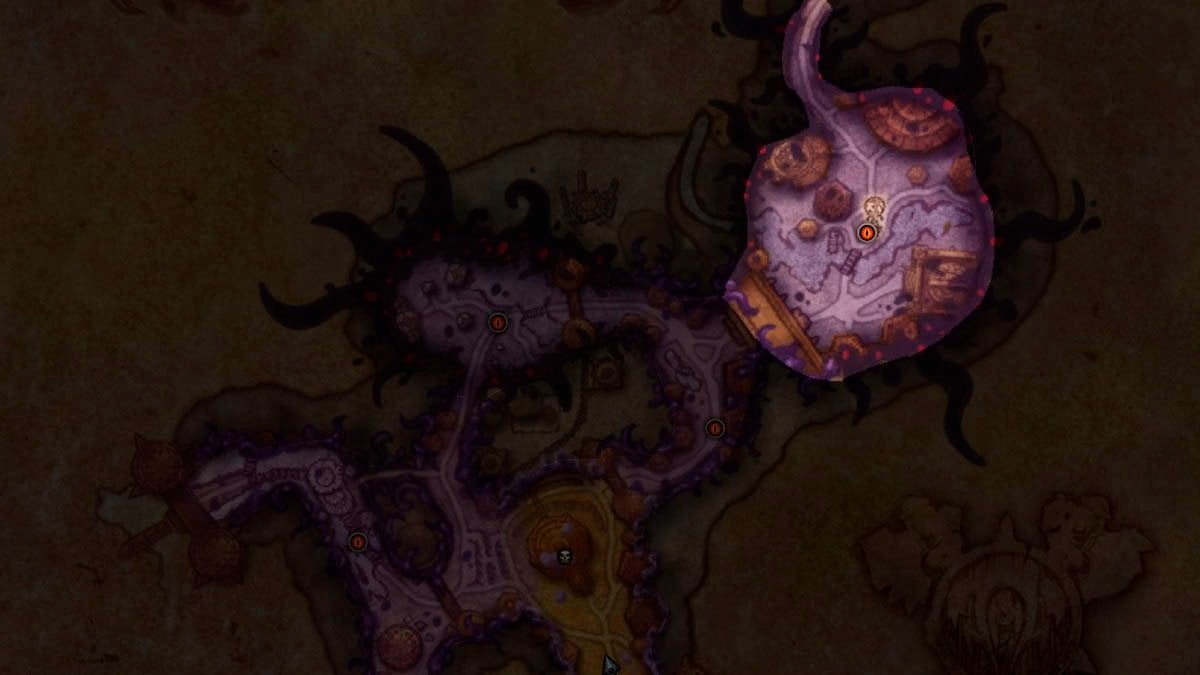
Valley of Spirits strategy
Sanity drain per second: 8
Madness affix: Madness: Entomophobia, Madness: Dark Delusions, or Madness: Scorched Feet
The Valley of Spirits is a Tier 2 area in the Horrific Vision of Orgrimmar and is often considered one of the easiest bonus zones.
Step 1: Defeat Decimator Shiq’voth
You’ll first encounter Zekhan right after heading up from the Valley of Strength. Help him clear the way by defeating the nearby enemies and taking down the mini-boss Decimator Shiq’voth. He uses:
- Surging Fist – Charges a player, knocks them back, and deals physical damage.
- Decimator – Launches a projectile that hits a player, then returns and deals more damage while draining 120 Sanity.
Defeating Shiq’voth removes the barrier and opens the path to the Valley of Spirits. At this point, you can either enter this area or head north past the Barber Shop toward the Valley of Wisdom.
Step 2: Defeat mini-boss Bwemba
Inside the Valley, you may come across Bwemba, a bonus mini-boss. Defeating him grants a 10% Haste and Movement Speed buff for the rest of your run. His abilities include:
- Hex – Instantly turns a player into a frog for 4 seconds.
- Twisted Lightning – A 3-second cast that chains lightning between players.
Step 3: Rescue the Captive Shamans
Your main task is to rescue four shamans who are trapped by corrupted totems. To free them:
- Defeat the enemies near each totem
- Click the totem once the area is clear
You’ll need to work your way through the zone and destroy all four corrupted totems to proceed.
Step 4: Defeat the Oblivion Elemental
Once all shamans are freed, the final boss Oblivion Elemental will appear at the end of the area. Be ready for:
- Despair – Waves slowly move across the area, dealing light damage and draining Sanity if you’re hit.
- Hopelessness – When the Oblivion Elemental reaches 80% and 40% health, it casts Hopelessness, silencing all players for up to 10 seconds. A golden orb will spawn nearby, running over it removes the silence early. You can either grab the orb while avoiding the Sanity-draining waves, or simply wait out the full 10 seconds. Letting the debuff expire won’t cause any damage or Sanity loss, so it’s safe to wait if needed.
Defeating the Oblivion Elemental completes the Valley of Spirits objective and earns you an extra chest at the end of your vision.
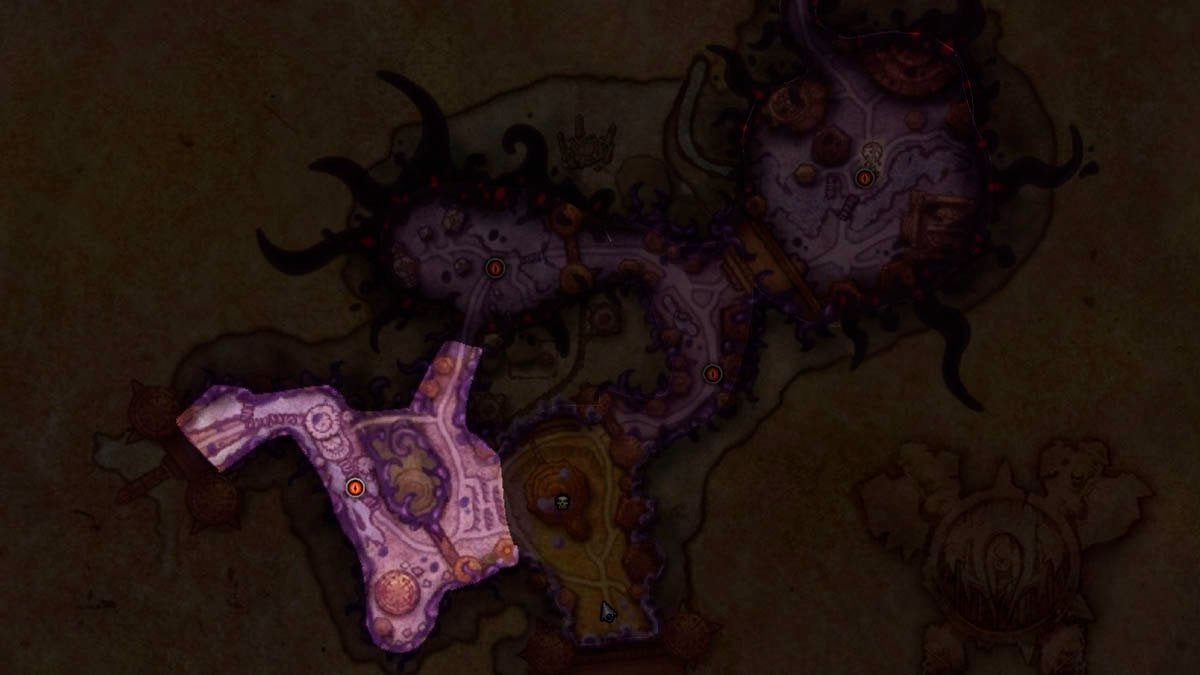
Valley of Wisdom strategy
Sanity drain per second: 12
Madness affix: Madness: Split Personality, Madness: Leaden Foot, or Madness: Haunting Shadows

The Valley of Wisdom has two main objectives: Fill a progress bar by killing enemies and defeat the boss, Vez’okk the Lightless.
Step 1: Fill the Progress Bar
To complete the first objective, simply defeat enemies in the area. You’ll need to kill almost everything, including two elite mobs, to hit 100%. Don’t worry about what to skip, just work your way through the Valley.
The two elites each grant 25% progress and are located as follows:
- Coagulated Horror – Found on the right side of the Valley, near the path leading to The Drag.
- Voidcrazed Hulk – Found on the left, near the inn entrance.
Coagulated Horror Abilities:
- Sanguine Residue – Launches blood pools that deal shadow damage and drain 30 Sanity per second. He heals for 100% of the damage dealt.
- Visceral Fluid – Frontal cone that deals heavy damage and drains 60 Sanity if hit.
Voidcrazed Hulk Abilities:
- Explosive Leap – Grabs and throws a player, instantly draining 40 Sanity, then leaps for extra damage and 60 more Sanity loss.
- Howling in Pain – Deals minor group-wide damage and interrupts casts.
Step 2: Defeat Vez’okk the Lightless
Once the bar reaches 100%, Vez’okk the Lightless will spawn and move toward the central crossroads of the Valley. This boss has much more health than the elites, so be ready with your cooldowns.
Vez’okk’s Abilities:
- Defiled Ground – A frontal attack that deals heavy damage, drains 60 Sanity, and stuns you for 3 seconds.
- Unleash Corruption – Spawns a damaging circle around Vez’okk. Standing in it drains 60 Sanity.
- Ring of Chaos – Summons multiple circles that shoot outward. Getting hit stuns you, deals shadow damage, and drains 60 Sanity.
Defeating Vez’okk completes the Valley of Wisdom and rewards you with an extra chest at the end of your run.
Horrific Vision Thrall tactics
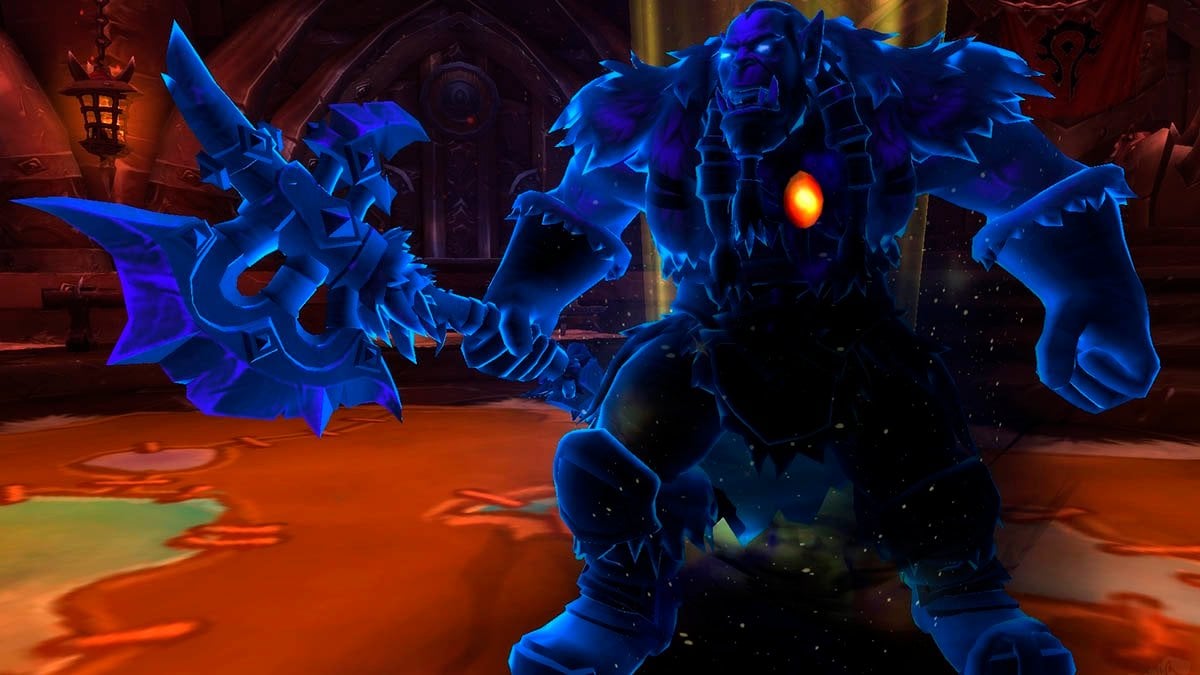
Now that all areas of Orgrimmar are cleared, you’re ready to face Thrall, the final boss of the Horrific Vision. Keep in mind: defeating Thrall will immediately end your run, so be sure you’ve finished all objectives, looted everything, and turned in your Odd Crystals before starting the fight. Once you’re ready, head into Grommash Hold and take him down to complete the vision.
To access Thrall, you must first defeat the two Voidbound Honor Guards at the entrance of Grommash Hold.
Core Abilities (Always Active)
| Ability | Effect | How to counter |
|---|---|---|
| Surging Darkness | Thrall jumps to the center of the room and sends out void waves. The attack either starts in the center and moves outward or starts at the edges and moves inward. | Watch where the first ring spawns and move to safety fast. Getting hit deals massive shadow damage and drains 60 Sanity. |
| Seismic Slam | A cone attack in front of Thrall that stuns for 2 seconds and drains 30 Sanity. | Stay out of his front and dodge when he casts. |
For each bonus objective area completed, Thrall:
- Gains 10% more health.
- Unlocks one additional ability.
This makes him significantly harder if you’ve cleared multiple areas, but also more rewarding.
Bonus Abilities (Based on Objectives Cleared)
| Ability | When active | Effect | How to counter |
|---|---|---|---|
| Cries of the Void | If you cleared The Drag | At 55% health, Thrall shields himself for 25% of his max HP. If the shield isn’t broken in 6 seconds, it explodes, dealing shadow damage and draining Sanity based on how much shield is left. | Save offensive cooldowns for this phase to break the shield quickly. |
| Void Boar | If you cleared the Valley of Honor | Thrall starts the fight with two Void Boars, similar to Rexxar’s. They cast Void Quills, which deal high shadow damage and drain 30 Sanity. | Focus and kill them immediately. They don’t respawn and are easy to burst down. |
| Defiled Ground | If you cleared the Valley of Wisdom | Replaces Seismic Slam. It hits in a frontal line, stuns for 3 seconds, drains 60 Sanity, and leaves behind a damaging void zone. | Dodge the initial hit and move away from the void patch it leaves. Try to bait it toward the edges of the room to keep the center clear. |
| Hopelessness | If you cleared the Valley of Spirits | At 80% and 40% health, Thrall casts this to silence all players for 10 seconds. A golden orb will spawn nearby: running over it removes the silence. | Be ready to move. If the orb lands in a dangerous spot, it’s safe to wait out the 10 seconds—you won’t lose Sanity for letting it expire. |
Horrific Visions of Orgrimmar tips and tricks
Here are some helpful tips to improve your Horrific Visions progression and make your runs smoother and more rewarding:
- Make your first run an intro run. For your very first attempt, go straight to Thrall and defeat him without exploring side zones. This gets you familiar with the layout and gives you Steeled Mind buff.
- Build progress gradually. On your second and third runs, aim to complete just one or two bonus zones before defeating Thrall. Doing this lets you stack the Steeled Mind buff, which significantly helps reduce Sanity drain in future runs.
- Avoid bringing Soridormi’s Construct. Soridormi’s Construct is bugged currently and counts as an extra player, which makes all enemies stronger and harder to defeat.
- Collect tributes in the event hub. These often contain helpful bonuses. Don’t skip them before starting your run.
- Always use the bad potion system. Check the bad potion color at the start of your run and avoid that color for the rest of the vision to prevent unnecessary Sanity loss.
- Take your time with Masks. Don’t activate all Masks right away. Make sure you’re comfortable with the full run before adding more difficulty.
- Familiarize yourself with each zone’s objectives, boss mechanics, and common mob locations. Knowing where to go saves time and Sanity.
- Enemies like Coagulated Horror, Voidcrazed Hulk, or Misha have abilities that can rapidly drain Sanity. Take them out first and avoid unnecessary AoE pulls near them.
- Keep moving to avoid Sanity drains. Many mechanics, like Surging Darkness or Cries of the Void, punish standing still. Stay mobile and avoid telegraphed attacks to preserve Sanity.
- Use Sanity Restoration Orbs wisely:
- Ideally during or right before difficult encounters like Rexxar, Thrall, or Vez’okk.
- Don’t waste Orbs on easy trash pulls.
- Use Orbs when your Sanity is critically low to maximize their benefit.
- Since the Orb limit is shared, communicate with your team to decide optimal placement and usage times.
- You can also resurrect allies who died from damage or Sanity loss by using an Orb near them.
- Be aware of bugs: If the special action button doesn’t appear, try disabling UI addons or relogging. This issue has been reported by players. Or use this macro:
#showtooltip sanity restoration orb
/cast Sanity Restoration Orb
Conclusion
That’s everything you need to know about the Horrific Visions of Orgrimmar. If you want to learn more about the event itself, check out our full Horrific Vision guide. And we have a Stormwind Horrific Vision guide also, so check it out too.
Hopefully, this guide will help you succeed, complete the event with top results, and collect all your mounts and achievements along the way. And if you ever need a hand, consider using our Horrific Vision boost for extra support.


Comments