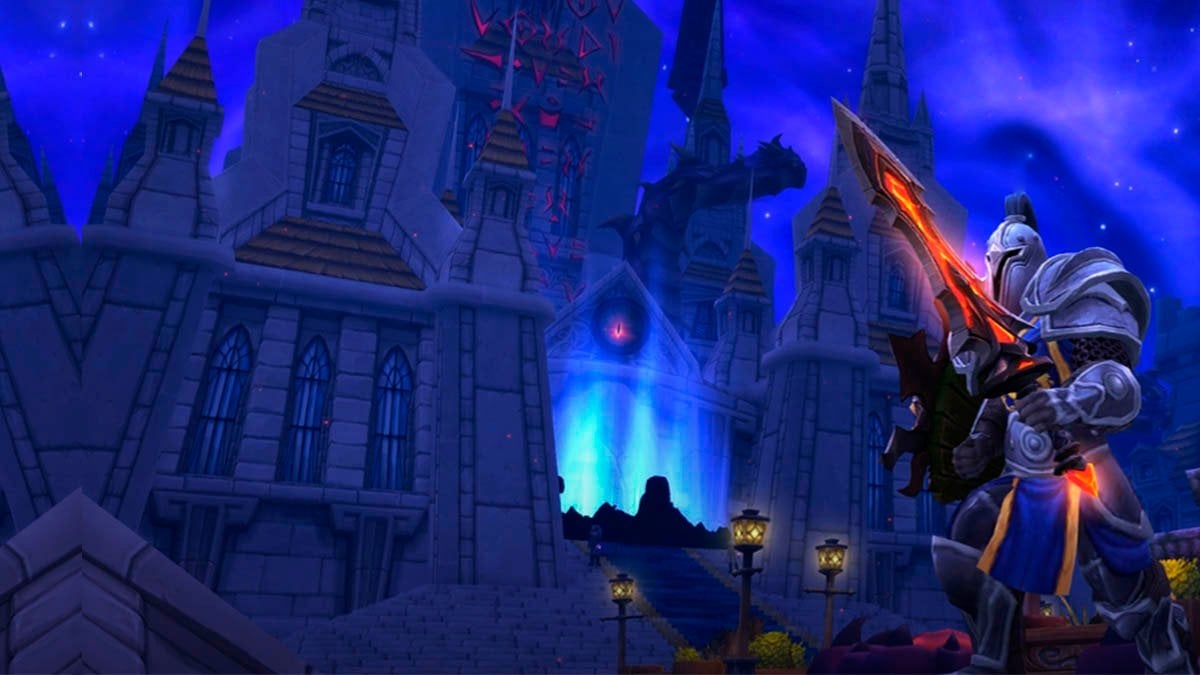
The War Within patch 11.1.7: Horrific Vision of Stormwind guide
Master the Horrific Vision of Stormwind in The War Within! Follow our full walkthrough guide to clear all zones, defeat Alleria, and earn max rewards.

Table of Contents
- How to start Horrific Visions of Stormwind
- Horrific Visions of Stormwind route
- Horrific Vision of Stormwind Potion color and location
- Horrific Vision of Stormwind Odd Crystals location
- Horrific Visions of Stormwind Mailbox location
- Horrific Visions of Stormwind walkthrough
- Horrific Visions of Stormwind tips and tricks
- Conclusion
Key takeaways:
- Start with a direct run to Alleria: This unlocks the Steeled Mind buff and helps you get familiar with the Stormwind layout without added pressure.
- Each bonus zone increases Alleria’s power: For every additional area completed, she gains more health and new mechanics, so plan your path and cooldown usage carefully.
- Identify and avoid the bad potion color: Drink one potion early to discover the harmful color and steer clear of it to prevent heavy Sanity loss.
- Collect Odd Crystals, mailboxes, and tributes before finishing: These hidden rewards won’t count if you end the run without turning them in or looting them.
- Use Sanity Orbs strategically: Save them for moments before tough encounters or when your Sanity is low—not just whenever they appear.
The Horrific Vision of Stormwind returns in The War Within, more dangerous than ever. Ready to take it on? Our complete guide covers everything—from zone strategies to boss tips—so you can master this corrupted version of Stormwind with confidence. Let’s dive in!
Related posts:


Be sure to check out the Horrific Vision of Orgrimmar guide once the weekly rotation switches over!
How to start Horrific Visions of Stormwind
To join the Horrific Visions event, make your way to the special staging area in Dornogal, where key NPCs and the gateway to the vision realm await your arrival.
Horrific Vision event hub location:
/way 34.0 68.6Note:
Horrific Visions alternate weekly, with Stormwind and Orgrimmar swapping each cycle. Make sure to check the event schedule over two weeks to catch both.
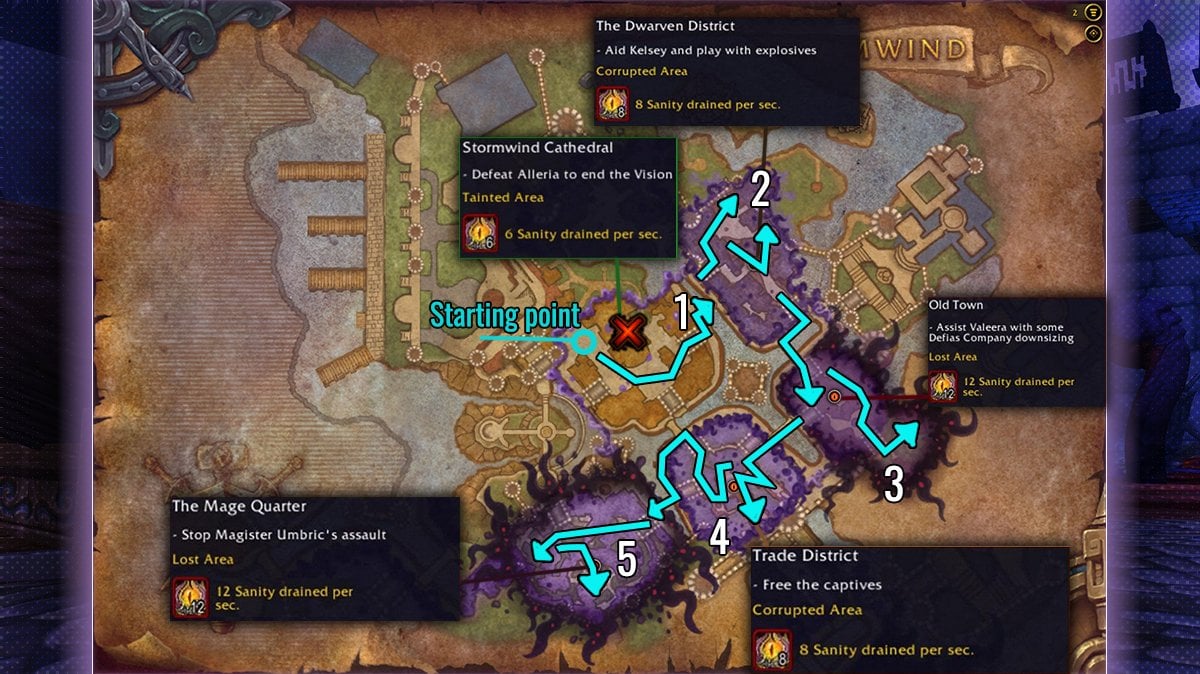
Horrific Visions of Stormwind route
To fully clear the Stormwind Horrific Vision, follow this route. It’s the fastest and most efficient way to tackle every threat and claim all available rewards.
Tip:
Completing the full route not only boosts your end-of-run rewards but also lets you collect Horrific Chests, which hold additional Displaced Corrupted Mementos.
The Horrific Vision of Stormwind route is straightforward and consists of the following five steps:
- Start in Cathedral Square and clear the opening area: Begin by clearing all enemies and elites near the Cathedral, but do not engage Alleria yet. Check the poisonous potion color early and make note of it to avoid Sanity loss later. Once you’re ready, head toward the Dwarven District.
- Complete the Dwarven District (Corrupted Zone): Rescue Kelsey Steelspark by defeating the three Brainwashed Gnomes outside the area. Then, plant 8 explosives while avoiding or defeating Forge-Guard Hurrul. Use the detonator in the southeast to spawn and defeat Therum Deepforge. Take the portal back to Cathedral Square.
- Clear Old Town (Lost Zone): Meet Valeera Sanguinar and acquire two keys by defeating Armsmaster Terenson and Alx’kov the Infested. Activate both monoliths to bypass Shaw’s security and defeat Overlord Mathias Shaw inside the SI:7 Headquarters. You’ll receive a bonus chest and a large Memento reward.
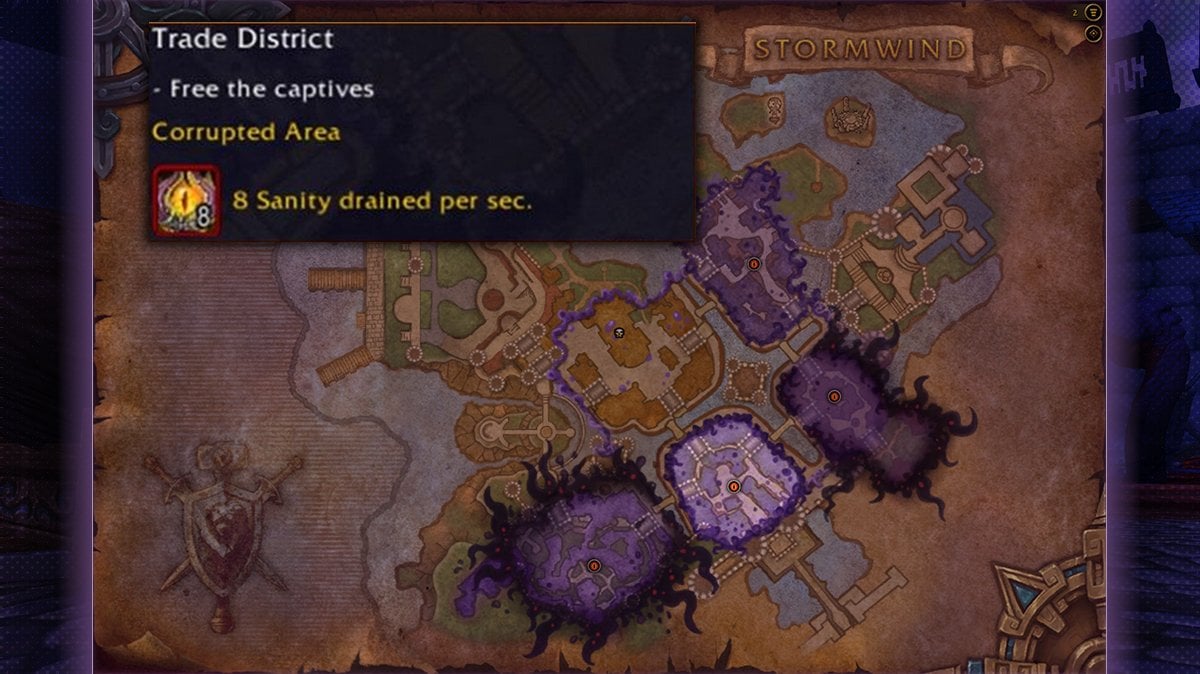
- Handle Trade District and Mage Quarter (Corrupted + Lost Zones): Head to the Trade District and defeat Inquisitor Darkspeak and Slavemaster Ul’rok, then rescue 8 captives to complete the objective.
Next, enter the Mage Quarter and close 5 Void Portals guarded by elite enemies. Defeat Magister Umbric in the Portal Room. Afterward, use the portal to return to Cathedral Square. - Face Alleria Windrunner to complete the Vision: Make sure you’ve collected all Odd Crystals, looted any Black Empire Chests, and turned in your crystals to Zarhaal. Once ready, enter the Cathedral and defeat Alleria Windrunner to complete your Horrific Vision run.
Note:
Defeating Alleria will immediately end your Horrific Vision run, but doing so right away will result in the lowest possible tier of rewards.
We’ll cover all the steps in detail—including events, elites, and boss tactics—in the Walkthrough section of this guide. But for now, here are a few more important things you need to know.
Horrific Vision of Stormwind Potion color and location
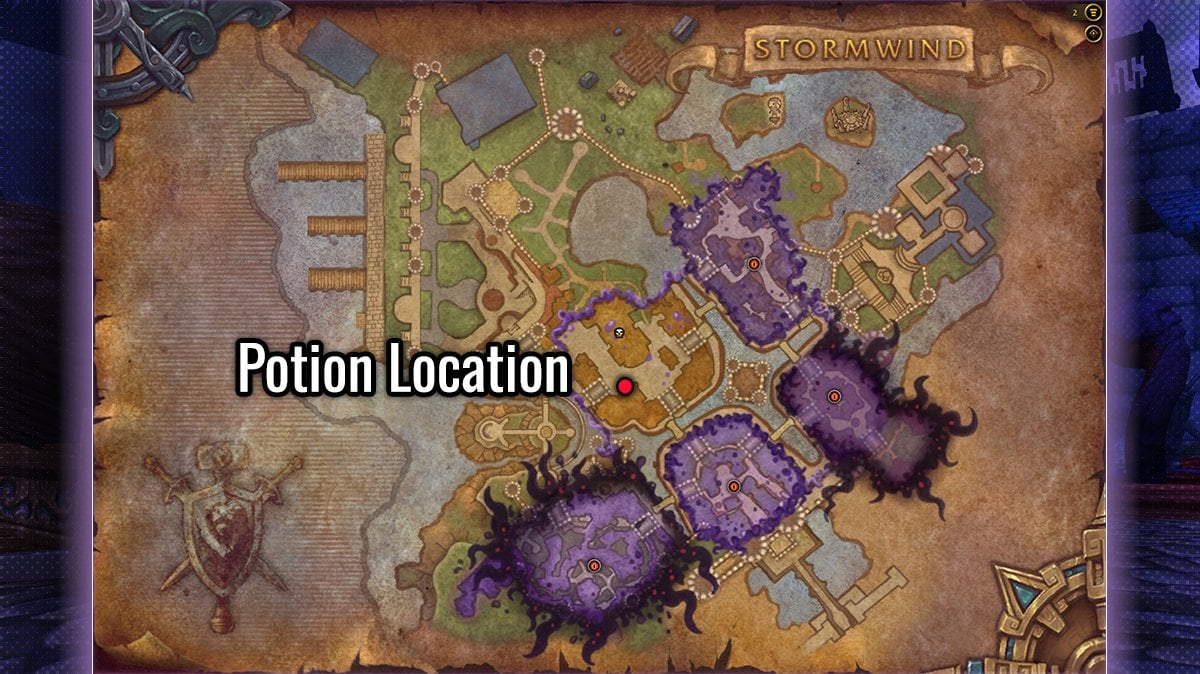
One of the first things you should do during your Horrific Vision run is clear to the front of the Cathedral and take out the two guards standing just outside. Doing this early unlocks the Cathedral entrance, saving you time and trouble later when you’re ready to face Alleria.
While you’re there, check the bad potion to identify the dangerous color for this run. You’ll find it next to the corpse of Morgan Pestle, just off the stairs leading up to the Cathedral. You can safely spot it from a distance—there’s no need to fight the enemy pack nearby.
Once you’ve identified the bad potion color, remember to avoid that color entirely for the rest of your run, as it will drain your Sanity. The other potion colors are safe, and one will even restore Sanity. Knowing which to drink can make a huge difference, so take a moment to get this intel early.
| If the Bad Potion is this color | Then this is +100 Sanity Potion color |
|---|---|
| Black | Green |
| Blue | Purple |
| Green | Red |
| Purple | Black |
| Red | Blue |
Stormwind Horrific Vision bad potion location:
/way 51.6 58.2Here are all 5 Horrific Vision potion effects and what they do:
- -100 Sanity
- +100 Sanity
- Spicy Potion — Frequently breath fire dealing damage to nearby enemies. On expiration or removal you will catch fire yourself for a short time.
- Sluggish Potion — Heals 2% of maximum health every 5 seconds. On expiration or removal it will slow movement speed for a short time.
- Sickening Potion — Take 5% less damage from all sources. On expiration or removal you will Vomit uncontrollably for a short time.
Horrific Vision of Stormwind Odd Crystals location
Here are all the Odd Crystal locations in the Stormwind Horrific Vision:
Odd Crystals are hidden collectibles found throughout each run of the Horrific Visions of Stormwind or Orgrimmar in World of Warcraft. Each vision contains a total of 10 Odd Crystals, with 2 crystals hidden in each zone. These crystals are more elusive than regular Black Empire Chests, but with knowledge of their spawn points, they become much easier to locate.
What are Odd Crystals
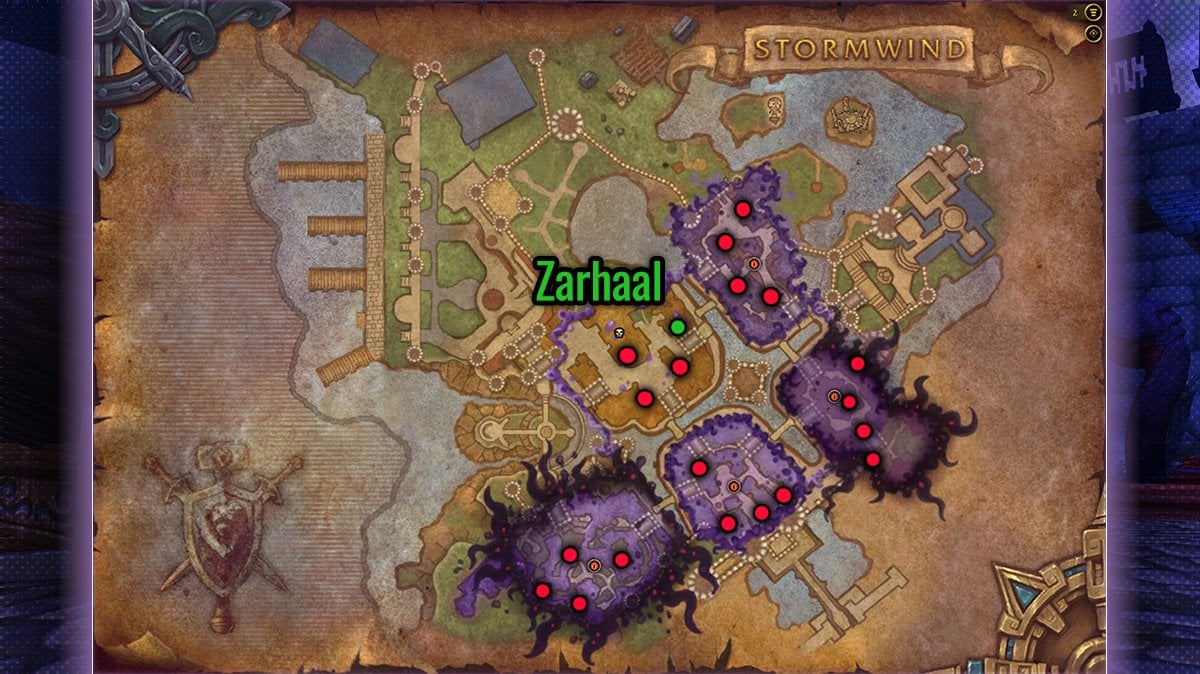
Odd Crystals do not appear in your inventory when collected, but the game tracks them in the background. Simply click on a crystal to collect it. At the end of your run, you must turn them in to Zarhaal—found in the Twisted Zone—to receive Corrupted Mementos, a valuable currency used for purchasing upgrades and items.
Turning in Odd Crystals
- Stormwind: Zarhaal is inside a side building at coordinates [57.3, 47.9].
Speak to Zarhaal to report the number of Odd Crystals you’ve found. He will then teleport away and leave a chest filled with Corrupted Mementos.
Note:
Make sure to collect your chest before the run ends—unturned Odd Crystals are lost, and unlooted chests yield no Mementos.
The more Odd Crystals you collect, the higher the value of each. Here’s the breakdown:
| Crystals Found | Corrupted Mementos |
|---|---|
| 1 | 20 |
| 2 | 45 |
| 3 | 75 |
| 4 | 110 |
| 5 | 150 |
| 6 | 195 |
| 7 | 245 |
| 8 | 300 |
| 9 | 360 |
| 10 | 425 |
Below is a complete table listing each Odd Crystal’s spawn location in the Horrific Vision of Stormwind, organized by area:
| Area | Coordinates | Description |
|---|---|---|
| Cathedral Square | 54.6, 59.4 | Behind boxes |
| Cathedral Square | 53.0, 51.9 | Hidden left of the Cathedral entrance |
| Cathedral Square | 58.4, 55.1 | On top of a hill |
| Dwarven District | 64.6, 30.9 | Corner behind boxes |
| Dwarven District | 62.7, 37.0 | Corner by the middle forge |
| Dwarven District | 63.4, 41.7 | Corner by chest spawn |
| Dwarven District | 67.3, 44.7 | Beside boss forge |
| Trade District | 69.0, 73.1 | Behind Inquisitor, left of stairs |
| Trade District | 62.0, 76.9 | Behind Mail Muncher mailbox |
| Trade District | 66.1, 75.7 | Behind destroyed cart |
| Trade District | 60.4, 68.8 | In corner in alleyway |
| Old Town | 75.6, 53.4 | Bar, upper level |
| Old Town | 75.6, 64.6 | Behind Mail Muncher mailbox |
| Old Town | 74.6, 59.2 | Middle area behind boxes |
| Old Town | 76.5, 68.5 | Behind stables by Shaw |
| Mage Quarter | 47.4, 81.6 | In transition house behind counter |
| Mage Quarter | 44.2, 87.9 | On upper walkway in corner |
| Mage Quarter | 47.7, 89.4 | On platform above upper walkway |
| Mage Quarter | 52.4, 83.4 | In transition house behind counter |
Horrific Visions of Stormwind Mailbox location
Here are all Horrific Visions of Stormwind mailbox locations:

Scattered throughout Stormwind in the Horrific Vision are interactable mailboxes. Most of the time, clicking on one will spawn a simple trash mob. However, there’s a small chance it will summon the rare enemy Mail Muncher. Defeat it and get the Mail Muncher mount, a unique and rare reward. So don’t skip those mailboxes during your run!
Horrific Vision of Stormwind Affixes
Madness Affixes are rotating negative effects that add unique challenges to each area in a Horrific Vision. Each affix alters combat in a different way—some are mild nuisances, while others can quickly spiral out of control if ignored.
If you are wondering which area is which, here is the list:
- Cathedral of Stormwind: Tainted area
- Dwarven District: Corrupted area
- Trade District: Corrupted area
- Old Town: Lost area
- The Mage Quarter: Lost area
| Madness Affix | Area Type | Description | How to Handle It |
|---|---|---|---|
| Desynchronized | Tainted | Abilities shift you between fast and slow time. Fast time speeds up buffs/debuffs and increases cast, attack, and movement speed. | Harmless overall—continue as normal. |
| Bloodthirsty | Tainted | Periodically damages nearby enemies and allies, healing you slightly for each target hit. | No major threat—ignore it during solo play. |
| Promised Power | Tainted | Spawns a zone of power. Stand in it for +25% damage; failing to do so reduces your damage by 10%. | Try to stay in the zone if safe, but don’t overcommit. |
| Entomophobia | Corrupted | While in combat, you gain bug stacks. At 5, you’re forced to run forward for 5 seconds. Jumping removes stacks. | Jump regularly during combat to stay in control. |
| Dark Delusions | Corrupted | Summons a shadowy clone that chases you. If it touches you, it stuns and deals shadow damage. | Keep moving and kite it until it disappears. |
| Scorched Feet | Corrupted | Random fire pools appear under you and launch you away if stepped on. | Pause movement during the effect or use the launch for mobility when safe. |
| Split Personality | Lost | Creates a ring of mirror images around you; only one safe gap exists. Touching an image disorients you. | Look for the gap quickly and sidestep through it. |
| Leaden Foot | Lost | Moving in combat slows you over time. Staying still restores movement speed. | Pause frequently to reset your speed. |
| Haunting Shadows | Lost | Spawns a shadow image at your location. After 4 seconds, it explodes, fearing players nearby. | Move out of your current spot immediately when you see the cast begin. |

Horrific Visions of Stormwind walkthrough
Let’s dive into the Stormwind Horrific Vision walkthrough. Here, you’ll find everything you need: key trash mobs, boss fights, main objectives, useful buffs, dangerous debuffs, and more.
Stormwind Cathedral
Sanity drain per second: 6
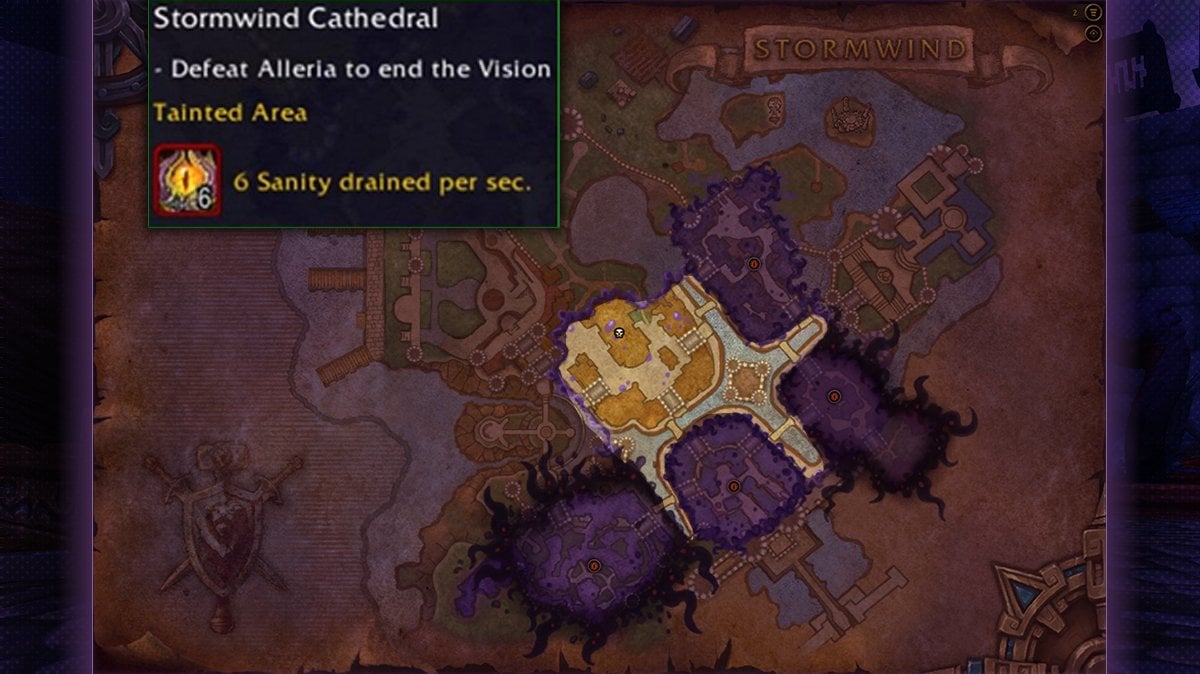
Step 1: Defeat two mini-bosses
Head to the front of the Cathedral and defeat the two elite guards standing just outside. This unlocks the Cathedral doors so you can easily access it later without delay.
Step 2: Check the bad potion
After that, make sure to check the bad potion color, as mentioned earlier. This will help you avoid Sanity-draining potions.
Step 3: Leave
Before going inside, make sure you’ve completed all desired bonus zones, looted any chests, turned in Odd Crystals, and used any buffs available in the open world. Defeating Alleria will end your run immediately, so only enter when you’re fully ready.
Dwarven District strategy
Sanity drain per second: 8
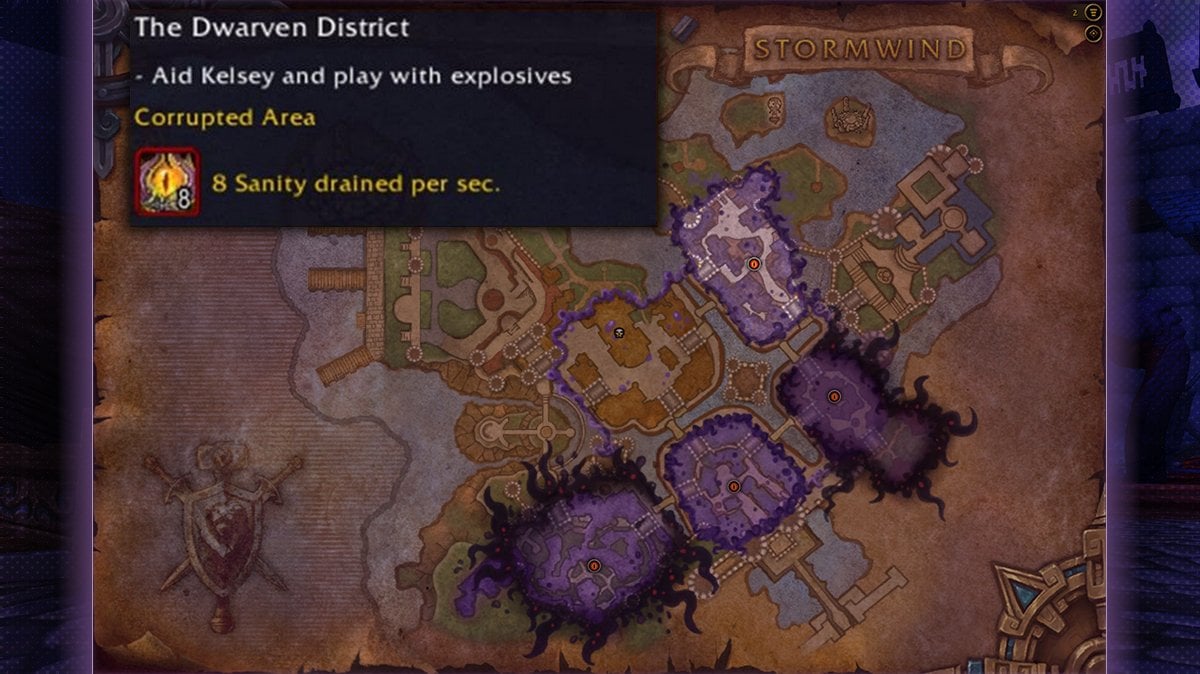
Tip:
Before doing further steps, we recommend you to get one buff. Just inside the entrance on the left, there’s a small building that sometimes hides a valuable 10% damage buff. If the door is open, carefully weave through the teleportation mines, head upstairs, and grab the buff. Then proceed with the main objective: rescue Kelsey, plant bombs, and take down Therum Deepforge.
Step 1: Defeat Annihilator Lak’hal
Before fully entering the Dwarven District, begin by rescuing Kelsey Steelspark from 3 Brainwashed Gnomes. This initial task is located just outside the Corrupted Zone, between Cathedral Square and the Dwarven District.
Each gnome is guarded, so clear surrounding enemies carefully. Once all three are defeated, Kelsey is freed and will assist with the next phase.
Step 2: Rescue survivors and explore shops
Now inside the Dwarven District, your objective is to plant 8 explosives at designated points marked on your map. You can choose your own route through the area.
While planting the bombs, watch out for Forge-Guard Hurrul, an elite enemy near the central Blacksmith area. Though defeating him is not mandatory, he stands near one of the explosive sites, so be prepared for combat or stealth tactics.
Step 3: Detonate the Explosives
Once all 8 bombs are planted, proceed to the southeast path of the district. There you’ll find a detonator. Interact with it to trigger the explosions and spawn the final boss of this zone.
Step 4: Defeat Therum Deepforge
Therum Deepforge is the final boss of the Dwarven District. Defeating him is required to complete this area and will reward you with a bonus chest at the end of your Horrific Vision run.
After Therum is defeated, a portal to Cathedral Square will appear nearby, allowing for quick transit back to the central zone.
Old Town strategy
Sanity drain per second: 12
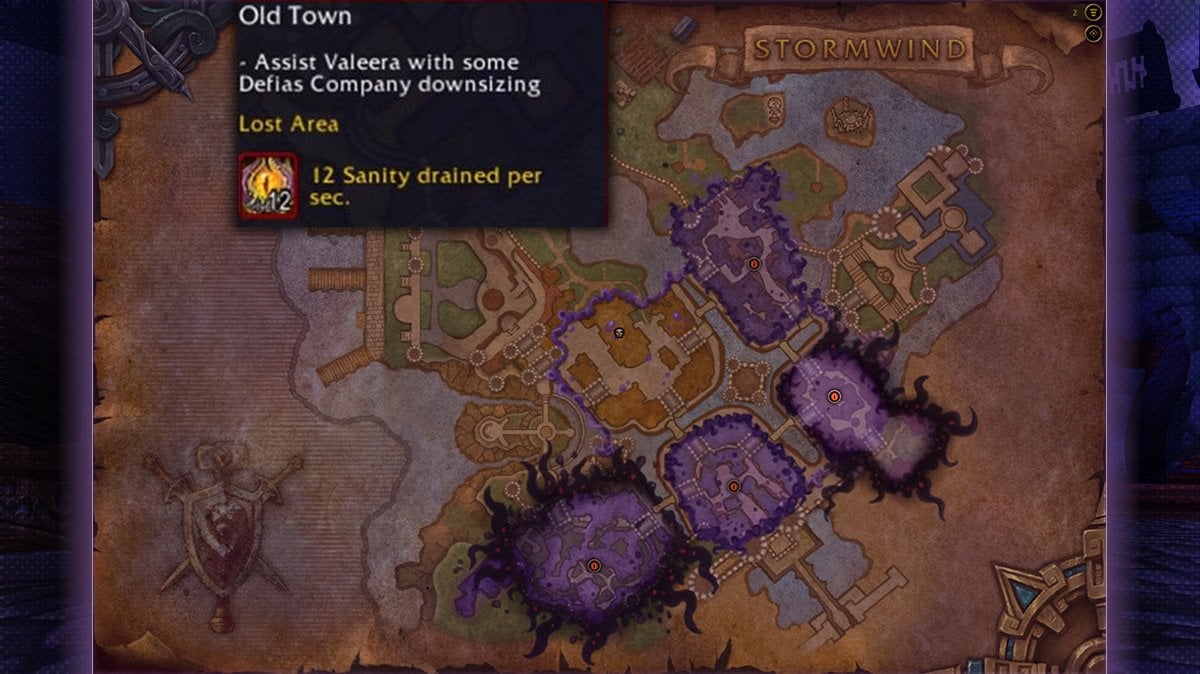
Step 1: Rendezvous with Valeera
As soon as you enter Old Town, you’ll meet Valeera Sanguinar. She’ll accompany you throughout this zone. Your first task is to obtain two keys to access the SI:7 Headquarters.
Step 2: Obtain Terenson’s and Alx’kov’s Keys
Your targets are:
- Armsmaster Terenson: Found early in the zone and heavily guarded. Defeat him to retrieve the first key.
- Alx’kov the Infested: Located farther down the path near the SI:7 entrance. Be careful—he applies a poison that reduces casting speed, and nearby enemies are often in stealth.
Defeat both elites to acquire the keys needed to proceed.
Step 3: Bypass Shaw’s Security
With both keys in hand, approach the locked gates to the SI:7 Headquarters. You’ll need to activate two monoliths simultaneously to disable the security barrier.
- If playing solo, Valeera will handle one monolith.
- If in a group, coordinate with your team to activate both at the same time.
Ensure Valeera isn’t distracted by combat, or she won’t assist properly.
Step 4: Defeat Overlord Mathias Shaw
Defeat Shaw to complete the Old Town objective. This unlocks a bonus chest at the end of your Horrific Vision and grants 300 Corrupted Mementos.
Horrific Vision Mathias Shaw Tactics

Tip:
Mathias Shaw may not hit the hardest, but he can drain your Sanity rapidly through the Eye of Chaos mechanic—making the fight all about precise positioning and timing.
Deep within the SI:7 Headquarters in Old Town, you’ll face Overlord Mathias Shaw, a stealthy and chaotic boss encounter. Come prepared, as the fight ramps up quickly and punishes poor positioning:
- Use a Sanity Restoration Orb before or during the fight if your bar is low.
- Keep cooldowns ready for burst phases and chaos management.
- Watch for hidden mechanics—stealth and surprise are Shaw’s specialties.
Shaw’s Abilities:
- Eye of Chaos – From the start, Shaw summons an Eye of Chaos that leaps around the room and casts Dark Gaze. If you’re looking at the Eye during the cast, you’ll take shadow damage and lose 20 Sanity every 2 seconds. Look away when it casts.
- Summon Additional Eyes – As the fight continues, Shaw spawns more Eyes of Chaos, increasing the room’s danger. Prioritize avoiding their gaze to conserve your Sanity.
- Shadow Ambush – Occasionally, Shaw vanishes into stealth, then launches shadowy attacks from the darkness. Dodge the shadow swirls that appear during this phase—getting hit drains Sanity and can quickly overwhelm you if you’re not alert.
This fight is about not losing Sanity. Stay mobile, manage your line of sight, and react quickly to survive Shaw’s deadly tricks and complete the Old Town objective.
Trade District strategy
Sanity drain per second: 8
Tip:
As you clear the Trade District, go left upon entering. Most enemies here need to be dealt with for the objective to complete. Keep an eye on the Stormwind Bank—if it’s open, pop inside and defeat the Neglected Guild Bank for a 10% crit buff.
Step 1: Defeat Inquisitor Darkspeak
As you enter the Trade District, your first objective is to defeat Inquisitor Darkspeak, who is holding Halford Wyrmbane captive. Head to the location marked on your map and engage the Inquisitor.
Watch for his shadow-based abilities, which can drain Sanity quickly if not dodged. Freeing Wyrmbane advances the objective and sets the stage for the zone’s boss.
Step 2: Defeat Slavemaster Ul’rok
With Darkspeak defeated, your next target is Slavemaster Ul’rok, the boss of the Trade District. He’s stationed near the main entrance of Stormwind.
Ul’rok is heavily guarded and uses crowd-control abilities to slow your progress. Clear out surrounding enemies before pulling him to avoid being overwhelmed. Defeating him unlocks the final objective.
Step 3: Rescue 8 Captives
Once Ul’rok is down, 8 captives will appear in cages throughout the district. Their locations are marked on your minimap.
Make your way through the streets, avoiding or defeating any remaining enemies, and interact with each cage to release the prisoners. After all 8 are freed, the Trade District objective is complete, and you’ll earn a bonus chest at the end of your Horrific Vision run.
The Mage Quarter strategy
Sanity drain per second: 12
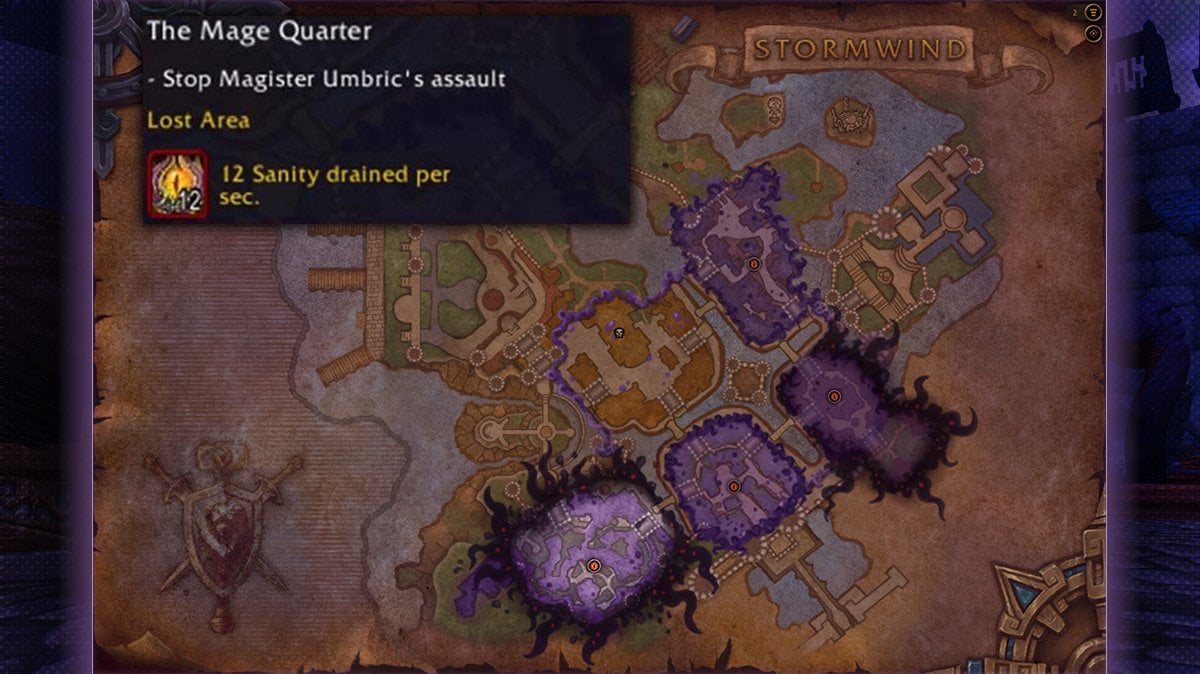
Step 1: Close 5 Void Portals
Your first objective in the Mage Quarter is to close 5 Void Portals scattered throughout the area. Each portal is guarded by enemies, including:
- 4 Portal Keepers positioned near the portals.
- Zardeth of the Black Claw, an elite guarding the westernmost portal.
- A Boundless Corruption, a patrolling elite near the Mage Tower.
All portal locations are marked on your minimap, and you may close them in any order. Be aware that Zardeth will continuously summon adds throughout the area until you confront him, making navigation increasingly dangerous the longer he remains alive.
Step 2: Defeat Magister Umbric
After all 5 portals are closed, proceed to the Mage Tower and enter the Stormwind Portal Room.
Inside, you will face Magister Umbric, the final boss of the Mage Quarter. Expect high-damage void magic and area-denial abilities. Positioning and timing are critical to surviving this fight, especially under heavy Sanity pressure.
Defeating Umbric completes the Mage Quarter objective and rewards you with a bonus chest in the reward room at the end of your Horrific Vision run.
Step 3: Return to Cathedral Square
After defeating Magister Umbric, a portal will appear near the entrance to the portal room. Use it to return safely to Cathedral Square, where you can continue your run or end it and collect your rewards.
Final Boss: Alleria Windrunner tactics

Defeating Alleria Windrunner is the final step of your run in the Horrific Vision of Stormwind. Engaging her will immediately end your run, so make sure you’ve completed all side objectives, looted chests, and turned in your Odd Crystals before starting the fight.
Alleria awaits inside the Cathedral. As you approach, a roleplay event unfolds between her and Turalyon. Once inside, more roleplay occurs which allows you to repositions yourself comfortably. After that, you can begin the encounter with Alleria.
Core mechanics (Always active)
| Ability | Effect | How to Counter |
|---|---|---|
| Darkened Sky | Fires a shadow arrow above a player’s location. It explodes after a short delay, showering the area in shadow damage. | Move out of the marked area quickly to avoid damage and Sanity loss. |
| Void Eruption | Massive shadow AoE that hits all players in line of sight, draining 240 Sanity. | Break line of sight (e.g., behind pillars) before the cast completes. |
| Eye of Chaos | Summoned at the start. Casts Dark Gaze, dealing shadow damage and draining 20 Sanity every 2 seconds if you’re looking at it. | Turn away from the Eye when it casts. |
Bonus abilities (Fallen Servants)
For each bonus zone you’ve cleared (Dwarven District, Trade District, Mage Quarter, Old Town), Alleria gains +10% health and one additional ability by summoning a Fallen Servant. These mechanics significantly raise the difficulty, so prepare accordingly.
| Ability | When Active | Effect | How to Counter |
|---|---|---|---|
| Tainted Polymorph | If you cleared Mage Quarter | Turns a random player into a Void Sheep for 4 seconds. You can’t attack or act. | Spread out and interrupt/stun nearby adds to reduce pressure while disabled. |
| Explosive Ordnance | If you cleared Dwarven District | Bombs land near random players and explode after 5s, dealing fire damage, draining 90 Sanity, and leaving fire zones. | Move away from bombs and avoid lingering in fire pools. |
| Chains of Servitude | If you cleared Trade District | At 66% and 33% health, Alleria silences and pulls all players toward her. If pulled to melee range, you’re stunned and lose 200 Sanity. | Run away quickly; use movement abilities to escape the pull. |
| Fallen Servant: Shaw | If you cleared Old Town | Overlord Shaw joins the fight briefly and attacks from stealth. | Stay alert for his ambush; use AoE to reveal and burst him down fast. |
Strategy tips
- Line of sight is critical for surviving Void Eruption.
- Positioning is key—leave room to maneuver around the Eye of Chaos and avoid bombs.
- Save cooldowns for when Chains of Servitude or other bonus mechanics occur.
- If running solo, consider skipping 1-2 bonus zones to reduce the number of mechanics.
- Be ready for rapid target switching and burst phases when Fallen Servants appear.
Defeating Alleria Windrunner completes the Horrific Vision of Stormwind and unlocks your reward chests.
Horrific Visions of Stormwind tips and tricks
Tip:
Take full advantage of your Horrific Vision talent tree. One of the most valuable upgrades is the Sanity Restoration Orb, which not only restores your own Sanity but also revives and replenishes the Sanity of your group members.
Here are some helpful tips to improve your Horrific Visions progression and make your runs smoother and more rewarding:
- Make your first run an intro run. For your very first attempt, go straight to Alleria and defeat her without exploring side zones. This gets you familiar with the layout and gives you Steeled Mind buff.
- Build progress gradually. On your second and third runs, aim to complete just one or two bonus zones before defeating Alleria. Doing this lets you stack the Steeled Mind buff, which significantly helps reduce Sanity drain in future runs.
- Avoid bringing Soridormi’s Construct. Soridormi’s Construct is bugged currently and counts as an extra player, which makes all enemies stronger and harder to defeat.
- Collect tributes in the event hub. These often contain helpful bonuses. Don’t skip them before starting your run.
- Always use the bad potion system. Check the bad potion color at the start of your run and avoid that color for the rest of the vision to prevent unnecessary Sanity loss.
- Take your time with Masks. Don’t activate all Masks right away. Make sure you’re comfortable with the full run before adding more difficulty.
- Familiarize yourself with each zone’s objectives, boss mechanics, and common mob locations. Knowing where to go saves time and Sanity.
- Keep moving to avoid Sanity drains. Many mechanics, like Surging Darkness or Cries of the Void, punish standing still. Stay mobile and avoid telegraphed attacks to preserve Sanity.
Conclusion
That’s everything you need to know about the Horrific Visions of Stormwind. If you want to learn more about the event itself, check out our full Horrific Vision guide.
Hopefully, this guide will help you succeed, complete the event with top results, and collect all your mounts and achievements along the way. And if you ever need a hand, consider using our Horrific Vision boost for extra support.
Enjoy your Horrific Visions Stormwind raids, and have a great weekend!


Comments