WoW SoD Phase 8 Scarlet Enclave raid boss guide
Here’s your ultimate Scarlet Enclave boss guide for WoW Season of Discovery Phase 8. Get all the tactics and strategies you need to take down every boss from Balnazzar and Beatrix to Caldoran.

Table of Contents
- Scarlet Enclave raid preparations
- Scarlet Enclave raid entrance
- Scarlet Enclave raid map
- Scarlet Enclave raid boss guides
- Scarlet Enclave boss loot
- Final words
Key takeways:
- The Scarlet Enclave raid features 8 bosses with unique mechanics and is designed exclusively for Season of Discovery.
- Before the raid, be sure to pick up the weekly quests from the New Avalon Blacksmith, install DBM, and buy a bunch of Greater Holy Protection Potions, Greater Fire Protection Potions, and other fire resistance items.
- Gather 30–40 players for the raid, as it’s very hard to progress with only 20 people without 3.5-tier sets.
- Check out the detailed boss guides for the Scarlet Enclave raid listed below.
The Scarlet Enclave raid is finally live, and SoD fans couldn’t be more excited. This is the first raid made just for the Season of Discovery in WoW Classic, marking a big step for the game. It wraps up the long-running Scarlet Crusade storyline and introduces players to the brand-new city of Avalon, offering intense battles within its walls.
The raid supports groups of 20 to 40 players and features a single difficulty mode. Inside, you’ll face 8 challenging bosses, each with unique mechanics, lore, and rewards. In this guide, we’ll walk you through everything you need to know to defeat the Scarlet Enclave bosses and get ready for every fight.
Related posts:


Note:
Another reward for players who defeated Balnazzar is a Level 85 Character Boost, which was revealed as part of the Mists of Pandaria Classic launch announcement.
Scarlet Enclave raid preparations
You can enter the raid without any attunement, but we strongly recommend doing a few quests beforehand and gather some protectives.
Tier-3.5 set quests
- Pick up the Scarlet Activities quest and follow the chain until you unlock the ability to craft Scarlet Disguises. Scarlet Activities quest coordinates:
/way 81.6 57.8- Collect 4 pieces of Scarlet Disguise and a Scarlet Insignia to explore New Avalon without triggering combat. Learn more with our Scarlet Insignia attunement guide.
- Speak with Bryon Steelblade Blacksmith in New Avalon.
- Complete his weekly quest (Prove Your Worth: Belt or Prove Your Worth: Gloves) to earn a chance at a tier-3.5 set token each week.
Of course, you need proper gear to participate in the Scarlet Enclave raid. Check our WoW SoD Phase 8 gearing catch-up guide to learn how to gear up.
DBM for Scarlet Enclave
DBM is a must-have addon for serious raiders in WoW. With it, you will dramatically improve your raiding performance. It provides the most important announcements during fights for you and your raid members, helps track boss cooldowns, and much more. You can find DBM and other useful addons in our 10 Must-Have SoD Addons guide. Or simply click the button below to download DBM directly.
Scarlet Enclave defensives
This raid features significant Fire damage, as nearly all bosses (including Solistrasza, Alexei, Mason, Council, Lillian Voss, and Caldoran) utilize Fire-based attacks. Be prepared to them by following these recommendations:
- Assign one Paladin specifically to maintain Fire Resistance aura throughout the raid.
- Make sure you have Mark of the Wild and a Fire Resistance Totem.
- Encourage one or two raid members to equip and use a Duke’s Domain trinket.
- Stock up on Greater Fire Protection Potion for yourself and your raid. At the very least, use a Fire Protection Potion as a cheaper option.
- Get Juju Ember from Witch Doctor Mau’ari.
Holy damage is also very common, so stock up on Greater Holy Protection Potions.
Scarlet Enclave raid entrance
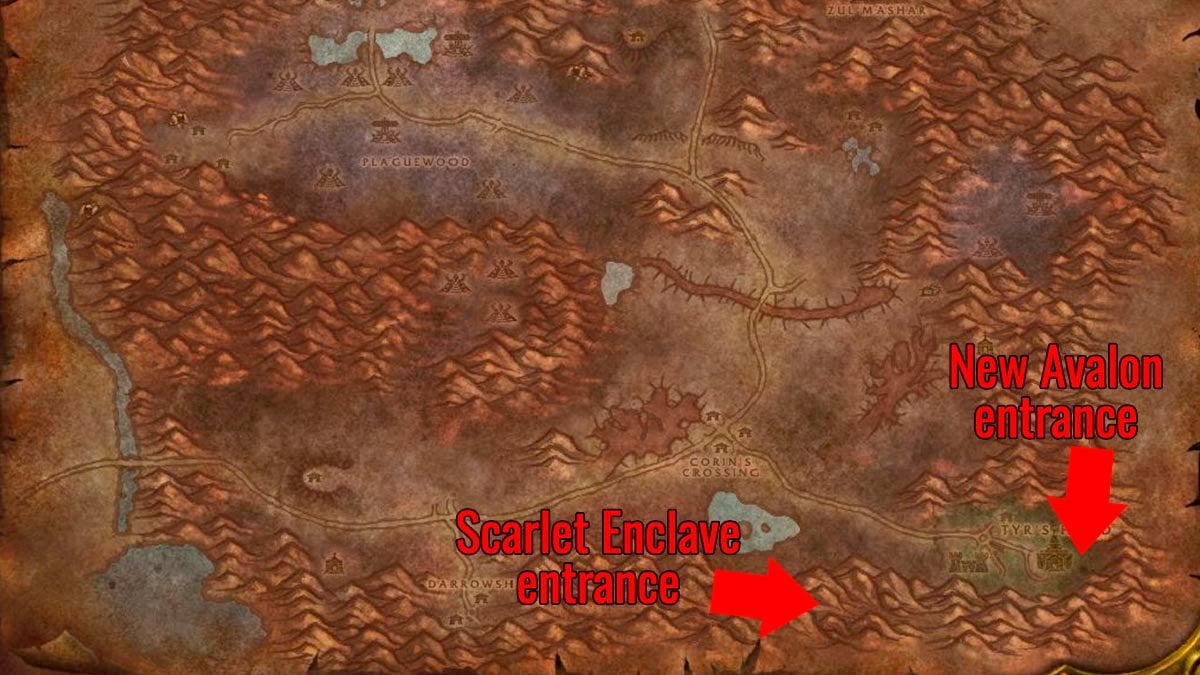
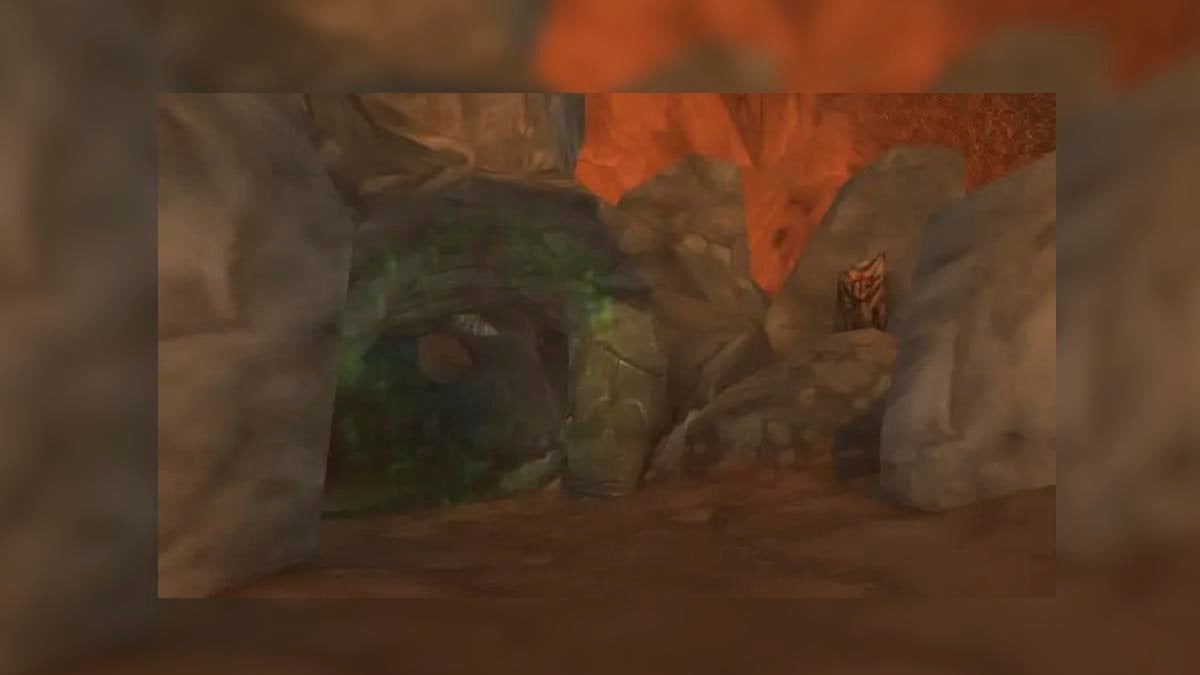
You’ll find the Scarlet Enclave entrance in the southern mountains of Eastern Plaguelands. Head to the Scarlet camp located east of Lake Mereldar. From there, follow the path south into the mountains. You’ll spot the meeting stone, with the raid entrance just behind it.
Scarlet Enclave entrance location:
/way 67.0 85.0
Scarlet Enclave raid map
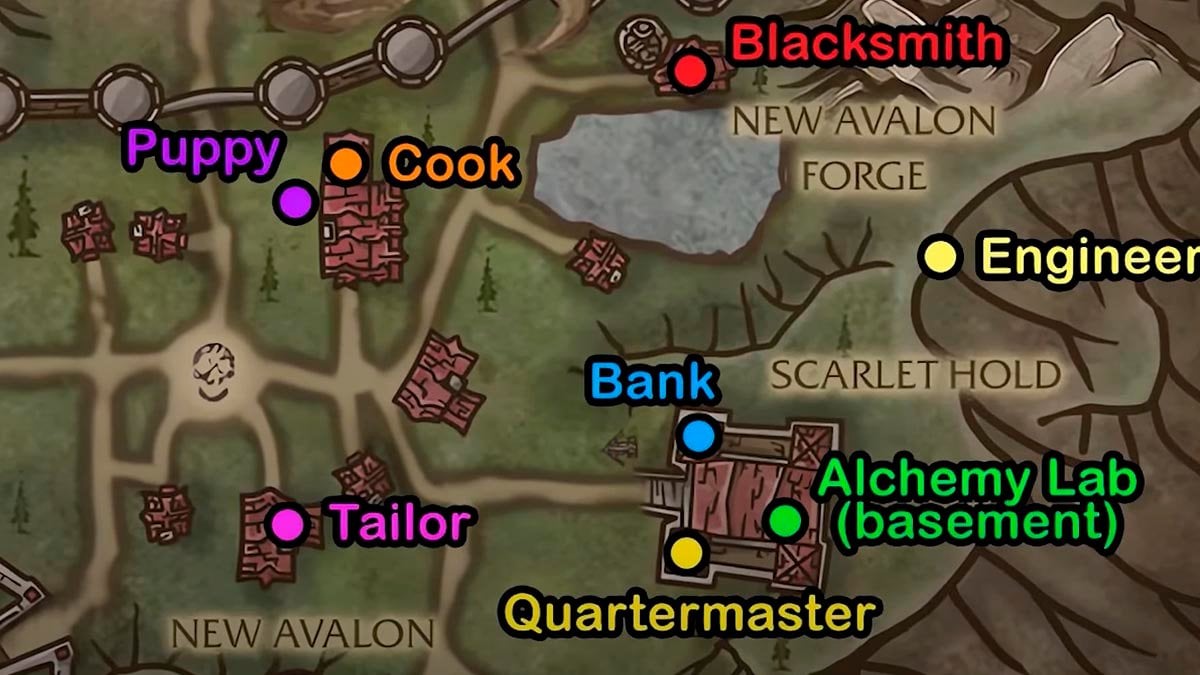
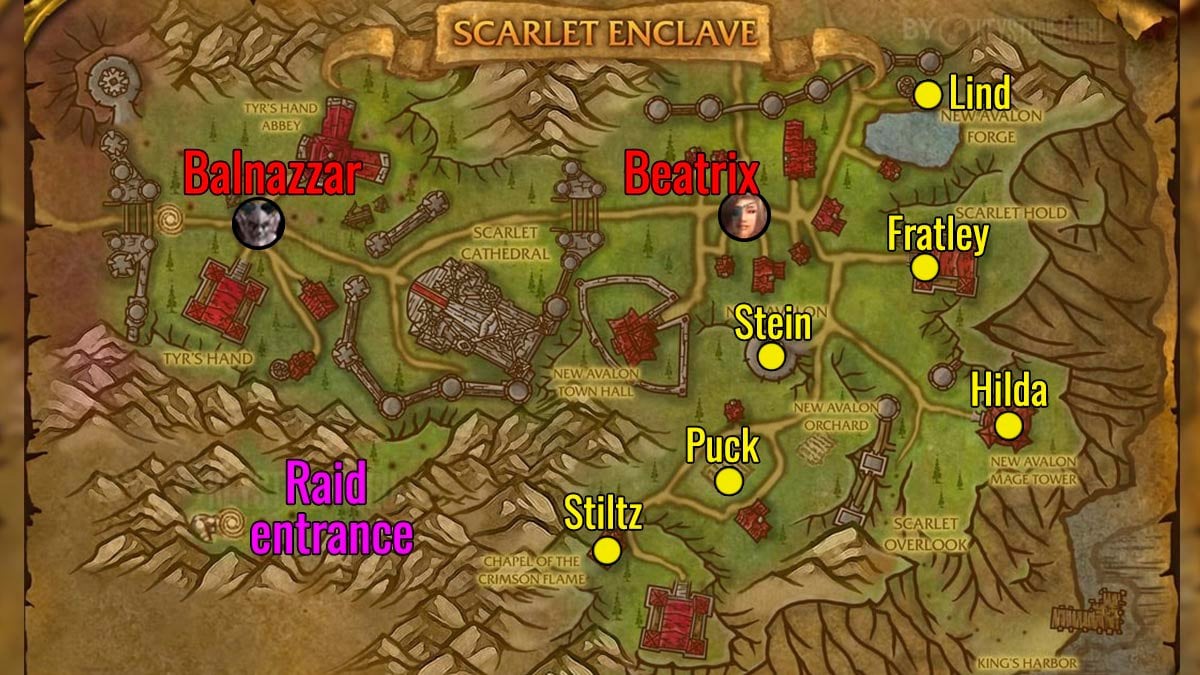
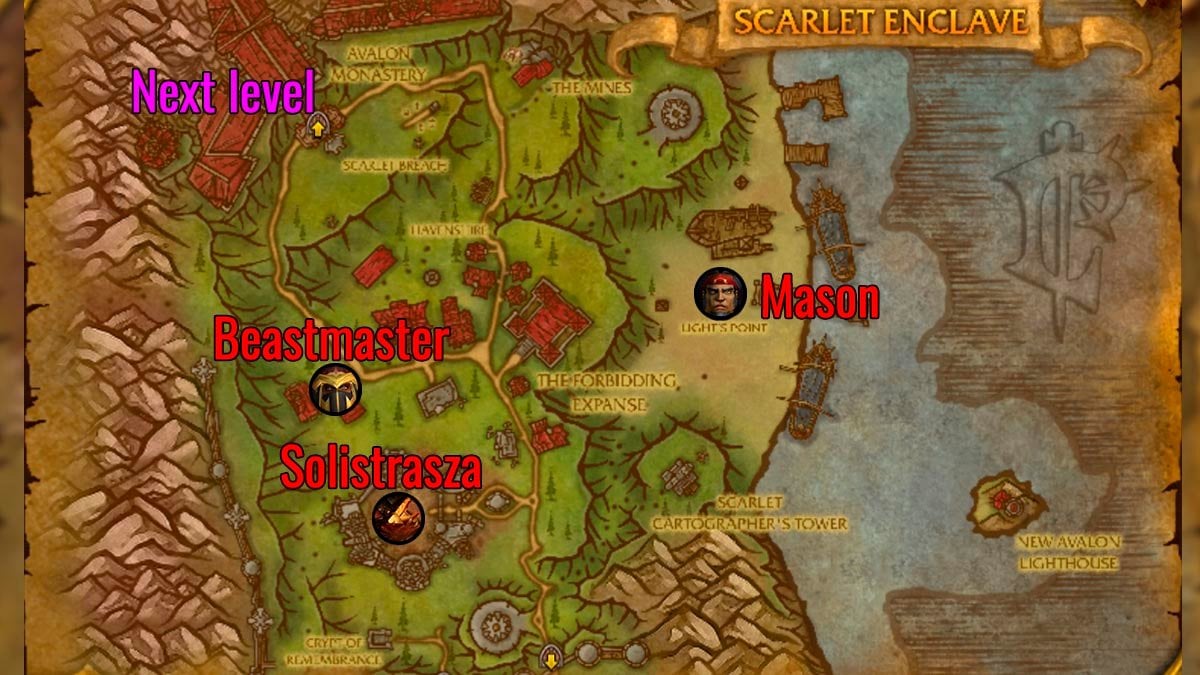
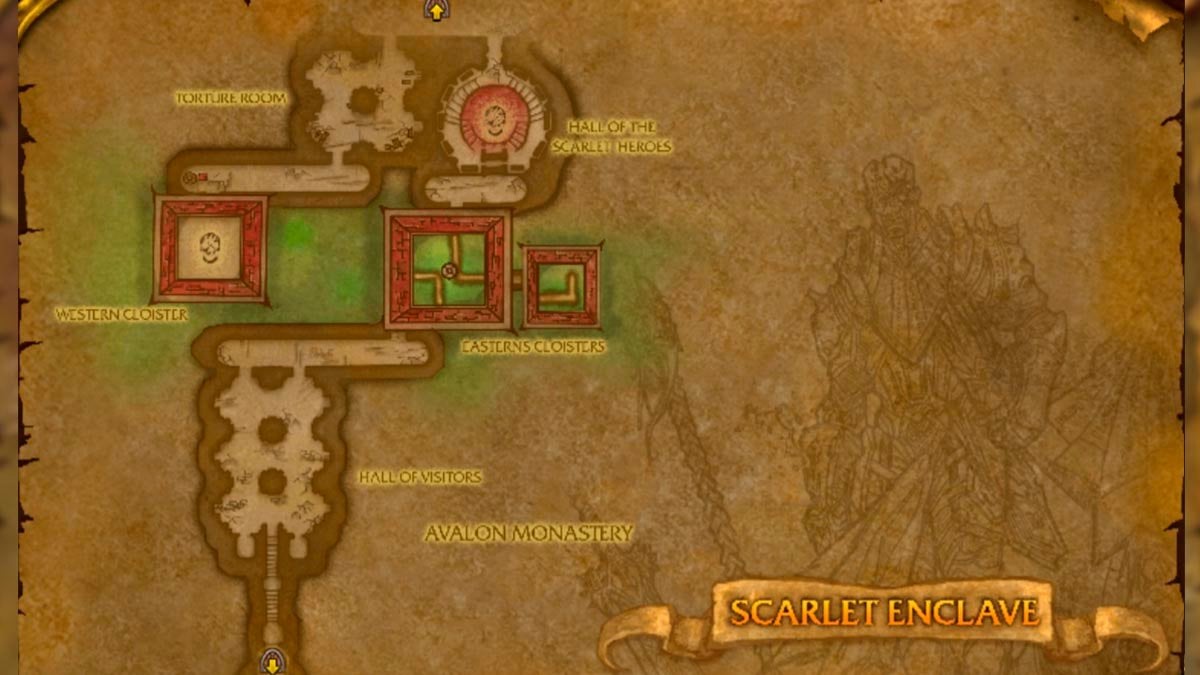
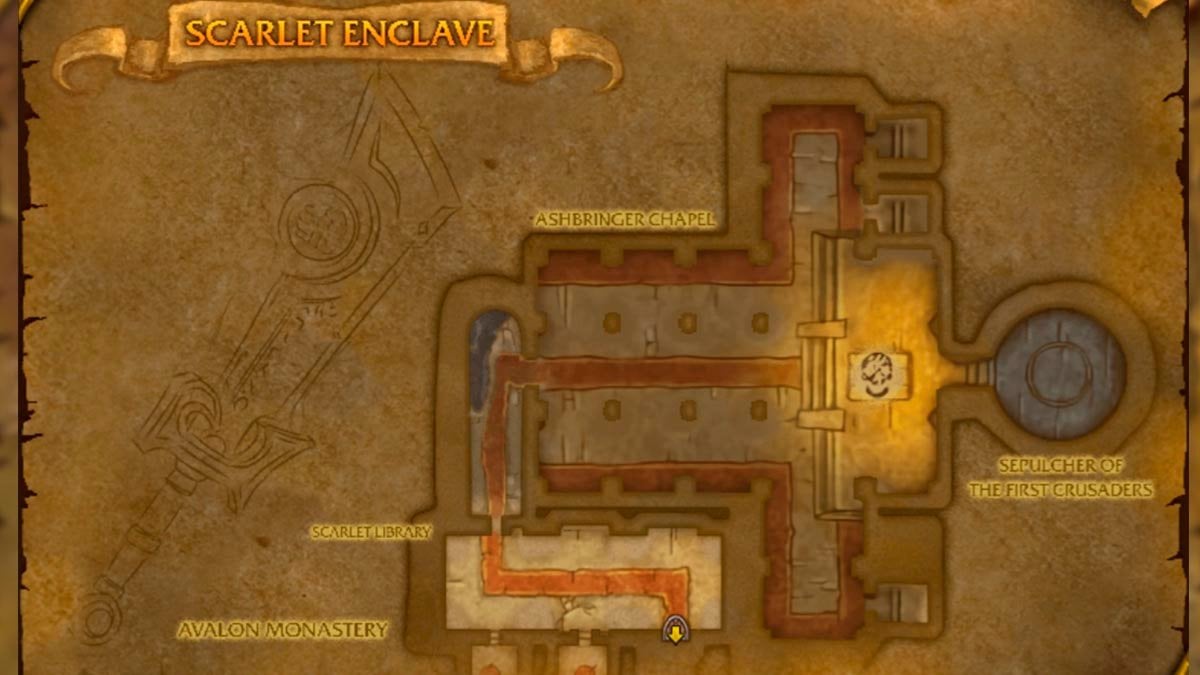
In the Scarlet Enclave raid, you’ll battle your way through both the southern and northern sections of New Avalon before heading into the Avalon Monastery, and eventually fighting inside it as well. The only areas where you might get turned around are the New Avalon sections, so here are some maps to help you find boss locations and key NPCs.
Scarlet Enclave raid boss guides
There are 8 bosses in the Scarlet Enclave raid. The first 2 must be defeated one after the other, then you’re free to choose the next 3 bosses in any order. After that, the raid returns to a set path leading to the final encounter.
You can run the Scarlet Enclave with as few as 20 players or scale up to the 40-player cap. The difficulty stays the same regardless of group size, but loot will be harder to get with more players. For the easiest experience and to meet the DPS requirements, we recommend starting the raid with a full 40-player group.
Balnazzar boss guide

How to summon Balnazzar
- Ring the bell at the top of Tyr’s Hand Abbey.
- This will trigger the appearance of a miniboss, Captain Karnwield, in front of the Scarlet Cathedral. He doesn’t have any special mechanics, but he does have a large health pool.
- Once Karnwield is defeated, head into the Cathedral to trigger Balnazzar.
- The boss will then exit the Cathedral and move to the fountain in the center of Tyr’s Hand.
- The first boss fight takes place at the fountain. When the Balnazzar spawns, he will automatically clear any remaining trash mobs nearby.
How to skip trash
Since ringing the bell is all it takes to open the Cathedral, you can have a Rogue stealth to the top of the Abbey and ring it. There’s only one mob at the top, and the Rogue can vanish after activating the bell. This method skips about 99% of the trash—leaving only Captain Karnwield and a few nearby packs to deal with.
Phase 1
100% to 70% ground phase.
- Carrion Swarm deals damage to nearby players, so all DPS and healers should stay spread out around the area. However, make sure to stay close to one other player to avoid triggering the Prey on the Weak effect. Split into pairs before the fight and stay close to your partner throughout the encounter.
- Screeching Terror spawns adds throughout the fight if a player doesn’t stay close to another. The off-tank should pick adds up and keep them close to the boss so they can be cleaved down efficiently. Watch for Screeching Fear casts from the adds and interrupt them as soon as possible.
- Be sure to eliminate all the adds before transitioning to Phase 2.
Phase 2
70% to 40% flying phase.
- Suppressing Darkness forces players to stay near the four NPC Priests casting Light’s Hope to avoid being silenced. These zones are primarily intended for Healers and DPS casters.
- Healers and DPS casters should position themselves spread out between three of the NPC Priests, with ranged DPS focusing damage on the boss.
- If you’re silenced near one of the NPC Priests, move quickly to another Priest to remove it.
- Classes like Hunters can try to move out of the NPC Priest area to give healers more space.
- Handle Circle of Domination by using crowd control (CC) on affected players to prevent chaos.
- Melee DPS should stay near the fourth, unassigned NPC Priest and deal focused damage to one Screeching Terror add at a time. The main tank should hold position, facing the adds away from the NPC Priests to prevent them from enraging. The off-tank should move between NPC Priests, picking up adds and bringing them to the main tank.
- Carrion Swarm and Prey on the Weak effects are still active during this phase, so continue managing them carefully.
DPS and Healers positioning
If a caster gets infected with Carrion Swarm, try to spread out just enough to prevent spreading it to others, while still staying inside the NPC Priest holy zone. If that’s not possible, it’s better for DPS to step outside the zone and risk being silenced. A temporary loss in damage is far safer than losing players. However, healers must stay inside the NPC Priest zones at all times, as the fight can quickly spiral without healing. DPS should give up their position if needed to make room for healers.
Phase 3
40% to 5% ground phase.
- When Balnazzar lands, the main tank should grab him immediately, since casters are likely to be high on the threat list. He always lands in the same spot, near the easternmost holy zone where he first took off, so make sure to pre-position there in advance.
- Boss will summon Infernals, killing one Priest with each cast until just one remains, keep him alive and protect from the adds, as with his death the boss will enrage. Meanwhile, the Infernals have Infernal Presence, which protects you from Suppressing Darkness while you’re near them.
- Keep the Infernals positioned near the boss, and have melee stack on them when needed. Casters and healers should remain in the active Priest holy zones until the NPCs are dead. After that, they should move to any remaining holy zones or stand near the Infernals if no zones are left.
- Focus on the boss, only switching to Screeching Terror adds if necessary. Ignore the Infernals.
High Commander Beatrix boss guide

Jail escape
You’ll start in the basement prison of the Barracks in southern New Avalon, where an Argent Dawn member will unlock the door to help you escape.
If you have Rogue with 305 skill in lockpicking, you can free Viznit the Scoundrel, and he will help you to get Lucky Doubloon.
Clearing the Captains before the boss
- There are 6 Captains marked in yellow on the map above. You’ll need to defeat all of them before the Beatrix boss fight can begin, but the order matters.
- Speak with Fydriel outside the prison to find out which 2 Captains are active this week. These two will always be present during the Beatrix fight, no matter what.
- To make the encounter easier, you should defeat the two most dangerous Captains first. This will remove their effects from the boss fight. Be sure your first and second targets are not among the active pair for the week, as you can’t disable them.
Here’s a list of the most and least dangerous Captains:
- Cannon Mistress Lind – One of the most dangerous. Prioritize killing her first, unless she’s one of the two active Captains this week.
- Knight-Captain Fratley – Also among the most dangerous. Take him out early, unless he’s active this week.
- Cardinal Stiltz – His mechanic is easy to avoid but takes time. Deal with him after the top threats.
- Shield Warden Stein – One of the least dangerous. Save him for last.
- Arcanist Hilda – Also low threat. Leave her for the final fights.
- Bowmaster Puck – Minimal danger. Defeat him last.
Beatrix Phase 1 tactics
Lasts 2:20
When the fight begins, all players must immediately run toward the boss. Scarlet soldiers will quickly form a square perimeter around the area, and anyone left outside of it will be killed instantly.
Before Beatrix joins the battle, you’ll need to survive waves of enemy adds. The key to this phase is keeping up with the add spawns and avoiding incoming mechanics. Be aware that both continue even after the boss becomes active.
Occasionally, enemy leaders will trigger a special mechanic. Only one of these will happen at a time. While all six enemy types appear as adds, only the four Captains killed last during the earlier trash phase will participate in this fight and trigger mechanics. Here’s what to watch for:
| Captain | Effect | How to counter |
|---|---|---|
| Cannon Mistress Lind | Call in artillery strikes marked by 5 large red swirls. Each strike also leaves a short-lived AoE ember that deals massive damage. | Dodge all strikes and AoE. It’s hard to survive. |
| Knight-Captain Fratley | Sends 4 waves of fast-moving Scarlet Cavalry. Getting hit knocks you back hard. There are gaps, but Cavalry moves quickly. | It’s easy to get chain-knocked around even off the battlefield and into the deadly perimeter, so make sure to dodge at all costs. |
| Cardinal Stiltz | Applying a DoT that explodes after 5 seconds based on how close players are to each other. | Spread out before it hits to avoid a wipe. |
| Shield Warden Stein | Sends 4 waves of Scarlet Infantry with two gaps per line. Getting hit adds a stack of Scarlet Phalanx, a bleed that stacks. | Isn’t too dangerous and can be healed through. So ignore if you can’t dodge easily. |
| Arcanist Hilda | Summons a slow-falling meteor, those inside take some damage, but anyone outside dies instantly. | Run under the meteor and use defensives. |
| Bowmaster Puck | Applies a raid-wide DoT. | Ignore. |
Beatrix Phase 2 tactics
Beatrix herself is a simple boss, but the real challenge is managing adds and dodging all listed above mechanics. Adds respawn faster the more you kill, so cleave them down, but keep your main focus on Beatrix.
- Tank should swap after Unwavering Blade cast.
- Stock Break hits 3 players for 95% of their max health, dropping them to 1 HP if already below that. They’re stunned and briefly invulnerable. Heal them before it fades.
- With Rose’s Thorn boss charges to a player, applying a bleed that lasts until they’re fully healed. Don’t ignore this debuff.
Solistrasza boss guide

- You must reduce Solistrasza’s HP to zero three times. Each phase becomes slightly more difficult, but the core mechanics remain the same.
- At the start of the pull, the tank should drag Solistrasza to the wall and face her away from the group. Tanks should swap whenever one reaches 2 stacks of Tarnished Breath.
- DPS and Healers need to constantly dodge yellow circles from Cremation that appear on the ground, as they deal delayed damage. Also Cremation creates additional damaging zones on the ground. Be sure to avoid them as well.
- From time to time, the boss will cast Hallowed Dive, fly into the air and crash down in a random area. All players must avoid this landing zone. After she lands, the tank should quickly reposition her.
- Solistrasza will also summon Lightforged Whelps, which explode for heavy AoE damage when killed. Avoid cleaving them. Instead, kill them one by one and wait for the raid to recover between kills.
- Quickly focus down a Lightforged Whelp as soon as it spawns, since its AoE damage increases over time.
- Alternatively, kill one and let the others despawn.
- One random player will be targeted with a large yellow beam. Shortly after, Solistrasza will cast Crimson Flare, a massive AoE directed at that player. The targeted player should move toward a wall to drop the AoE safely away from the group. Despite this, the entire raid will still take heavy damage over 10 seconds from Blistering Vent, so use defensives and healing cooldowns during this time. And don’t kill Lightforged Whelps while this is happening.
Alexei the Beastlord boss guide

Alexei the Beastlord and Sir Dornel share a single HP pool, but they must be kept separated. Position them away from each other to avoid Enkindle and Enervate debuff stacks.
Split the raid into two melee groups (including 1 tank in each group) and position each boss in the center of a group. The five closest players to each boss will receive a stacking debuff: Enkindle from Alexei the Beastlord and Enervate from Sir Dornel.
Once each group reaches 2–3 stacks, tanks should taunt swap the bosses, moving them between the groups. The groups themselves should stay in place. This allows the debuffs to wear off while the groups begin stacking the new debuff. Continue rotating the bosses between the two groups throughout the encounter.
Alternatively, you can use the third tank to assist with the tank rotation. Or you can stack the two bosses together and cleave them. When affected by the Enkindle or Enervate debuffs, melee DPS should move closer to the other boss to avoid gaining additional stacks.
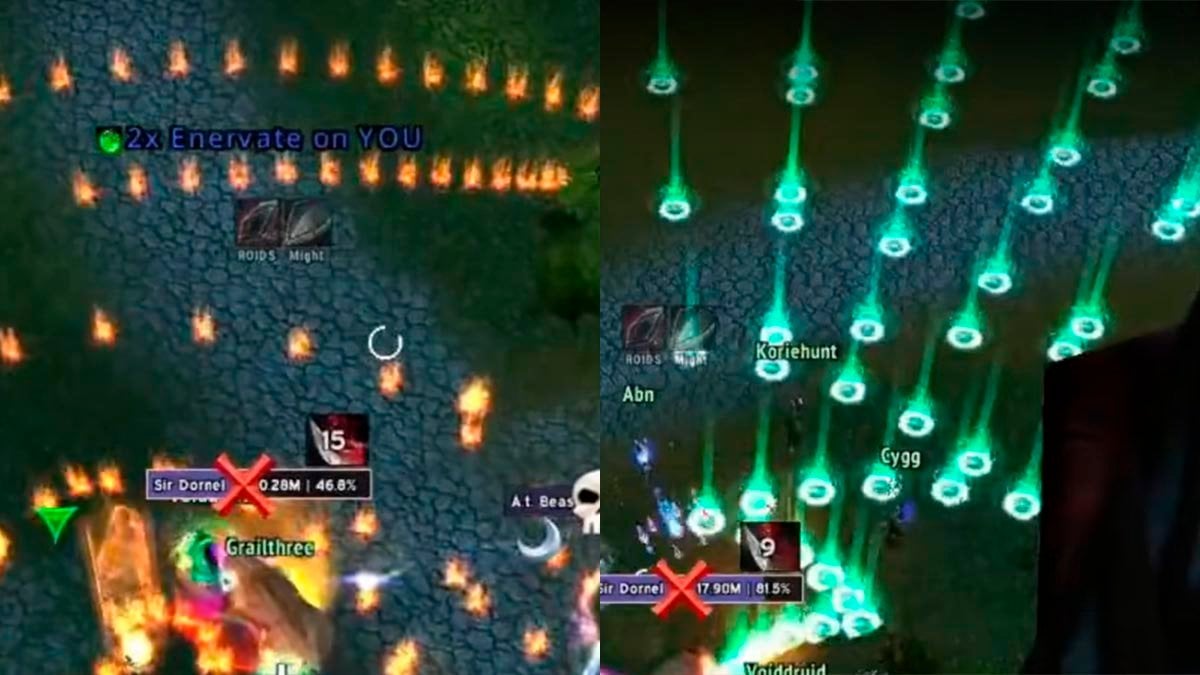
Alexei the Beastlord Abilities:
- Entangling Shot targets the tank and creates a danger zone. Everyone must avoid standing in it.
- Melee DPS should avoid Rending Slash by not standing in front of the boss.
- Watch out for fiery zones spawned by Alexei. These deal significant damage, especially if you’re affected by the Enkindle debuff.
Sir Dornel Abilities:
- Stomp is an AoE ability, melee DPS should move out quickly to reduce incoming stun and damage.
- The bear will cast snake-shaped green damaging zones on the ground. Avoid them, especially if you’re affected by the Enervate debuff.
Mason the Echo boss guide

Kill First Mate Kip on the beach near the ships to summon the boss.
- Use Greater Fire Protection Potion.
- Pull the boss to one side of the map, then gradually drag him toward the center as oil spills and cannon zones appear. Avoid standing in these to prevent getting the Burning Oil debuff.
- Oil spills on their own only slow players, but if they are hit by cannon fire, they will ignite. Avoid staying in oil spills for too long.
- Dispel Drowning Shallows immediately to prevent affected players from dying.
- Use Underwater Breathing and Noggenfogger Elixir (with Skeleton Buff) to survive Drowning Shallows.
- This effect will occur during the Tidal Force phase, so make sure to bring a decurser aboard the ships.
- Players affected by Ignite Flesh need focused healing to survive the burning DoT.
- Swap tanks at 1-2 stacks of the Mortal Wound debuff.
- The off-tank should pick up adds and position them close to the boss for cleave damage. Keep in mind the off-tank will be hit with Mortal Strike, so healers need to pay extra attention to their health.
- At 75%, 50%, and 25%, the boss becomes immune and starts channeling Tidal Force. Your fastest players (ideally with Tinkerbox: Nitro Boosts) must board the ships, collect one cannonball per ship, and fire the ship cannons to break the shield.
- This must be done quickly, as the boss gains stacking Tidal Force buffs that drastically increase his damage. At 20+ stacks, he can one-shot any tank.
- You can use the dock cannons to quickly travel to the ships.
- Send a group of three players to each ship: a tank to handle adds, a healer to support the tank, and a DPS to find a cannonball and fire it from the cannon.
- These groups should start moving toward the ships before the Tidal Force cast, at approximately 78%, 53%, and 28% of the boss’s HP.
Reborn Council boss guide

This encounter features 3 bosses, each with separate HP pools. It’s important to kill them at the same time or within a short window, as the remaining bosses gain significant strength when one is defeated.
Positioning is crucial. You can pull a boss out of the room to reset them. After the reset, quickly move into your assigned positions as shown below.
Reborn Council positioning:
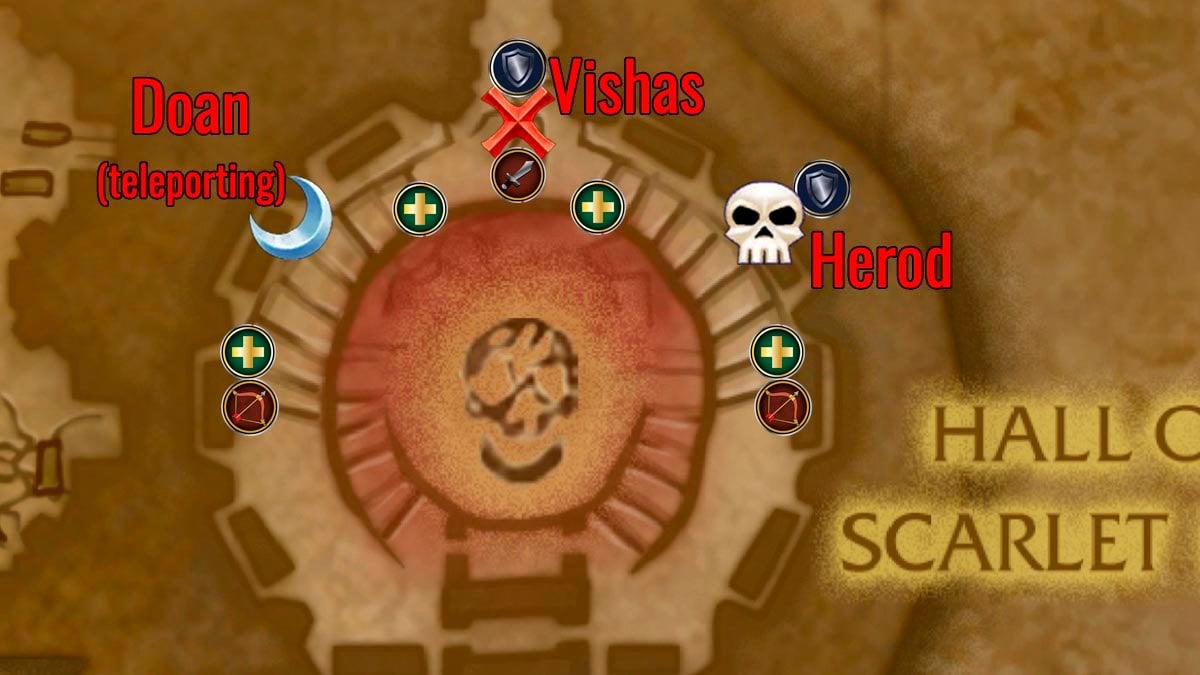
- The safe spot in this boss fight is where the melee DPS are standing, as this area is not hit by the Fire Tornado.
- By not standing in the center of the hall, you automatically avoid Molten Basin ability.
- Vishas and Herod should be tanked, while Doan is a free-roaming boss with a teleport ability. One Ranged DPS can focus him and soak Fireball using a Greater Fire Protection Potion.
- Melee DPS can switch between Vishas and Herod, while ranged DPS should focus on Doan and apply DoTs to the others.
Tanks:
- Stay between the bosses and the wall to avoid being knocked into the center of the room.
- If Doan teleports near your location, move your boss away and wait until Doan teleports again before returning.
- Herod’s tank should use defensives to survive Radiant Divide and Divine Avatar.
- Herod’s tank should move the boss to avoid fiery zones, but make sure not to bring him too close to your allies.
- Vishas’s tank needs to remove the stacking Rend Flesh debuff with Divine Shield. Or you can use a third tank to swap with them.
Healers and DPS:
- Avoid the Divine Strike ability, which creates yellow circles on the ground and deals heavy damage shortly after.
- If Doan is close to you, stay near a wall or run away from him to avoid being knocked into lava or close to Herod by Blast Wave.
- Interrupt Peeled Secrets at all cost. Assign a couple of players to interrupt this in rotation. One missed cast of this ability will wipe the raid.
- Stay away from Herod when he is using Whirlwind.
- Run through the Fiery Tornados to avoid taking any damage from them.
- Heal up Garrote debuff or remove it
- Dispel Slow and Imbued Assault from you allies.
Lillian Voss boss guide

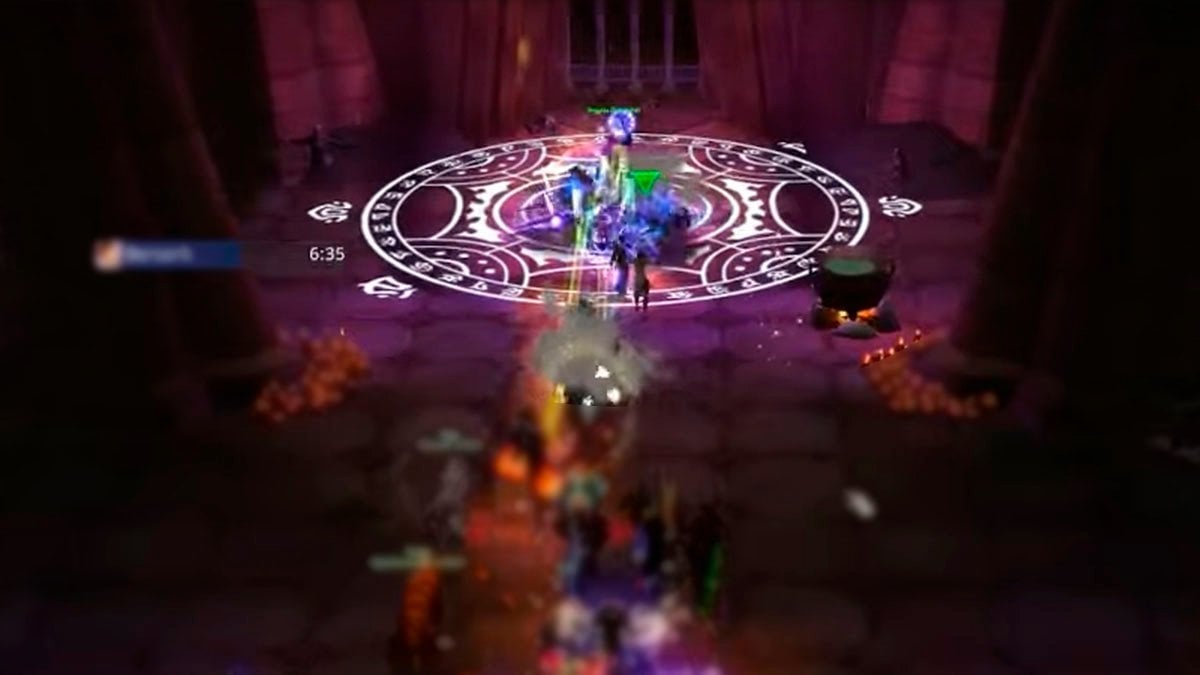
This encounter is relatively straightforward. Keep the boss positioned in the center of the arena, she starts there before the pull. All players must monitor their debuff statuses closely, as managing these is the most critical part of the fight.
Debuffs:
- When the boss casts Ignite on you, immediately move away from others and maintain a safe distance to avoid spreading damage. Use defensives.
- The boss will pull everyone toward the center with Scarlet Grasp and apply Unstable Concoction to some players. Those affected must quickly move away from both the raid and each other. Run to the edges of the boss fight area. Before the Unstable Concoction explodes, other raid members should stay in melee range.
- If you are afflicted with the Intoxicating Venom debuff, move constantly. Strafe left and right at a short distance to avoid its effects.
- Noxious Poison will leave a pool of slime on the ground when dispelled or expired. Move to the edge of the room before asking for a dispel or dispelling it yourself.
Healers should aim to keep everyone at full health to mitigate the impact of Ambition. Don’t hesitate to overheal and burn your mana. This is a short fight, and spam healing is fine. If you can, bring more healers for this fight.
Tanks need to taunt swap whenever one of them receives the Debilitating Strike debuff.
Grand Crusader Caldoran boss guide

There are 4 phases to this boss encounter, with the first phase being significantly more difficult and requiring extra attention. You’ll need 3 well-geared tanks, as both the boss and the adds deal heavy damage. Without much Scarlet Enclave gear and lacking the tier-3.5 set, only a Rogue can main tank Caldoran with relative ease.
Phase 1
100% to 55% HP of the boss
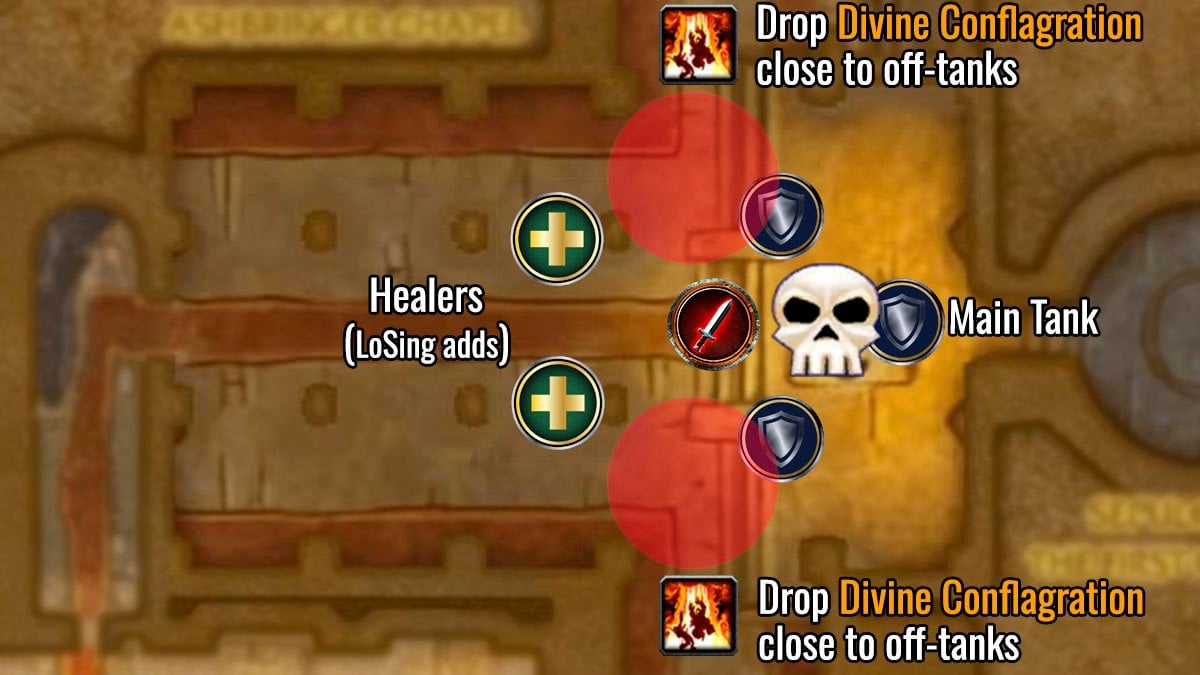
Make sure to position yourself precisely for this boss, exact placement is crucial:
- The main tank should pick up the boss where he stands before the pull and immediately turn him away from the raid.
- Off-tanks position themselves nearby to pick up all the adds, dragging them into the fire zones created by Divine Conflagration.
- All DPS should stack in one frame behind the boss in melee range. Hunters can take a few steps back if needed.
- Healers should stand near the columns, and if the adds begin casting on them, they need to use the columns to break line of sight (LoS).
With the right positioning, you can begin the fight. Phase 1 is all about managing the adds, as they pose a serious threat. Their casts can wipe out all DPS and healers, they can heal themselves and the boss, and they can even be resurrected by Reclamation.
Here is how to deal with the adds:
- Off-tanks should split the adds into two groups and position them near the columns.
- When the boss casts Divine Conflagration, targeted player must run out from the raid and drop the AoE effect on top of the adds (as shown on the map).
- Off-tanks must drag the adds into the fire zones left by Divine Conflagration and keep them there. Tanks can briefly step into the fire themselves to ensure all adds are fully inside. This positioning prevents the adds from being resurrected with Reclamation.
- Scarlet Magus and Scarlet Martyr adds will cast Divine Conflagration, which must be stopped. It will heal all adds and the boss to full. This adds cannot be interrupted with Kick, so use stuns, Polymorph, or other forms of crowd control.
- Scarlet Ravager adds deal high damage and can one-shot healers or DPS, so off-tanks need to stay alert and manage them carefully.
- All DPS must immediately switch to the adds and kill them as quickly as possible while they are inside the fire zones.
Boss abilities:
- When Divine Conflagration is casted, the targeted player must run to the designated location (as shown on the map) and drop the AoE zone near the off-tank and their group of adds.
- The second targeted player should do the same near the second off-tank.
- For the third Divine Conflagration, the targeted player can run in any direction to safely drop the fire away from the group.
- When the first fire zone expires, the fourth Divine Conflagration should be placed once again on top of the adds, near the first off-tank.
- When Blinding Flare is casted, the entire raid (including the main tank) must look away from the boss to avoid being disoriented.
- Blade of Malice deals heavy damage to the tank, so they should use defensive cooldowns to survive the hit.
- Execution Sentence will stun the main tank, so the raid must shield and protect them during this time, while healers focus on keeping the tank alive through the heavy damage.
- Wake of Ashes deals heavy damage in a frontal cone, so the main tank must keep the boss faced away from the raid at all times.
Phase 2
55% HP of the boss to 40% HP of The Ashbringer
- The Ashbringer will appear and begin dealing heavy AoE damage. Focus it down as quickly as possible.
- Cleave any remaining nearby adds.
- Use health potions, and personal defensive cooldowns during this phase, as surviving the constant AoE damage is quite hard.
- Healers should work to keep the entire raid as topped off as possible, especially as Phase 2 nears its end, when The Ashbringer reaches 40% energy.
When The Ashbringer is brought to 40% HP, the entire raid will be shackled. Immediately after, the boss begins casting Dying Light. As soon as the shackles break, run toward the blue circle to stay protected from the blast. Once Dying Light is casted, follow the boss through the portal and be careful to avoid falling rocks along the way.
Phase 3
55% to 10% HP of the boss
During this phase, the boss will continue to use many of the abilities from the previous phase:
- Blinding Flare — look away.
- Blade of Malice — use defensives as a main tank.
- Execution Sentence — use defensives on a main tank.
- Wake of Ashes — face the boss away from the raid.
New abilities:
- Quietus — another ability that targets the tank and deals heavy damage. Use defensive cooldowns to survive, or swap tanks if the main tank is out of defensives.
- Cessation — summons Scarlet Hollow adds that explode on death, leaving behind a void zone. Keep them away from the boss and kill them here.
Phase 4
10% to 0% HP of the boss
- At 10% HP, the boss will summon The Ashbringer once again, along with previous Scarlet Enclave bosses.
- Your only choice is to keep all DPS on the Ashbringer and then the boss, while dodge all the new and old mechanics.
- Watch out for Stock Break from Beatrix and Whirlwind from Herod, as both can deal significant raid damage.
Scarlet Enclave boss loot
If you’re searching for raid loot from bosses, explore our Scarlet Enclave loot table. Here, you’ll find detailed item drops from every boss.
Final words
That’s a wrap on our Scarlet Enclave raid guide! We hope it helps you conquer every boss with confidence. And if you ever need a hand, don’t hesitate to check out our WoW Classic raid boost services.


Comments
Man, you are ahead of the curve and beyond big brain. Can’t thank you enough for taking the time to create and share this treasure trove of information.
thanks a lot! doing my best
Great guide but I suggest adding information on what protection consumables are appropriate for each fight
thanks! i will try to add more info for each boss fight, including consumables