
Cataclysm Classic Throne of the Four Winds Raid Guide
Welcome to our comprehensive Cataclysm Classic Throne of the Four Winds raid guide.

Table of Contents
- Throne of the Four Winds Location
- Full Cataclysm Classic Throne of the Four Winds Walkthrough
- Throne of the Four Winds Loot Table
- Throne of the Four Winds Raid Guide: FAQ
- Conclusion
In WoW Cataclysm Classic, the Throne of the Four Winds is a raid available for both 10– and 25-player groups, offering Normal and Heroic difficulty modes. Despite having only two bosses, this raid is rich in rewards, including Armor Tokens and a special currency called Essence of the Forlorn used to purchase gear with item levels 359 and 372.
One of the most coveted rewards from this raid is the Reins of the Drake of the South Wind mount, which can drop from Al’akir on both Normal and Heroic modes.
For a comprehensive look at the factions in Cataclysm Classic and the rewards they offer, be sure to check out our previous article. If you have not read it yet, it is worth your time:
Throne of the Four Winds Location
As you can see, the Throne of the Four Winds location is in southwestern Uldum. It is a floating Skywall castle, so you must have a flying mount to reach it.
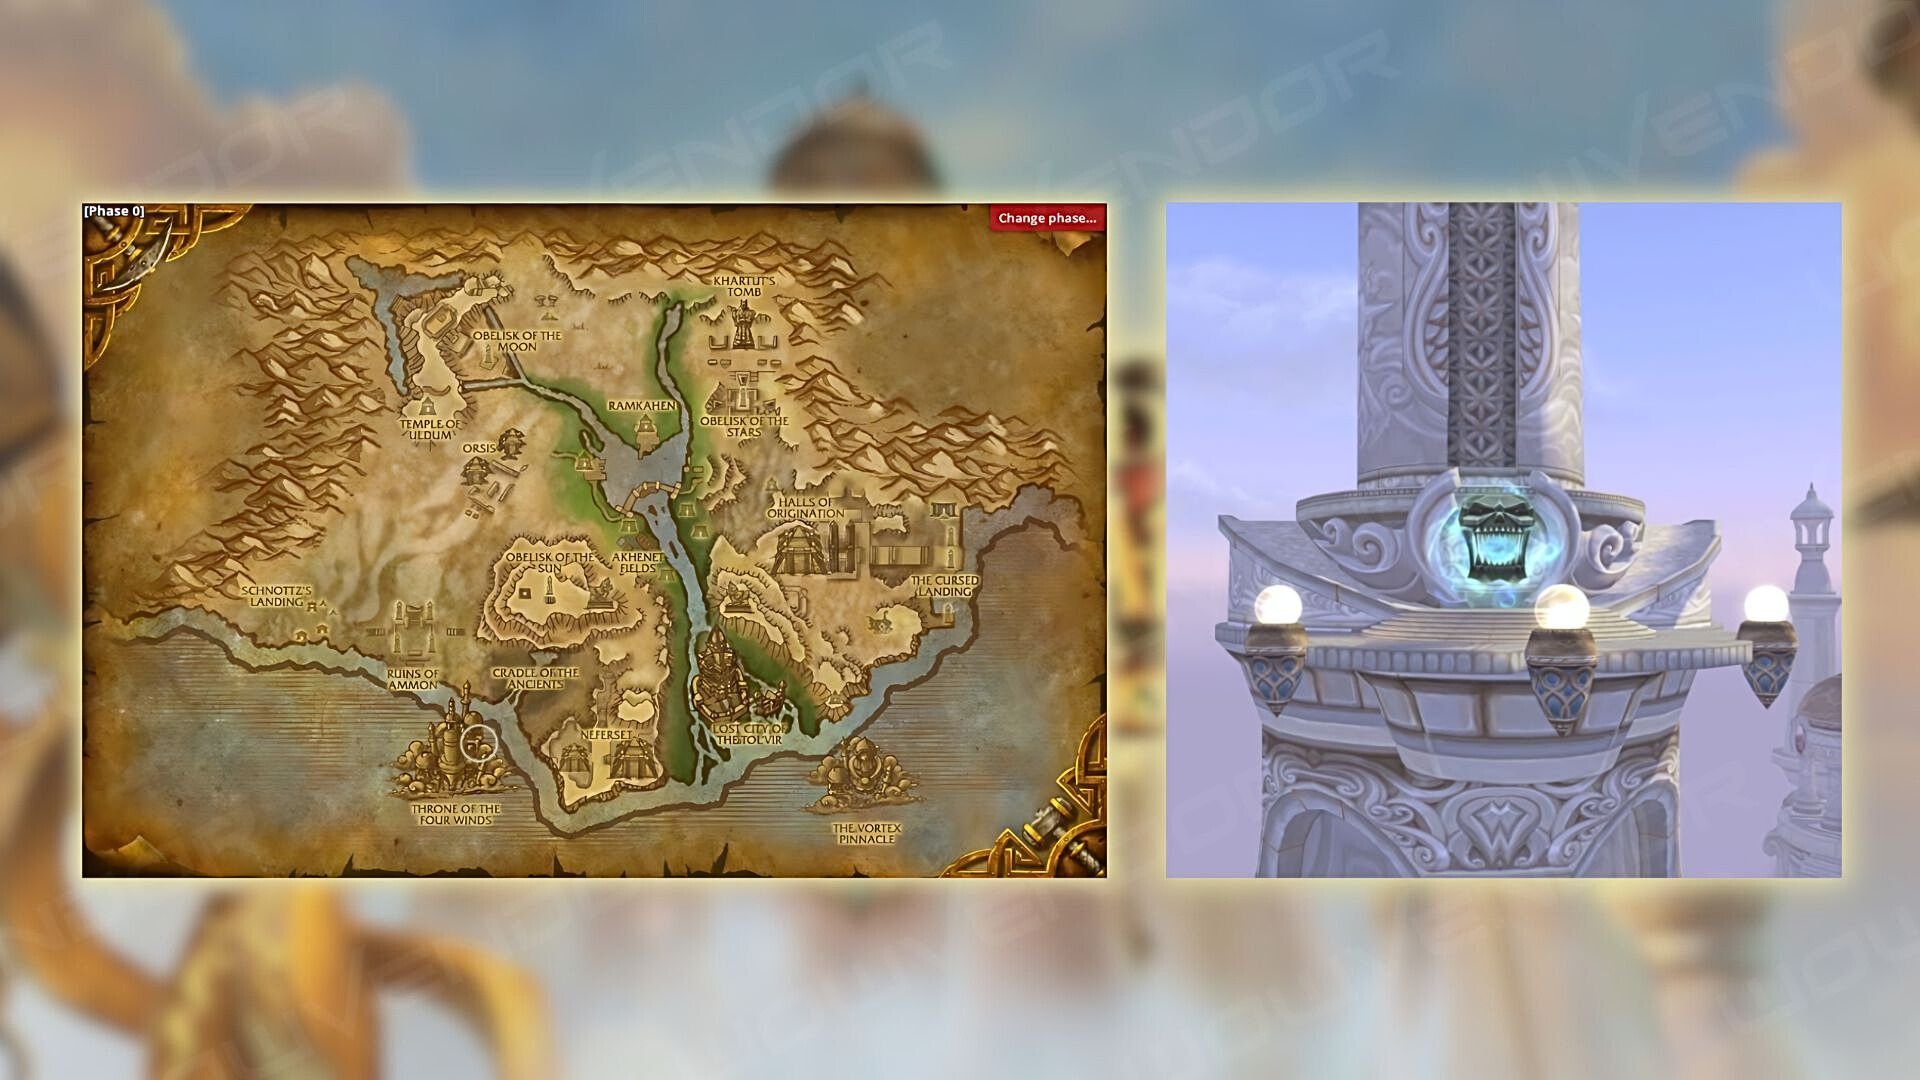
If you need to summon your fellow teammate, the Meeting Stone is located on the opposite side of the raid entrance at [36.9, 81.5]. You can also find the entrance portal at coordinates [38.4, 80.6] or refer to the picture above for a visual guide.
How to Get to Throne of the Four Winds for Alliance
To get to the Throne of the Four Winds, which is in Uldum, you can use the portal in Stormwind. The portal is likely already available for those going to the Throne of the Four Winds raid. However, if you do not have it available and ready to be used, it is maybe because you haven’t completed the starting quest chain The Explorers yet. So, be sure to do it first. For more information on how to finish this quest chain, check out “What Is the Fastest Route to Uldum?” in this guide’s FAQ section.
How to Get to Throne of the Four Winds for Horde
To get to the Throne of the Four Winds, which is in Uldum, you can use the portal in Orgrimmar. The portal is likely already available for those going to the Throne of the Four Winds raid. However, if you do not have it available and ready to be used, it is maybe because you have not completed the starting quest chain The Reliquary. So, be sure to do it first. For more information on how to finish this quest chain, check out “What Is the Fastest Route to Uldum?” in this guide’s FAQ section.
Full Cataclysm Classic Throne of the Four Winds Walkthrough
Throne of the Four Winds Raid Layout
The Throne of the Four Winds raid layout is quite interesting. There are 5 platforms: one leads out of the raid, and the other four are designed for fighting the Al’akir and Conclave of Wind bosses.

In this Throne of the Four Winds raid guide, we recommend you to ride your mount into the instance. It is a massive advantage for those who prefer swift and convenient movement. Also, If you happen to fall off the platform, do not worry – the wind currents will catch you and gently return you to the ground.
Regarding the wind currents, they will be the ramps you will use during your raiding experience to commute between the four platforms. For your convenience, we have depicted them in the picture above as puncture lines connecting the bosses.
Conclave of Wind Guide

The Conclave of Wind encounter features three bosses: Rohash, Anshal, and Nezir, each positioned on their platforms. Utilize the wind bridges to switch between platforms, being careful not to fall off the wrong edge. Keep reading our Conclave of Wind guide to learn what to do and expect during the fight:
The fight consists of 2 Phases:
- Recharge Phase: It begins when the boss’s energy is between 0 and 80.
- Full Energy Phase: This phase kicks when the boss’s energy is between 80 and 100.
Throne of the Four Winds Raid Guide: Conclave of Wind Strategy
This Conclave of Wind strategy is not very complicated if you follow our Throne of the Four Winds raid guide recommendations and tips. In a 10-man group, you will need one healer on each of the three platforms, but in a 25-man group, two healers are required on each platform. Also, you will need a tank for Nezir and another for Anshal. In a 10-player group, only one tank is needed, but in a 25-man group, one tank is required for Anshal and another for his adds.
For Anshal in a 25-player team, it’s best to bring 5 DPSers (2 ones for a 10-man setup) with strong AoE, and the rest of the DPSers should focus on Rohash. It’s preferable for one of the DPSers for Rohash to be a Rogue, Frost Mage, or Paladin. No tank is needed for Rohash.
Here is what each boss does during the Conclave of Wind fight:
Rohash avoids melee combat, instead casting Slicing Gale to damage random players and creating tornadoes around him, which must be avoided. Watch out for his rotating frontal ability, Wind Blast, as it can knock you off the platform. When Rohash reaches full energy, he will knock everyone into the air and deal continuous damage, similar to the Eye of Eternity. You will take full damage during this phase.
Anshal spawns adds that release AoE poison around them. It’s best to have another tank handle these adds and move them away while ranged DPS focuses on taking them down. Anshal also creates healing patches on the ground that heal both himself and the adds, so move him out of these areas quickly. When Anshal reaches full energy, he will cast Zephyr, healing himself and any remaining adds, so defeat them before this happens.
Nezir spawns icy patches on the floor, so avoid standing in them. Wind Chill will increase the damage for everyone on the platform, requiring a tank and a healer to manage it. He also has a frontal attack, so keep him away from the group. When Nezir reaches full energy, he will unleash a massive raid-wide attack split between everyone on the platform, so all DPS need to be ready.
Recharge Phase
At the beginning of the Recharge Phase fight, you’ll have approximately 80 seconds to DPS all the bosses down. During the recharge phase, split DPS between Anshal and Rohash, with most ranged DPS on Rohash and a few strong AoE ranged and Melee on Anshal. When it’s time to swap on Nezir, the tank handling Anshal‘s adds should jump over to Nezir, while the Nezir tank switches to Anshal. Wait to leave before the new tank arrives, or someone may die. Protection Paladins can use Divine Shield to swap less often.
Full Energy Phase
At around 80 energy, Nezir will unleash a massive raid-wide attack called Sleet Storm and deal 28,500 to 31,500 Frost damage per second to all targets within 100 yards (91 meters), split between all raid members on the platform.
Therefore, everyone should jump to Nezir to soak his ultimate and be ready to deal maximum damage. Leave one healer on Rohash and one tank with a healer on Anshal‘s platform to avoid leaving them empty. Once the Sleet Storm ends, everyone returns to their original platforms.
On Heroic difficulty, Rohash casts Storm Shield, absorbing 1,698 damage and inflicting 29 Nature damage per second on everyone on his platform. Use a healer CD and focus DPS to break it quickly. The bosses must be killed within 60 seconds of each other to prevent them from healing.
When Anshal and Rohash are at 10%, send the DPS to finish off Nezir before returning to kill the others and finish the fight. Congratulations on triumphing over the Conclave of Wind!
Al’Akir Guide
Al’akir‘s encounter consists of three health-based phases, with phase one being particularly challenging due to strict positioning requirements. Keep reading our Al’Akir guide to learn what to do and expect during the fight:
Throne of the Four Winds Raid Guide: Al’Akir Strategy
Phase 1
This Al’Akir strategy is not very complicated if you follow our Throne of the Four Winds raid guide recommendations and tips. Lightning Strike is an ability when Al’akir summons lightning bolts, randomly striking either you or a teammate with 19,000 to 21,000 Nature damage per second in a cone-shaped area for 30 seconds. Also, it sets off Chain Lightning that affects anyone hit.
If three players are hit, each player will be struck by three Chain Lightnings. To manage this, divide the raid into eight groups of three, evenly spread across the platform. It’s important for healers to be spread out to heal all players effectively.
On Heroic difficulty, the frontal attack lasts for 16 seconds. Designate someone to handle it while the rest of the group moves to another group. Tornado lines caused by Squall Line rotate around the platform, leaving a gap to run through, so push through it safely if possible.
Every 30 seconds, a Wind Burst will damage the entire raid and cause a strong knockback. This ability deals 28,275 to 31,725 Nature damage to you and your allies, forcefully pushing you back for 5 seconds. To avoid falling off, run towards the boss when this happens. As a tank, be ready to handle the Electrocute hits when you get knocked out of range.
Ice Storm will be scattering ice patches across the platform. Each patch inflicts 7,000 Frost damage every 0.5 seconds and slows movement speed by 50%. Be sure not to stand in them.
Lastly, Static Shock will cause 1,000 Nature damage per second for 5 seconds and interrupt anyone in melee range. Casters and healers should stay away to avoid being affected.
Phase 2
As Al’akir‘s health drops to 80%, Phase 2 kicks in. In this phase, you can start stacking up. The boss will continue to cast Static Shock, Electrocute, and spawn the Squall Line tornadoes but won’t perform knockback or frontal attacks. In addition, the boss will unleash Acid Rain, afflicting you and your teammates with 500 Nature damage per second. This damage increases by 500 every 15 seconds until Phase 3 commences.
This phase becomes a race to deal damage before your raid group takes too much damage. Additionally, the boss will summon an add every 20 seconds that deals AoE damage around it. Keeping this add away from the melee group while ranged players focus on killing it is crucial.
When the adds bite the dust, they make Al’akir more vulnerable for 30 seconds thanks to the Feedback debuff. To keep it going, knock off the next add to reset the debuff’s duration. On Heroic difficulty, this debuff only lasts 20 seconds, so it’s crucial to keep it going to pass the DPS check.
Get the first add down to 50%, then hold off until the third one shows up before taking it out. Just make sure the tank can handle these adds without any issues.
Take out each new add when the Feedback debuff has about 5 seconds left, and you should be able to keep it going until the following Phase 3. For healers, save some CDs for the end of the stage when things get rough.
Phase 3
At 25% health, Al’akir triggers Phase 3 by destroying the platform and making everyone fly. Gather near the boss to avoid being swallowed by the storm.
Lightning in this phase causes 28,500–31,500 Nature damage to random teammates, keeping healers busy. When someone is targeted with the Lightning Rod, they will deal AoE damage around them, so everyone else should move to one side to avoid getting hit.
The Wind Burst mechanic is the same as in Phase 1: Al’akir unleashes a mighty blast of wind, dealing 38,000–42,000 damage and forcefully hurling you all backward. Therefore, your raid group should stay close to the boss to avoid being knocked back.
When Lightning Clouds spawn on someone, they will take up a lot of space at a high altitude. After a quick 5-second countdown, these clouds start flashing with lightning, causing 47,500 and 52,500 Nature damage per second. They will last for 30 seconds, and there are two ways to handle them:
- Method 1: Fly along with the clouds. When the first clouds appear, fly just below them to avoid getting hit, and continue doing this as more clouds spawn. You can try the second method if you run out of space before you defeat the boss.
- Method 2: Start at the top of the room and move just below the clouds when they first appear. When the second cluster of clouds appears, fly to the bottom of the room and dodge upwards for the third. When the fourth cloud shows up, you can fly back to the top of the room and keep repeating this pattern.
You may lose some DPS due to all this movement, but you can keep it up until you eventually defeat Al’akir.
Throne of the Four Winds Loot Table
The Conclave of Wind and Al’Akir loot table for 10 and 25 players on Normal and Heroic difficulty offers 359 and 372-item level gear.
Throne of the Four Winds Raid Guide: Conclave of Wind Loot Table
10-Player Normal
| Name | Type |
| Soul Breath Belt | Cloth |
| Gale Rouser Belt | Leather |
| Wind Stalker Belt | Leather |
| Lightning Well Belt | |
| Star Chaser Belt | |
| Sky Strider Belt | Plate |
| Tempest Keeper Belt | Plate |
| Thunder Wall Belt | Plate |
| Mistral Circle | Finger |
| Permafrost Signet | Finger |
| Planetary Band | Finger |
10-Player Heroic
| Name | Type |
| Soul Breath Belt | Cloth |
| Gale Rouser Belt | Leather |
| Wind Stalker Belt | Leather |
| Lightning Well Belt | |
| Star Chaser Belt | |
| Sky Strider Belt | Plate |
| Tempest Keeper Belt | Plate |
| Thunder Wall Belt | Plate |
| Mistral Circle | Finger |
| Permafrost Signet | Finger |
| Planetary Band | Finger |
25-Player Normal
| Name | Type |
| Soul Breath Belt | Cloth |
| Gale Rouser Belt | Leather |
| Wind Stalker Belt | Leather |
| Lightning Well Belt | |
| Star Chaser Belt | |
| Sky Strider Belt | Plate |
| Tempest Keeper Belt | Plate |
| Thunder Wall Belt | Plate |
| Mistral Circle | Finger |
| Permafrost Signet | Finger |
| Planetary Band | Finger |
25-Player Heroic
| Name | Type |
| Soul Breath Belt | Cloth |
| Gale Rouser Belt | Leather |
| Wind Stalker Belt | Leather |
| Lightning Well Belt | |
| Star Chaser Belt | |
| Sky Strider Belt | Plate |
| Tempest Keeper Belt | Plate |
| Thunder Wall Belt | Plate |
| Mistral Circle | Finger |
| Permafrost Signet | Finger |
| Planetary Band | Finger |
Throne of the Four Winds Raid Guide: Al’Akir Loot Table
10-Player Normal
| Name | Type |
| Cloudburst Necklace | Neck |
| Mistral Pendant | Neck |
| Permafrost Choker | Neck |
| Planetary Amulet | Neck |
| Helm of the Forlorn Conqueror | Armor Token |
| Helm of the Forlorn Protector | Armor Token |
| Helm of the Forlorn Vanquisher | Armor Token |
| Mantle of the Forlorn Conqueror | Armor Token |
| Mantle of the Forlorn Protector | Armor Token |
| Mantle of the Forlorn Vanquisher | Armor Token |
| Cloudburst Cloak | Cloak |
| Mistral Drape | Cloak |
| Permafrost Cape | Cloak |
| Planetary Drape | Cloak |
| Soul Breath Leggings | Cloth |
| Gale Rouser Leggings | Leather |
| Wind Stalker Leggings | Leather |
| Lightning Well Legguards | |
| Star Chaser Legguards | |
| Reins of the Drake of the South Wind | Flying Mount |
| Stormwake, the Tempest’s Reach | One-Handed Sword |
| Stormwake, the Tempest’s Reach | One-Handed Sword |
| Stormwake, the Tempest’s Reach | One-Handed Sword |
| Sky Strider Greaves | Plate |
| Tempest Keeper Leggings | Plate |
| Thunder Wall Greaves | Plate |
| Cloudburst Ring | Finger |
10-Player Heroic
| Name | Type |
| Cloudburst Necklace | Neck |
| Mistral Pendant | Neck |
| Permafrost Choker | Neck |
| Planetary Amulet | Neck |
| Crown of the Forlorn Conqueror | Armor Token |
| Crown of the Forlorn Protector | Armor Token |
| Crown of the Forlorn Vanquisher | Armor Token |
| Shoulders of the Forlorn Conqueror | Armor Token |
| Shoulders of the Forlorn Protector | Armor Token |
| Shoulders of the Forlorn Vanquisher | Armor Token |
| Cloudburst Cloak | Cloak |
| Mistral Drape | Cloak |
| Permafrost Cape | Cloak |
| Planetary Drape | Cloak |
| Soul Breath Leggings | Cloth |
| Essence of the Forlorn | Currency |
| Gale Rouser Leggings | Leather |
| Wind Stalker Leggings | Leather |
| Lightning Well Legguards | |
| Star Chaser Legguards | |
| Reins of the Drake of the South Wind | Flying Mount |
| Stormwake, the Tempest’s Reach | One-Handed Sword |
| Stormwake, the Tempest’s Reach | One-Handed Sword |
| Stormwake, the Tempest’s Reach | One-Handed Sword |
| Sky Strider Greaves | Plate |
| Tempest Keeper Leggings | Plate |
| Thunder Wall Greaves | Plate |
| Cloudburst Ring | Finger |
25-Player Normal
| Name | Type |
| Cloudburst Necklace | Neck |
| Mistral Pendant | Neck |
| Permafrost Choker | Neck |
| Planetary Amulet | Neck |
| Helm of the Forlorn Conqueror | Armor Token |
| Helm of the Forlorn Protector | Armor Token |
| Helm of the Forlorn Vanquisher | Armor Token |
| Mantle of the Forlorn Conqueror | Armor Token |
| Mantle of the Forlorn Protector | Armor Token |
| Mantle of the Forlorn Vanquisher | Armor Token |
| Cloudburst Cloak | Cloak |
| Mistral Drape | Cloak |
| Permafrost Cape | Cloak |
| Planetary Drape | Cloak |
| Soul Breath Leggings | Cloth |
| Gale Rouser Leggings | Leather |
| Wind Stalker Leggings | Leather |
| Lightning Well Legguards | |
| Star Chaser Legguards | |
| Reins of the Drake of the South Wind | Flying Mount |
| Stormwake, the Tempest’s Reach | One-Handed Sword |
| Stormwake, the Tempest’s Reach | One-Handed Sword |
| Stormwake, the Tempest’s Reach | One-Handed Sword |
| Sky Strider Greaves | Plate |
| Tempest Keeper Leggings | Plate |
| Thunder Wall Greaves | Plate |
| Cloudburst Ring | Finger |
25-Player Heroic
| Name | Type |
| Cloudburst Necklace | Neck |
| Mistral Pendant | Neck |
| Permafrost Choker | Neck |
| Planetary Amulet | Neck |
| Crown of the Forlorn Conqueror | Armor Token |
| Crown of the Forlorn Protector | Armor Token |
| Crown of the Forlorn Vanquisher | Armor Token |
| Shoulders of the Forlorn Conqueror | Armor Token |
| Shoulders of the Forlorn Protector | Armor Token |
| Shoulders of the Forlorn Vanquisher | Armor Token |
| Cloudburst Cloak | Cloak |
| Mistral Drape | Cloak |
| Permafrost Cape | Cloak |
| Planetary Drape | Cloak |
| Soul Breath Leggings | Cloth |
| Essence of the Forlorn | Currency |
| Gale Rouser Leggings | Leather |
| Wind Stalker Leggings | Leather |
| Lightning Well Legguards | |
| Star Chaser Legguards | |
| Reins of the Drake of the South Wind | Flying Mount |
| Stormwake, the Tempest’s Reach | One-Handed Sword |
| Stormwake, the Tempest’s Reach | One-Handed Sword |
| Stormwake, the Tempest’s Reach | One-Handed Sword |
| Sky Strider Greaves | Plate |
| Tempest Keeper Leggings | Plate |
| Thunder Wall Greaves | Plate |
| Cloudburst Ring | Finger |
Throne of the Four Winds Tier Sets
Once you defeat Al’akir on Normal and Heroic difficulty, you will likely acquire an Armor Token. Depending on your class, you can use this token to purchase an 359-item level piece of the Throne of the Four Winds tier sets from the Valor Quartermasters Faldren Tillsdale in Stormwind and Jamus’Vaz in Orgrimmar:
| Class | Normal-Difficulty Armor Token | Heroic-Difficulty Armor Token |
| Paladin, Warlock, and Priest | Helm of the Forlorn Conqueror, Mantle of the Forlorn Conqueror | Crown of the Forlorn Conqueror, Shoulders of the Forlorn Conqueror |
| Shaman, Hunter, and Warrior | Helm of the Forlorn Protector, Mantle of the Forlorn Protector | Crown of the Forlorn Protector, Shoulders of the Forlorn Protector |
| Mage, Druid, Rogue, and Death Knight | Helm of the Forlorn Vanquisher, Mantle of the Forlorn Vanquisher | Crown of the Forlorn Vanquisher, Shoulders of the Forlorn Vanquisher |
Moreover, for those who dare to tackle Heroic-difficulty Al’akir, a special currency awaits: the Essence of the Forlorn. This valuable essence can be exchanged for more rewards, such as 372-item level gear from the same Quartermasters, Faldren Tillsdale and Jamus’Vaz.
Throne of the Four Winds Achievements
Throne of the Four Winds Raid Guide: Personal Achievements
Your personal Throne of the Four Winds achievements are only yours, regardless of whether you’re playing with pugs or guild members:
- Throne of the Four Winds: Conquer the Conclave of Wind and Al’Akir raid bosses.
- Heroic: Conclave of Wind: Defeat the Conclave of Wind raid boss on Heroic difficulty.
- Heroic: Al’Akir: Overcome the Al’Akir raid boss on Heroic difficulty to earn the prestigious <Name> of the Four Winds title.
Throne of the Four Winds Raid Guide: Guild Achievements
Getting the following Throne of the Four Winds guild achievements necessitates teaming up with your guild. This time, there are no rewards to earn, which is kind of sad and weird at the same time:
- Throne of the Four Winds Guild Run: Cooperate with your guild members to defeat the Conclave of Wind and Al’Akir raid bosses. It is a requirement for the Guild Glory of the Cataclysm Raider achievement.
- Heroic: Al’Akir Guild Run: Defeat the Conclave of Wind raid boss on Heroic difficulty as part of a guild group.
- Realm First! Al’Akir: Be the first to defeat the Al’Akir raid boss on Heroic difficulty with your guild.
Throne of the Four Winds Raid Guide: Miscellaneous Achievements
You must have excellent performance and teamwork with your raid members to earn these two Throne of the Four Winds achievements required for Glory of the Cataclysm Raider. Although they are pretty challenging, they are possible to get:
- Stay Chill: Defeat the Conclave of Wind boss while all your raid members are under the 7 stacks of the Wind Chill debuff.
- Four Play: You must defeat the Al’Akir boss while he is under the Feedback debuff.
Throne of the Four Winds Raid Guide: FAQ
What Level Is the Throne of the Four Winds?
Throne of the Winds is an 85-level raid, so your character must be at 85 to participate.
Is There a Portal from Uldum to Stormwind or Orgrimmar?
Unfortunately, no. There is no Portal from Uldum to Stormwind or Orgrimmar.
What Is the Fastest Route to Uldum?
There is no fastest route to Uldum unless you unlock the Portal for Stormwind and Orgrimmar. Anyway, here is the solution that can help you:
- If you are at level 83, travel to Deepholm and pick up the following quest depending on your faction:
- The Explorers for Alliance players
- The Reliquary for Horde players
- Once you complete the Meetup with the Caravan quest by speaking with Adarrah at Thistleshrub Valley in Tanaris, you will be eligible for the coveted one:
- Hero’s Call: Uldum! for Alliance players
- Warchief’s Command: Uldum! for Horde players
- The final stroke is to pick up the Easy Money quest and escort the caravan to Uldum.
- Once in Uldum, find Prince Nadun and pick up the Escape From the Lost City quest.
- Completing the aforementioned quest opens up the Portal to Uldum in Stormwind and Orgrimmar.
Conclusion
That’s all for now. We hope this Cataclysm Classic Throne of the Four Winds raid guide has been a great help to you and that you have learned a lot of beneficial information. Share your thoughts in the comment section below, and see you soon in our next Cataclysm article!


Comments